


Chapter 7 Wireless
XMG3512-B10A User’s Guide
94
Note: The XMG applies the security settings of the
SSID1
). If
you want to use the WPS feature, make sure you have set the security mode of
SSID1
to
WPA2-PSK
or
No Security
.
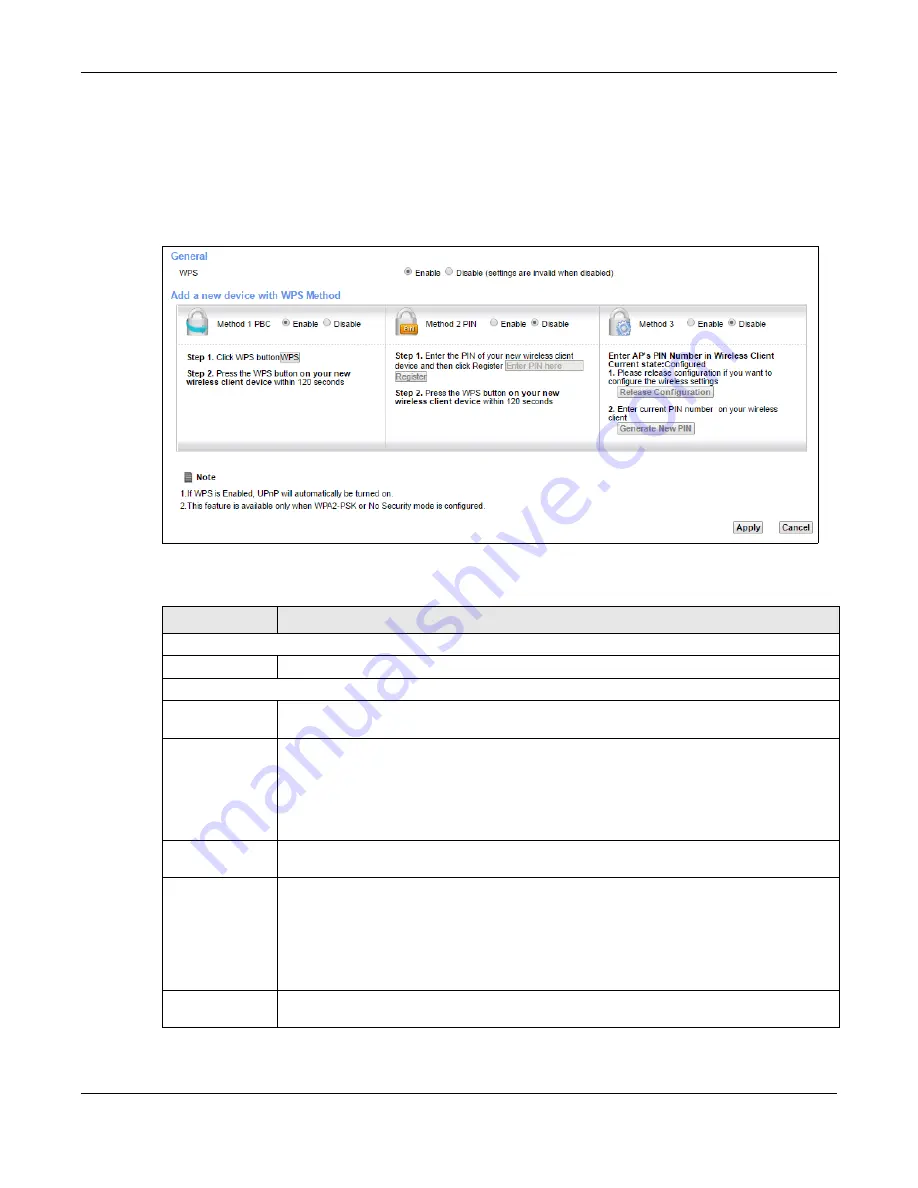
Click
Network Setting > Wireless > WPS
. The following screen displays. Select
Enable
and click
Apply
to
activate the WPS function. Then you can configure the WPS settings in this screen.
Figure 39
Network Setting > Wireless > WPS
The following table describes the labels in this screen.
Table 24 Network Setting > Wireless > WPS
LABEL
DESCRIPTION
General
WPS
Select Enable to activate WPS on this XMG.
Add a new device with WPS Method
Method 1
Use this section to set up a WPS wireless network using Push Button Configuration (PBC). Select
Enable
and click
Apply
to activate WPS method 1 on the XMG.
WPS
Click this button to add another WPS-enabled wireless device (within wireless range of the
XMG) to your wireless network. This button may either be a physical button on the outside of
device, or a menu button similar to the
WPS
button on this screen.
Note: You must press the other wireless device’s WPS button within two minutes of
pressing this button.
Method 2
Use this section to set up a WPS wireless network by entering the PIN of the client into the XMG.
Select
Enable
and click
Apply
to activate WPS method 2 on the XMG.
Register
Enter the PIN of the device that you are setting up a WPS connection with and click
Register
to
authenticate and add the wireless device to your wireless network.
You can find the PIN either on the outside of the device, or by checking the device’s settings.
Note: You must also activate WPS on that device within two minutes to have it
present its PIN to the XMG.
Method 3
Use this section to set up a WPS wireless network by entering the PIN of the XMG into the client.
Select
Enable
and click
Apply
to activate WPS method 3 on the XMG.
Содержание XMG3512-B10A
Страница 14: ...14 PART I User s Guide ...
Страница 23: ...Chapter 1 Introducing the XMG XMG3512 B10A User s Guide 23 Figure 8 Wall Mounting Example ...
Страница 33: ...Chapter 3 Quick Start XMG3512 B10A User s Guide 33 Figure 16 Quick Start Result Summary ...
Страница 56: ...56 PART II Technical Reference ...
Страница 139: ...Chapter 10 Quality of Service QoS XMG3512 B10A User s Guide 139 Figure 71 Classification Setup Add Edit ...
Страница 249: ...249 PART III Appendices Appendices contain general information Some information may not apply to your device ...
Страница 279: ...Appendix D Legal Information XMG3512 B10A User s Guide 279 Environmental Product Declaration ...


