Chapter 4 Tutorials
PX7511-B0 User’s Guide
51
4
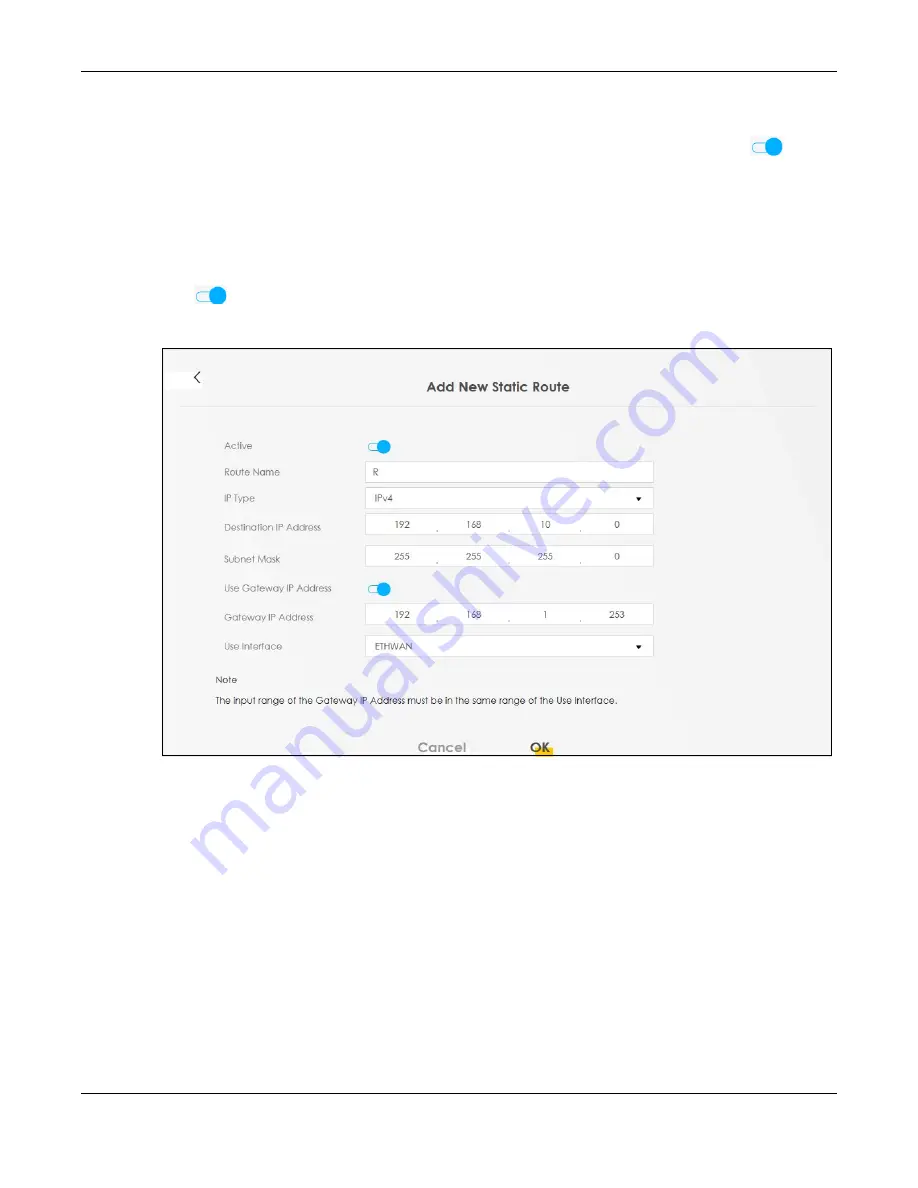
Create a new static route using the following settings:
4a
Click the
Active
button to enable this static route. When the switch goes to the right (
), the
function is enabled. Enter the
Route Name
as
R
.
4b
Set
IP Type
to
IPv4
.
4c
Type the
Destination IP Address 192.168.10.0
and
IP Subnet Mask
255.255.255.0
for the destination,
N2
.
4d
Click the
Use Gateway IP Address
button to enable this function. When the switch goes to the right
(
), the function is enabled. Type
192.168.1.253
(
R
’s N1 address) in the
Gateway IP Address
field.
4e
Select
ETHWAN
as the
Use Interface
.
4a
Click
OK
.
Now
B
should be able to receive traffic from
A
. You may need to additionally configure
B
’s firewall
settings to allow specific traffic to pass through.
4.5 Configuring QoS Queue and Class Setup
This section contains tutorials on how you can configure the QoS screen.
Let us say you are a team leader of a small sales branch office. You want to prioritize email traffic
because your task includes sending urgent updates to clients at least twice every hour. You also upload
data files (such as logs and email archives) to the FTP server throughout the day. Your colleagues use
the Internet for research, as well as chat applications for communicating with other branch offices.
Содержание PX7511-B0
Страница 16: ...16 PART I User s Guide...
Страница 36: ...Chapter 3 Quick Start Wizard PX7511 B0 User s Guide 36 Figure 20 Wizard WiFi...
Страница 45: ...Chapter 4 Tutorials PX7511 B0 User s Guide 45...
Страница 54: ...Chapter 4 Tutorials PX7511 B0 User s Guide 54 Tutorial Advanced QoS Class Setup...
Страница 59: ...59 PART II Technical Reference...
Страница 90: ...Chapter 7 Wireless PX7511 B0 User s Guide 90 Figure 47 Network Setting Wireless General...


