background image

8

Problem Solving

8.1 Troubleshooting

246

8.1

Troubleshooting

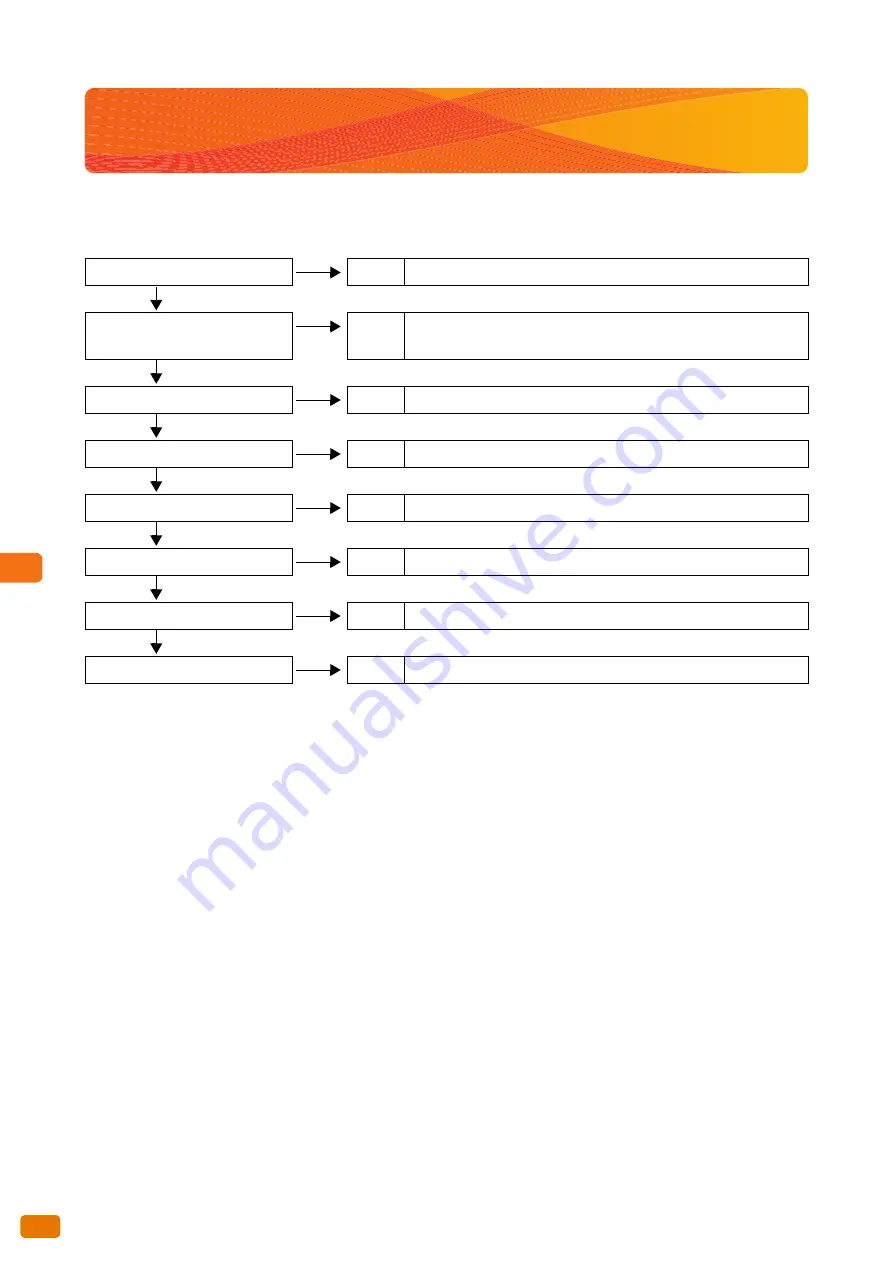
This section describes what to do when you encounter a problem in working with the machine. 
Take proper action according to the following troubleshooting procedures. 

If the error is not resolved even after following the above procedure, contact your local Xerox representative. 

Power is not turned on.

Action

Refer to "Machine Problems" (p. 247). 

No

Yes

Touch screen is not bright
enough.

Action

Refer to "Machine Problems" (p. 247). 

No

Yes

A message is displayed. 

Action

Refer to "Machine Problems" (p. 247). 

No

Yes

Jam problems

Action

Refer to "Paper Jam Problems" (p. 248)

No

Yes

Image quality problems

Action

Refer to "Image Quality Problems" (p. 249). 

No

Yes

Problem during copying

Action

Refer to "Problems during Copying" (p. 254). 

No

Yes

Problem during scanning

Action

Refer to "Problems during Scanning" (p. 255). 

No

Yes

Problem during printing

Action

Refer to "Problems during Printing" (p. 258). 

Содержание Wide Format 6705 System

Страница 1: ...Xerox Wide Format 6705 System User Guide...

Страница 2: ...tions are preceded by the symbol Always read and follow the instructions before performing the required procedures If a malfunction occurs with the machine s hard disk or other storage media any recei...

Страница 3: ...ion and operating instructions of your personal computer and network environment refer to the documentation provided for your personal computer operating system and network system After reading this g...

Страница 4: ...Preface 4...

Страница 5: ...e 36 1 3 2 Exiting the Energy Saver Mode 37 1 4 Control Panel 38 1 4 1 Screens and Buttons Displayed 40 1 5 Services Home Screen 41 1 5 1 Adjusting Screen Brightness 43 1 6 Text Entry 44 1 7 Loading R...

Страница 6: ...Step 1 Selecting Functions 78 2 1 2 Step 2 Entering a Quantity 79 2 1 3 Step 3 Starting the Copy Job 80 2 2 Canceling the Copy Job 82 2 3 Copying in the Specified Paper Size Auto Mode 83 2 4 Making A...

Страница 7: ...t Screen 112 2 15 1 Original Width Scanning to Copy Documents in Maximum Width 113 2 15 2 Image Shift Shifting the Position of Document Images 114 2 15 3 Scan Start Position Specifying Where to Start...

Страница 8: ...nting Background Colors from Appearing on the Copied Output 153 3 10 3 Threshold Sort Classifying Halftones on the Document 154 3 10 4 Adjust Color Density Adjusting Density Level for Individual Color...

Страница 9: ...Data 191 5 5 1 Import from a TWAIN compliant Application 191 5 5 2 Importing from Stored File Manager 3 194 5 5 3 Importing Using CentreWare Internet Services 197 Chapter 6 Configuration 199 6 1 Setu...

Страница 10: ...s 247 8 3 Paper Jam Problems 248 8 4 Image Quality Problems 249 8 5 Problems during Copying 254 8 6 Problems during Scanning 255 8 6 1 Unable to Scan with the Machine 255 8 6 2 Unable to Import Scanne...

Страница 11: ...Button Settings 292 9 3 4 Paper Tray Settings 293 9 3 5 Color Scan Settings 294 9 3 6 Attention Light 295 9 3 7 Maintenance 296 9 3 8 Other Settings 296 9 3 9 Detailed Settings 299 9 4 Copy Service S...

Страница 12: ...4 Overwrite Hard Disk 339 9 9 5 Detailed Settings 341 Chapter 10 Appendix 343 10 1 Specifications 344 10 2 Optional Components 351 10 3 Notes and Restrictions 352 10 3 1 Notes and Restrictions on the...

Страница 13: ...the daily maintenance procedures how to use the Copy Scan Print features how to clear paper jams how to set various setting items and notes and restrictions Guides for the Optional Components The gui...

Страница 14: ...an feature Chapter 4 Stored Programming This chapter describes the Stored Programming feature that enables you to store customized settings Chapter 5 Computer Operations This chapter covers computer o...

Страница 15: ...s or illustrations may not be displayed or available on your machine depending on its configuration A cross reference included in this guide Indicates the names of features input values input examples...

Страница 16: ...Microsoft Windows Operating System is referred to as Windows Product names are referred to as follows ApeosWare Device Management is abbreviated as Device Management ApeosWare Authentication Managemen...

Страница 17: ...that if not followed strictly can lead death or severe or fatal injuries and the possibility to do it is comparatively high Used for items that if not followed strictly can lead to severe or fatal in...

Страница 18: ...epresentative to check if an outlet is grounded Connect this product to a branch circuit or an outlet that has larger capacity than the rated ampere and voltage of this product See the data plate on t...

Страница 19: ...ical outlet the plug is not excessively heated rusted or bent the plug and electrical outlet are free of dust and the power cord is not cracked or worn down Once you notice any unusual condition switc...

Страница 20: ...erwise a power cord may be cracked and overheated and eventually may cause electric shock and a fire accident OTHERS To keep this product in a good performance and condition always use it in the follo...

Страница 21: ...water Any part of the product is damaged Be careful not to injure your fingers when using the cutter to cut the roll paper Do not insert any object into slots or openings of this product Do not put an...

Страница 22: ...e ground fault interrupter is normally ON indicated as Check once a month if the ground fault interrupter works properly in accordance with the following procedures 1 Press TEST button to turn off the...

Страница 23: ...of the machine for long periods of time This may damage the surface of or discolor the cabinet Before cleaning the touch panel display unplug the product from the electrical outlet When cleaning gentl...

Страница 24: ...othing wash it off with soap and water If you get toner particles in your eyes wash it out with plenty of water for at least 15 minutes until irritation is gone Consult a physician if necessary If you...

Страница 25: ...rning and Caution Labels Always follow all warning instructions marked on or supplied with this product To avoid the risk of burn injuries and electric shock never touch the area with the High Tempera...

Страница 26: ...Environment 26 Environment Dispose of used toner cartridges waster toner bottles and drums in accordance with local regulations...

Страница 27: ...ct generates uses and can radiate radio frequency energy and if not installed and used in accordance with the customer documentation may cause harmful interference to radio communications Operation of...

Страница 28: ...t may be illegal to copy or print in your country Currency Banknotes and checks Bank and government bonds and securities Passports and identification cards Copyright material or trademarks without the...

Страница 29: ...ergy Saver 1 1 Machine Components 30 1 2 Power Source 33 1 3 Energy Saver Mode 36 1 4 Control Panel 38 1 5 Services Home Screen 41 1 6 Text Entry 44 1 7 Loading Replacing Paper 45 1 8 Billing Informat...

Страница 30: ...uments flatly after they are ejected rearward from the machine Optional 5 Control panel Allows you to operate the machine by directly touching the buttons and tabs displayed on the touch screen An ope...

Страница 31: ...he toner 17 Power breaker Used to switch the main power to the machine on off 18 Interface cover Contains the LAN port and service port Do not use the service port It is intended to be used only by ou...

Страница 32: ...ironment for example during a rainy period the paper loaded in the machine can be dehumidified Note Normally the media heater should be switched off 25 Cutter button Trims the lead edge of roll media...

Страница 33: ...e power off before the menu screen is displayed on the touch screen the system could be damaged Note The machine has a power consumption of 7W or less even when the power switch is turned off To avoid...

Страница 34: ...he control panel is blinking Printing is being processed Copying is being performed Scanning is being performed After paper is completely output wait for five seconds or more before switching the powe...

Страница 35: ...this standby power follow the steps below to turn the power breaker OFF Important When turning the power breaker on off be sure to follow the steps below Turning the Power Breaker Off Steps St 1 Switc...

Страница 36: ...de the power is lowered even more than in the Low Power mode The touch screen goes out and the Energy Save button on the control panel lights up To use the machine press the Energy Save button The Ene...

Страница 37: ...y Saver mode is exited when The Energy Save button is pressed A job is received Steps St 1 Press the Energy Save button on the control panel 1 2 3 4 5 6 7 8 9 0 C Services Home Copy NotInUse Review Jo...

Страница 38: ...Error indicator Blinks if a system error occurs This indicator lights up when a problem other than a system error occurs with the machine including paper jams and running out of paper Note If the Erro...

Страница 39: ...thorized user refer to Logging in as Authorized User p 69 9 Clear All button Press to restore all the settings on the screen that is currently displayed to their default 10 Energy Save button When the...

Страница 40: ...e machine exits the Energy Saver mode or when the Auto Clear feature is turned on Refer For information on how to do this refer to Screen Default p 292 Setting the Screen Displayed after Auto Clear Yo...

Страница 41: ...atures Copy Allows you to configure the Copy feature Refer For more information refer to Copy p 77 Store to Folder Allows you to scan documents and save the scanned data in a folder of the machine Ref...

Страница 42: ...operation Refer For more information refer to Stored Programming p 163 Additional Feature Buttons Allows you to set the additional features related to jobs Screen Brightness Allows you to adjust the b...

Страница 43: ...is displayed on the touch screen when the power is switched on can be selected in Default Language under System Settings For information on how to do this refer to Default Language p 292 Scan Sensor G...

Страница 44: ...the touch screen Numerals alphabet and symbol characters are allowed Item Description Entering alphabets and numerals Press Standard Characters To enter upper case alphabets press Shift To toggle to...

Страница 45: ...Roll 2 cutter cover When loading paper of different type size or weight change the paper settings after you finish loading the paper For information on how to do this refer to Paper Tray Settings p 29...

Страница 46: ...according to the paper size guide on the shaft Important When attaching the roll paper onto the shaft do it on a stable surface such as the floor so that it will not fall down or topple over 6 Make su...

Страница 47: ...ess the Cutter button once 210 mm of the paper is cut If you hold down the Cutter button the paper comes out until you release the button and it is cut at the position where you release the button 9 R...

Страница 48: ...oaded Steps St 1 Fold the bypass manual feed table toward you to open it 2 Align the right edge of the paper against the scale and insert the paper until you hear a beep The paper is automatically con...

Страница 49: ...Before Using the Machine 1 49 1 7 Loading Replacing Paper 2 Select the paper tray you want to use and press Close Printing is resumed...

Страница 50: ...ck each meter on the displayed screen Serial Number Displays the serial number of the machine Meter 1 Displays the sum total of the surface area printed by the machine so far Unit m2 Meter 2 Displays...

Страница 51: ...their bodies or packages When calling your local Xerox representative to order consumables have the product codes ready Dispose of used toner cartridges and waste toner bottles in accordance with loca...

Страница 52: ...cuments with image density of 6 are used The value is only an estimate and varies depending on the conditions such as the content printed paper size paper type and the machine operating environment CA...

Страница 53: ...ure Steps St 1 Make sure that the machine is not operating and open the rear cover Note If the Scanner Catch Tray is being used fold it closed 2 Shake the new toner cartridge well so that the toner ca...

Страница 54: ...ntil all the toner inside gone 6 Slide the lever to the right and align it to the position 7 Remove the toner cartridge Important The bottom of the used toner cartridge may have toner adhered to it Ta...

Страница 55: ...remaining page yield for copy print jobs is applicable when A4 size documents with image density of 6 are used The value is only an estimate and varies depending on the conditions such as the content...

Страница 56: ...ng Important Put the used waste toner container into the supplied bag and dispose of in accordance with local regulations 4 Attach the new waste toner container 5 Close the upper unit Important Be car...

Страница 57: ...ly adjust the gaps by using the calibration chart that came with the machine Steps St 1 Press Scan Sensor Gap Calibration on the Services Home screen 2 Press Auto Adjust 3 Load the calibration chart f...

Страница 58: ...Make sure that you select A0 841 mm or larger size paper The calibration chart is printed out 1 10 2 Performing Optional Adjustment If you are not satisfied with the result of Auto Adjust you can per...

Страница 59: ...d of the motor to calibrate all the gaps Adjust By Gap Use this option to adjust the individual gaps between scanning sensors digital calibration 5 Press Save 0 mm Gap1 183 mm Gap2 386 mm Gap3 548 mm...

Страница 60: ...esult by using your documents If Option Adjust has failed with an error take corrective actions according to the error code and perform Option Adjust again For more information on error codes refer to...

Страница 61: ...load it face down on the document table 062 713 062 725 The position of the document guide is being shifted to the right The right edge of the calibration chart is not aligned with the document guide...

Страница 62: ...eaning agents other than water or neutral detergent Cleaning the machine with an excessive amount of water may cause the machine to malfunction or damage originals during copying Steps St 1 Turn off t...

Страница 63: ...damage 5 Wipe the document feed path with a dried cloth Important Do not wipe the roller Oil on the roller can adhere to the document feed path and this may causing originals to slip on the path duri...

Страница 64: ...nformation The Machine Information screen allows you to check the machine configuration and to switch between the print modes Refer to these subsections for more information on each function Machine I...

Страница 65: ...making inquiries about maintenance and operation Machine Serial Number Indicates the serial number of the machine MAC Address Indicates the MAC address of the machine Machine Configuration Press Machi...

Страница 66: ...be received On line The machine receives data from computers 1 12 2 Supplies The Supplies screen allows you to check the status of consumables The status of consumables is shown as OK Replace Now etc...

Страница 67: ...can be displayed Refer For more information refer to Checking Completed Jobs p 68 1 13 2 Checking Current Pending Jobs This following describes how to check current and pending jobs Steps St 1 Press t...

Страница 68: ...pleted Jobs This following describes how to check completed jobs You can check whether a job has been completed successfully Selecting a job allows you to see its details Steps St 1 Press the Job Stat...

Страница 69: ...fer to Auto Clear p 290 When Auto Clear is disabled any user can access the machine features if the previous authorized user failed to log out from the machine After you are done using the machine mak...

Страница 70: ...n exit the Interrupt mode Note The Login screen may appear when you select a service on which a usage restriction has been applied In this case enter your User ID and password to continue Once authent...

Страница 71: ...Refresh to refresh the display Press to display the previous screen and press to display the next screen 3 Press Close Logging out of the authenticated mode Steps St 1 Press the Log In Out button on...

Страница 72: ...or filing strips 1 15 3 Precautions When Handling Originals Observe the following precautions when handling originals The scanning area may become soiled if documents contaminated by glue or adhesive...

Страница 73: ...for copies or printing ensure that it complies with the following specifications However it is encouraged that you use the recommended media to achieve clear copy and print results WARNING Do not use...

Страница 74: ...rencies Electric spectaculars film Coated paper of 126 g m2 or less Digital coated paper glossy type NK special simplex art paper 127 157 209 g m2 Peel off film transparent white strong white Art flux...

Страница 75: ...n storing media Moisture is not good for media For storage keep the media in the document wrapping and store it in a comparatively dry place Vellum especially should be put into a plastic or moisture...

Страница 76: ...1 Before Using the Machine 1 16 Media Types 76...

Страница 77: ...iginal 84 2 5 Scanning to Copy Documents in Maximum Width 86 2 6 Loading Paper Manually Bypass Copying 88 2 7 Copying Long Documents 90 2 8 Copying Multiple Documents Collation 91 2 9 Running Sample C...

Страница 78: ...79 Step 3 Starting the Copy Job p 80 2 1 1 Step 1 Selecting Functions Select functions to set on the Copy screen Steps St 1 Press the Services Home button on the control panel 2 Press Copy on the Serv...

Страница 79: ...he number of copies by using the numeric keypad on the control panel The entered number of copies is displayed on the upper right of the touch screen 2 If you have entered an incorrect value press the...

Страница 80: ...ps Note You can shift the document guide to the right to shift the scanning position of the document The document is automatically conveyed and stops momentarily Then the machine automatically starts...

Страница 81: ...ou to scan a thick document whose thickness is up to 5 mm Steps St 1 Remove the U turn output guide 2 Pull the document cover toward you until it stops and lift it up to remove it 3 Install the Heavy...

Страница 82: ...is section describes how to cancel the current copy job Steps St 1 Press the Stop button on the control panel Alternatively press Stop on the touch screen Note Pressing the Stop button on the control...

Страница 83: ...are is the set value Steps St 1 On the menu screen press Copy 2 Select the Auto Mode check box 3 On the matrix select A2 for Original Size and A1 for Paper Supply Note If the orientation of your origi...

Страница 84: ...st Color Density When copying a color document this feature allows you to change the copy density level for each of the color com ponents Steps St 1 On the menu screen press Copy 2 Press the Image Qua...

Страница 85: ...ake a copy leaving out those parts that correspond to a specified color Steps St 1 On the menu screen press Copy 2 Press the Image Quality tab 3 Press Adjust Color Density 4 Select the Adjust check bo...

Страница 86: ...ize originals and you do not want to worry about the scan width Important This function works when the manual mode is selected It does not function in the auto mode When scanning documents in maximum...

Страница 87: ...Copy 2 87 2 5 Scanning to Copy Documents in Maximum Width 5 Press Maximum Width 6 Set other features as necessary 7 Enter the number of copies using the numeric keypad 8 Load the document...

Страница 88: ...ne you specified part of the image may be lost or the image may be copied with unwanted margins Note The following functions cannot be used in conjunction with bypass copying Image Shift Auto Center C...

Страница 89: ...aper is automatically conveyed and stops Important Load paper one sheet at one time If paper is curled hold the curled corners with both hands when inserting the paper Do not release your hands from t...

Страница 90: ...press Copy 2 Select the Auto Mode check box 3 Press Synchronized 4 On the matrix make sure that A1 is selected for both Original Size and Paper Supply 5 Set other features as necessary Note Scanning...

Страница 91: ...er Banner Sheet and Collation Order Banner Sheet Select Yes to insert a banner sheet The banner sheet will have the copy quantity and time printed on it Collation Order Select In Order to output copie...

Страница 92: ...This button is selected by default Delete Previous Image Press this button to delete images of the previously scanned documents Change Settings Press this button to change the magnification ratio the...

Страница 93: ...Sample Copy function cannot be used when Copy Output is set to Collated and Change Settings is applied to the next document Copy is running in the auto mode You are loading paper manually bypass copyi...

Страница 94: ...e Copy Job p 121 6 Set other features as necessary 7 Load the document The sample copy with the specified settings applied is output Note To run another sample copy repeat Steps 2 to 7 Settings are no...

Страница 95: ...the next document You return the screen to the Services Home screen You run an Interrupt copy You pull out the card DocuLyzer You log out of the authenticated mode The Copy from Memory function canno...

Страница 96: ...lear All button When you have selected Collated for the last copy job only the number of copies can be changed 3 Enter the number of copies using the numeric keypad 4 Press the Start button The image...

Страница 97: ...rupt button on the control panel The Interrupt button lights up indicating the Interrupt mode is enabled Note When you press the Interrupt button while a job is being performed the Interrupt button bl...

Страница 98: ...tions for more information on each item Original Orientation Specifying the Document Feeding Orientation p 99 Mapping Table between Original Sizes and Paper Sizes Matrix p 99 Paper Orientation Specify...

Страница 99: ...e portrait orientation Standard Landscape Select this when loading standard size documents in the landscape orientation Synchronized Select this when loading non standard size documents Note Image rot...

Страница 100: ...rait orientation regardless of the size and select landscape only when using A2 size documents for better output performance of the folded paper Steps St 1 Press Paper Orientation that corresponds to...

Страница 101: ...livered Paper p 105 Original Type Selecting the Document Type p 106 Original Width Scanning to Copy Documents in Maximum Width p 106 Lighten Darken Adjusting Copy Density p 106 Note The functions show...

Страница 102: ...More to display the Reduce Enlarge screen where you can make settings for Proportional Independent X Y and Calculator Refer For information on how to make settings on the Reduce Enlarge screen refer t...

Страница 103: ...magnification for each of the width and the length This calculation result however is within a range from 25 0 to 400 0 Steps St 1 Press Original Size under Width X and using the numeric keypad enter...

Страница 104: ...nlarge and Auto Select for Paper Supply are mutually exclusive Rolls 1 and 2 Select Roll 1 or Roll 2 Bypass Use this option when loading non standard size paper and paper of sizes you do not use very...

Страница 105: ...trait Cuts roll paper to a standard portrait size Set Landscape Cuts roll paper to a standard landscape size Synchronized Cuts roll paper according to the length of the document Variable Length Cuts r...

Страница 106: ...in Maximum Width This function is equivalent to that displayed for Original Width on the Layout Adjustment screen Refer For more information refer to Original Width Scanning to Copy Documents in Maxi...

Страница 107: ...Selecting the Document Type p 108 Image Options Adjusting the density sharpness and contrast of images p 109 Background Suppression Preventing Background Colors from Appearing on the Copied Output p 1...

Страница 108: ...contains both text and photos Printed Original Select this when copying a document whose photo elements are printed materials such as pamphlets Photograph Select this when copying a photo Blueprint Se...

Страница 109: ...ser to Darken To decrease the density level select a level closer to Lighten Note This function can also be set using Lighten Darken on the Copy Manual Mode screen Sharpness Select from five sharpness...

Страница 110: ...crease the effect of background suppression lighten the background color on the copied output select a level closer to High To decrease effects reproduce the background color as is select a level clos...

Страница 111: ...reproduced on copied output by classifying halftones via binarization You can set the threshold for classifying halftones to black or white 2 14 5 Adjust Color Density Adjusting Density Level for Ind...

Страница 112: ...ximum Width p 113 Image Shift Shifting the Position of Document Images p 114 Scan Start Position Specifying Where to Start Scanning p 115 Edge Erase Erasing Edges and Margin Shadows of the Original p...

Страница 113: ...width the following functions may not work Image Shift Edge Erase Mirror Image Negative Image Steps St 1 Press Original Width 2 Select the desired option Auto Detect Select this to allow the machine t...

Страница 114: ...mount is set in accordance with the media Even when using Reduce Enlarge copies are made with the margin shift amount that is set with Image Shift A part of the image may not be printed because it run...

Страница 115: ...d 0 to 500 mm in the left right direction in 1 mm increments Note Set the value by using the numeric keypad or by pressing or 2 15 3 Scan Start Position Specifying Where to Start Scanning The followin...

Страница 116: ...the actual printable area refer to Image loss width p 345 Steps St 1 Press Edge Erase 2 Select the desired option Normal Select this to set the edge erase amount to 0 mm for the left right top and bo...

Страница 117: ...Steps St 1 Press Invert Image 2 Select the desired option Mirror Image Swaps the left and right sides of the document image Negative Image Inverts the density brightness in the document images 2 15 6...

Страница 118: ...orientation that will be applied to images whenever they are rotated automatically Note This function works when Paper Supply is set to Auto Steps St 1 Press Image Rotation 2 Select the orientation th...

Страница 119: ...he following subsections for more information on each item Copy Output Specifying Finishing Options p 120 Lead Tail Margins Adding Margins to Top Bottom Edges of Document p 121 Sample Copy Determining...

Страница 120: ...output sheets sorted into sets that are arranged in page order Banner Sheet When Collated is selected you can select this option to insert a banner sheet The banner sheet will have the copy quantity a...

Страница 121: ...o determine the optimal settings Any portion on the document can be specified as the sample area This sample area can be printed with a variety of settings such as the enlarge reduce ratio density lev...

Страница 122: ...ginal Type List Select this to output a listing of effects of seven original types Background Suppression List Select this to output a listing of effects of seven levels of auto background suppression...

Страница 123: ...b 129 3 3 Color Scanning 130 3 4 Encrypting Scanned Data 131 3 5 Scanning Multiple Documents as One File 132 3 6 Running an Interrupt Scan 134 3 7 Store to Folder Screen 135 3 8 Scan to PC Screen 145...

Страница 124: ...n feature buttons Store to Folder Scan to PC and Multi Send Scan Use these button to access the corresponding screen where you can select the desired functions Store to Folder Use this feature to read...

Страница 125: ...first set up your network For information on how to configure network settings refer to Setting Up the Scan to PC Feature p 211 The destination group address must be registered before running a scan...

Страница 126: ...tion folder Note Only the numbers that are registered can be selected Press to display the previous screen and press to display the next screen If you want to display a specific folder at the top ente...

Страница 127: ...ert the edge with the holes first the document may get jammed Steps St 1 Align the document against the document guide with the side to be scanned face down and insert it all the way until it stops No...

Страница 128: ...nect to network need to be used Refer For more information refer to Import from a TWAIN compliant Application p 191 Import using Stored File Manager 3 Stored File Manager 3 which is an application pro...

Страница 129: ...section describes how to cancel the current scan job Note A scan job can be canceled while Stop is displayed on the touch screen Steps St 1 Press Stop on the touch screen Note To stop document feeding...

Страница 130: ...ify the save destination or address Refer Store to Folder Screen p 135 Scan to PC Screen p 145 Multi Send Scan Screen p 148 2 Press Color 3 Set other features as necessary Note When Resolution is set...

Страница 131: ...alue will be transferred to multiple destinations servers only Steps St 1 On the menu screen press Scan to PC or Multi Send Scan and specify the save destination or address Refer Scan to PC Screen p 1...

Страница 132: ...ulti Send Scan and specify the save destination or address Refer Store to Folder Screen p 135 Scan to PC Screen p 145 Multi Send Scan Screen p 148 2 Select either Multi Page TIFF or Multi Page PDF 3 S...

Страница 133: ...Scan 3 133 3 5 Scanning Multiple Documents as One File 5 Load the next document Repeat this step if you have more documents 6 When all documents have been scanned press Last Original...

Страница 134: ...not available during copying Steps St 1 Press the Interrupt button on the control panel The Interrupt button lights up indicating the Interrupt mode is enabled 2 During a print job the Services Home s...

Страница 135: ...d before running a scan job For information on how to create folders refer to Create Folder p 201 The following describes the Store to Folder screen Refer to the following subsections for more informa...

Страница 136: ...select the destination folder to save scanned data Steps St 1 Press Folder 2 Select the destination folder Note Only the numbers that are registered can be selected Press to display the previous scre...

Страница 137: ...nder Folder 2 Press File List 3 Select a document Note Press to display the previous screen and press to display the next screen 4 Select the desired option Select All Select this to select all the do...

Страница 138: ...for Scan Speed The setting is fixed to Super Slow 33 8 mm sec Text Line Blueprint Transparent and Uneven Toned Background under Original Type cannot be selected Threshold Sort cannot be selected Gray...

Страница 139: ...and line such as drawings It is recommended to select the most suitable from among the various options whenever you want more professional image quality Important When Black White is selected under Co...

Страница 140: ...t other available original types Steps St 1 Select the document type Text Line Select this to reproduce crisp text on the scanned image With this mode graphs and illustrations are also reproduced clea...

Страница 141: ...e format in which the machine saves scanned data Refer For information on file size limitations and the number of pages within a multiple page image refer to Notes and Restrictions on the Use of the S...

Страница 142: ...each page of the document to one file in TIFF format Multi Page TIFF Select this to save multiple pages of the document to one file in TIFF format Single Page PDF Select this to save each page of the...

Страница 143: ...method Encryption Algorithm The encryption method in use 128 bit AES is displayed Files that are encrypted using this method can be opened in Adobe Acrobat 7 0 or later Supported Version Before encry...

Страница 144: ...red to access the restricted operations or when attempting to change the permissions assigned to the file Enter the password using up to 32 characters Printing Displays the Permissions Printing screen...

Страница 145: ...ob For information on how to register a server refer to Server PC Save Address p 203 The following describes the Scan to PC screen Refer to the following subsections for more information on each item...

Страница 146: ...to the destination server Note Only the numbers that are registered can be selected Press to display the previous screen and press to display the next screen If you want to display a specific save des...

Страница 147: ...pecify the save destination Steps St 1 Press Browse 2 Select the save destination Press Previous or Next to move through the hierarchy Save in You can check where you are on the hierarchy Previous Pre...

Страница 148: ...ture you must first set up your network For information on how to configure network settings refer to Setting Up the Scan to PC Feature p 211 The destination group address must be registered before ru...

Страница 149: ...Note Only the numbers that are registered can be selected Press to display the previous screen and press to display the next screen If you want to display a specific group at the top enter that numbe...

Страница 150: ...t one printer as the destination for the pre output Edit Print Quantity If you have selected printers as part of the send destination you can specify the number of copies to be printed for individual...

Страница 151: ...ns Adjusting the Scan Density and Sharpness and Contrast of Images p 152 Background Suppression Preventing Background Colors from Appearing on the Copied Output p 153 Threshold Sort Classifying Halfto...

Страница 152: ...ity level on the scanned output select a level closer to Darken To decrease the density level select a level closer to Lighten Sharpness Select from five sharpness levels between Sharpen and Soften To...

Страница 153: ...increase the effect of background suppression lighten the background color on the copied output select a level closer to High To decrease effects reproduce the background color as is select a level cl...

Страница 154: ...Press Threshold Sort 2 You can set the threshold for classifying halftones to black or white 3 10 4 Adjust Color Density Adjusting Density Level for Individual Colors The following describes how to ad...

Страница 155: ...Reduce Enlarge Specifying the Scanning Magnification p 156 Original Size Specifying the Area Size to be Scanned p 156 Edge Erase Erasing Edges and Margin Shadows of the Original p 158 Scan Start Posit...

Страница 156: ...document size is A0 and the scan resolution is 150 dpi you cannot specify 70 or less A1 or smaller as the magnification If you specify a magnification lower than the minimum possible value an error m...

Страница 157: ...chine handles the document as shown in the figure below A4 Portrait dimensions A4 Landscape dimensions A4 Landscape dimensions Original Original Original 50 mm or less More than 50 mm When the length...

Страница 158: ...with borders the edges of the document may appear on the scanned image as black shadows This setting can erase such shadows when scanning Note When Reduce Enlarge is set the edge erase amount is also...

Страница 159: ...m edges individually The edge erase amount can be specified in the range of 0 to 50 mm in 1 mm increments 3 11 4 Scan Start Position Specifying Where to Start Scanning The following describes how to s...

Страница 160: ...8 mm sec You cannot change this setting Color When Output Color is set to Color you can adjust scan speed as shown in the table below Yes available unavailable Other than full color When Output Color...

Страница 161: ...ed function on the Filing Options screen 3 12 1 Quality File Size Specifying Image Compression Ratio Used When Scanning Documents The following describes how to select the image compression ratio when...

Страница 162: ...3 Scan 3 12 Scan Filing Options Screen 162...

Страница 163: ...This chapter describes the Stored Programming feature that enables you to store customized settings 4 1 Stored Programming Overview 164 4 2 Registering Deleting Changing a Stored Program 165 4 3 Call...

Страница 164: ...ram and Stored Scan Program The number of programs you can store on the machine is Stored Copy Programs 40 Stored Scan Programs 40 With Stored Copy Programs you can store settings on the Copy feature...

Страница 165: ...ored programs are disabled when The Interrupt button is pressed When the Auto Clear feature is turned on and the initial screen is displayed When a message screen for example a Paper Jam error message...

Страница 166: ...n press the Stop button 7 Press the Start button Note If no name is specified the program is displayed as No Name Refer For information on how to name the stored program you have registered refer to R...

Страница 167: ...g Changing the Name for a Stored Program The following describes how to name rename a registered stored memory You can specify up to 20 characters for the name of a stored memory Refer For information...

Страница 168: ...taining the settings you want to call up Note Only the numbers that are registered can be selected Press to display the previous screen and press to display the next screen If you want to display a sp...

Страница 169: ...ments and how to import scanned data Note The information on various drivers and utility software in this guide may not apply to your drivers and utility software depending on their version upgrade 5...

Страница 170: ...he machine s folder into your computer Refer For information on how to do this refer to CentreWare Internet Services p 171 For information on how to import scanned data stored in the machine s folder...

Страница 171: ...ion that enables you to remotely access the machine from your computer via a web browser when TCP IP connection is available With CentreWare Internet Services you can track the usage of the machine an...

Страница 172: ...describes how to set up Internet Explorer 9 0 Steps St 1 Select Internet Options from the Tools menu 2 On the General tab click Settings for Temporary Internet Files 3 In the Settings dialog box selec...

Страница 173: ...e Internet Services in it Note You can skip this step when the machine is already assigned an IP address Refer For information on how to assign an IP address to the machine refer to Setting the IP Add...

Страница 174: ...tor fails the following message is displayed in the right frame of web browser Login failed If the number of times of failed attempts to log in as system administrator exceeds the limit allowed the fo...

Страница 175: ...CentreWare Internet Services while the machine control panel is in use the changes you have made will not immediately take effect on the control panel In such a case the changes you have made will be...

Страница 176: ...g CentreWare Internet Services Printing Using the Print Driver You can print on the machine using the print driver Refer For information on the Print features refer to the print driver help that is di...

Страница 177: ...er to use the machine with TCP IP LPD Note CentreWare Internet Services can also be used to make these settings For details refer to the Help section which can be displayed by clicking Help in the upp...

Страница 178: ...mputer Before you can print on the machine from your computer you need to install the print driver and the required applications on your computer Refer Print drivers are available on xerox com For inf...

Страница 179: ...n the Print dialog box click Print 5 3 5 Canceling Print Jobs The following describes how to cancel print jobs Steps St 1 Press the Stop button on the control panel 2 Press Remove All or Delete Remove...

Страница 180: ...he machine Note Even if the Authentication feature is enabled in your environment you can use the Secure Print feature when Private Charge Print Settings Job Login Success is set to Print Job For info...

Страница 181: ...rint driver the PostScript driver or BT PlotAssistant The following describes as an example how to submit a Secure Print job and a Private Charge Print job from Windows WordPad Note For the PostScript...

Страница 182: ...Format 6705 System and click Preferences 3 Click the Basic tab 4 From Job Type select Secure Print The Secure Print screen appears 5 Enter User ID and Password Note Enter User ID using up to 24 single...

Страница 183: ...t 1 On the menu screen press Secure Print 2 Select the user ID with which you submitted the Secure Print job Note Press Refresh to refresh the display Press to display the previous screen and press to...

Страница 184: ...ress Print and Delete or Print and Save Note Press Cancel to stop printing This does not erase the print job This screen is not displayed when Tools System Settings Stored File Settings Print Job Conf...

Страница 185: ...ID For the setting procedure refer to these subsections Step 1 Preparing for Private Charge Print on the machine p 185 Step 2 Setting account information on your computer p 187 Step 3 Submitting a Pr...

Страница 186: ...uthentication Security Settings Authentication Private Charge Print Settings 5 Press Save as Private Charge Print Job Important When Remote Authentication is enabled if you select According to Print A...

Страница 187: ...as your User ID p 188 Note The User ID you need to specify here depends on whether your Windows logon name is the same as your User ID registered on the authentication server when remote authenticati...

Страница 188: ...istered on the machine when local authentication is enabled select Use login name for User ID options on the print driver For example if your Windows logon name is USER001 and the registered User ID i...

Страница 189: ...setting a password helps you to secure your login Setting a password Password Entry from Control Panel p 336 If you are not sure about the user ID and password consult your system administrator 3 On...

Страница 190: ...ngs Print Job Confirmation Screen is set to Disabled Print and Delete Select this to delete the Private Charge Print document stored on the machine after printing Print and Save Select this not to del...

Страница 191: ...be installed on the computer Note You can install the scanner driver to connect to network from xerox com Before you can import documents from the machine s folder you need to configure some settings...

Страница 192: ...ort Refresh and Delete can also be selected from the menu which is displayed when you right click an item on the list Thumbnail view is not available for documents stored in the machine s folder When...

Страница 193: ...d by clicking the Search Display Settings button on a scanner selection dialog box Select the display of scanner names from Display by under Scanner Name Display Note Under Search Target Settings spec...

Страница 194: ...played in the dialog box refer to the Help section of Stored File Manager 3 which can be displayed by clicking Help Steps St 1 Click the Start menu and select Programs Xerox Network Scanner Utility 3...

Страница 195: ...mport Note Multiple documents can be selected When File Saving Options is set to Set Destination for Each File under the import settings a dialog box for specifying a save destination is displayed Whe...

Страница 196: ...e Search Display Settings button on a scanner selection dialog box Select the display of scanner names from Display by under Scanner Name Display Under Search Target Settings specify the scanners to b...

Страница 197: ...p section which can be displayed by clicking the Help button in the top frame Steps St 1 Start up the computer and then a web browser 2 Enter the machine s IP address or Internet address in the browse...

Страница 198: ...nt to import Note If a password is set enter the password up to 4 digits in Password 5 Click the Retrieve button for the document to be imported Note Multiple documents can also be imported at one tim...

Страница 199: ...ration This chapter describes how to create folders register IP addresses and set up save destinations as well as change those settings 6 1 Setup 200 6 2 Setting the IP Address 209 6 3 Scanner Environ...

Страница 200: ...inter Multi Send Address p 205 Multi Send Address Group Address p 206 Paper Tray Series Paper Type p 208 Steps St 1 Press the Services Home button on the control panel 2 On the menu screen press Setup...

Страница 201: ...ant to display a specific folder number at the top enter that number in Go to 3 When you attempt to register a new folder the Check Folder Password screen appears Set items as necessary and press Save...

Страница 202: ...when users attempt to select this folder Retrieve Read Select this to require a password when users attempt to retrieve documents in this folder Delete Files After Retrieval Set whether to delete doc...

Страница 203: ...be deleted If the folder contains documents all the documents will also be deleted Important Documents cannot be restored once deleted 5 After completing the settings press Close 6 1 2 Server PC Save...

Страница 204: ...ser name domain name up to 64 characters user name up to 32 characters Input example example user1 example domain name user1 user name For a work group local user up to 32 characters Input example Tes...

Страница 205: ...the address using up to 36 characters Refer For information on how to enter characters refer to Text Entry p 44 Server Name IP Address Enter the host name domain name or IP address of the transfer de...

Страница 206: ...ole punching or stapling set this option to Off If On is selected settings of such a printer may not function When the Delete Entry button is selected The registered information of the selected addres...

Страница 207: ...how to enter characters refer to Text Entry p 44 PC Save Addresses 1 2 Select a server Note Press to display the previous screen and press to display the next screen If you want to display a specific...

Страница 208: ...ted 4 After completing the settings press Save 6 1 5 Paper Tray Series Paper Type The following describes how to tell the machine what series type and weight of paper is to be loaded from the bypass f...

Страница 209: ...keyboard displayed on the screen and press Enter Note By factory default the User ID is 11111 3 On the menu screen press Tools 2 Make settings for TCP IP IP Address under Protocol Settings 1 On the T...

Страница 210: ...machine s IP address must be configured Note You can skip this step when the machine is already assigned an IP address Refer For information on how to assign an IP address to the machine refer to Set...

Страница 211: ...Windows Server 2008 Microsoft Windows Server 2008 R2 Step 2 Configuring TCP IP To use Scan to PC feature the machine s IP address must be configured Note You can skip this step when the machine is al...

Страница 212: ...Share Name is the same as that of the folder you created in Step 1 6 Click Permissions 7 Set the appropriate permissions Note Set the permissions according to the security rules of your organization...

Страница 213: ...nfiguring Windows Firewall Steps St 1 Select Start Control Panel System and Security Windows Firewall 2 Click Turn Windows Firewall on or off 3 Under Home or work private network location settings cli...

Страница 214: ...6 Con guration 6 3 Scanner Environment Settings 214...

Страница 215: ...features available for the machine 7 1 Overview of the Authentication Features 216 7 2 Authentication Features 217 7 3 Services Controlled by Authentication 219 7 4 Folder Authentication 220 7 5 Enabl...

Страница 216: ...in to Remote Accounts that authenticates users based on user information registered on a remote server Note The supported remote servers include LDAP and Authentication Management servers Refer For mo...

Страница 217: ...stem administrator ID To log in to the machine as system administrator the registered system administrator ID must be entered in the user ID entry field on the Login screen Login User A user who is re...

Страница 218: ...orms authentication by querying a remote authentication server No user information is registered to the machine With remote authentication the user information maintained on the remote authentication...

Страница 219: ...on refer to Create User Account p 333 When Login Type is set to Login to Remote Accounts 1 Indicates whether authentication is required to use that service Yes indicates authentication is required 2 T...

Страница 220: ...ared folder press the Log In Out button on the control panel to log in to the machine as the system administrator Personal folder A folder created by a login user when the Authentication feature is en...

Страница 221: ...No Not available Note If you change the machine authentication setting from enabled to disabled local users will no longer be able to use any personal folders created by login users In such a case fi...

Страница 222: ...l no longer be able to use any General Shared folders In such a case first delete all personal folders and then create a new General Shared folder Folder Operation Unregistered User Local User Login U...

Страница 223: ...set the authentication method to Login to Local Accounts Important Any user information and personal folders registered on the machine will be deleted If you change authentication method from Login to...

Страница 224: ...ss Tools Note Press the Services Home button on the control panel to display the menu screen if not yet displayed 4 Press Authentication Security Settings Authentication Login Type 5 Press Login to Lo...

Страница 225: ...k Close Refer For more information refer to Service Access p 332 7 5 3 Registering a User The following describes how to register uses Up to 999 user data can be registered Steps St 1 Press Authentica...

Страница 226: ...rvices to register the accounts to the machine at one time Refer to these subsections for more information on each step CSV File Format p 226 Step 1 Exporting Login user information p 227 Step 2 Editi...

Страница 227: ...D used to identify the user The user ID can be up to 32 single byte characters Important The following characters cannot be used for the User ID If a field contains a comma character it must be surrou...

Страница 228: ...is 11111 and the password is x admin 4 Select Support Settings Administration Manage All Users 5 Click Export file in csv format 6 Click Save 7 Select where to save the file enter a file name and cli...

Страница 229: ...crosoft Excel or a text editor Note Since no password can be exported from among the Login user information the second column Password in the CSV file appears blank in Microsoft Excel In a text editor...

Страница 230: ...nts p 230 Adding Login user accounts 1 Add new Login users at the bottom of the listing of registered Login users Modifying Login user accounts 1 Overwrite to modify the listings Deleting Login user a...

Страница 231: ...be performed when the machine is not working Note You need to reboot the machine after completing registration of Login user information Steps St 1 Log in to CentreWare Internet Services Refer For inf...

Страница 232: ...ne 7 To display Login user information you have registered log in to CentreWare Internet Services and select Properties Security Authentication User List 8 Check that the user list contains Login user...

Страница 233: ...set the authentication method to Login to Remote Accounts Important Any user information and personal folders registered on the machine will be deleted If you change authentication method from Login t...

Страница 234: ...ss Tools Note Press the Services Home button on the control panel to display the menu screen if not yet displayed 4 Press Authentication Security Settings Authentication Login Type 5 Press Login to Re...

Страница 235: ...Authentication Information on the Machine The following describes how to enable saving user information that was used for remote authentication to the machine Steps St 1 Press Authentication Security...

Страница 236: ...thentication server you are using For the setting procedure refer to these subsections Configuring Active Directory p 236 Configuring Authentication Management p 240 Configuring Active Directory The f...

Страница 237: ...he following setup procedures Authentication Policy p 237 Authentication System p 238 LDAP Server Directory Service p 238 LDAP Authentication p 239 Custom Filters p 239 SSL TLS Settings p 240 Authenti...

Страница 238: ...rs Authentication System 2 Select LDAP for Authentication System 3 Set each of other items indicated in the rectangle in the figure below 4 Click Apply LDAP Server Directory Service 1 Select Propertie...

Страница 239: ...ct Properties Network Settings Protocol Settings LDAP LDAP Authentication 2 Set each of items indicated in the figure below 3 Click Apply Custom Filters 1 Select Properties Network Settings Protocol S...

Страница 240: ...guring Authentication Management The following describes how to configure the parameters of the authentication server Authentication Management When using Authentication Management you need to configu...

Страница 241: ...t Management Service Device User Device List 2 On the Device Group portlet click the desired device group 3 Click Add Device 4 Select Specify and add IP address host name directly and click Next 5 On...

Страница 242: ...low 1 From the menu select Management Service Device User Device List 2 On the Device Group portlet click the device group in which Xerox Wide Format 6705 System is included 3 Click Users Permissions...

Страница 243: ...CentreWare Internet Services Refer For information on how to log in to CentreWare Internet Services refer to Steps 1 to 3 in Configuring Active Directory p 236 2 Set up the authentication server Refer...

Страница 244: ...Remote Authentication 244 Authentication System 1 Select Properties Security Remote Authentication Servers Authentication System 2 Set each of items indicated in the rectangle in the figure below 3 Cl...

Страница 245: ...chine Problems 247 8 3 Paper Jam Problems 248 8 4 Image Quality Problems 249 8 5 Problems during Copying 254 8 6 Problems during Scanning 255 8 7 Problems during Printing 258 8 8 Problems with CentreW...

Страница 246: ...n Action Refer to Machine Problems p 247 No Yes Touch screen is not bright enough Action Refer to Machine Problems p 247 No Yes A message is displayed Action Refer to Machine Problems p 247 No Yes Jam...

Страница 247: ...er Refer to Power Source p 33 Is the power cord disconnected from the machine Touch screen is dark Is the Energy Saver button lit The machine is in the Energy Saver mode Press the Energy Saver button...

Страница 248: ...er Refer to Usable Originals p 72 Media is often jammed or wrinkled Is the appropriate type of media being used Correctly load the appropriate type of media Refer Refer to Media Types p 73 Is the medi...

Страница 249: ...und Colors from Appearing on the Copied Output p 110 For a scan job refer to Original Type Selecting the Document Type p 139 Image Options Adjusting the Scan Density and Sharpness and Contrast of Imag...

Страница 250: ...job refer to Step 2 Starting the Scan Job p 127 Is the document guide set properly Set the document guide correctly Refer For a copy job refer to Step 3 Starting the Copy Job p 80 For a scan job refe...

Страница 251: ...ype of media Refer Refer to Media Types p 73 Internal components are soiled Contact your local Xerox representative Printed toner smudges when rubbed with your finger Toner is not fused to the paper T...

Страница 252: ...Start Position correct Set the copy settings correctly Refer Refer to Reduce Enlarge Making Enlarged Reduced Copies p 102 and Copy Output Format Screen p 119 Are the copy settings such as Reduce Enla...

Страница 253: ...resolution too low Select a higher resolution Refer Refer to Resolution Specifying the Scanning Resolution p 139 Is the color mode setting correct Select an appropriate color mode Output Color Refer...

Страница 254: ...ocument is dog eared Is the document curled Flatten the curled document before loading it Document is not copied at the desired size Did you select the document size series properly Set the media size...

Страница 255: ...uto Detect p 157 Is the document placed correctly Correctly load the document Refer Refer to Step 2 Starting the Scan Job p 127 Is the document guide set properly Set the document guide correctly Refe...

Страница 256: ...t to discover manually Is the machine in the Sleep mode Exit the Energy Saver mode Refer Refer to Exiting the Energy Saver Mode p 37 Specify the IP address of the scanner you want to discover manually...

Страница 257: ...Are you attempting SMB data transfer with a user account for which no password has been set on a computer running Windows Server 2003 Windows Server 2008 or Windows XP Follow the steps below to change...

Страница 258: ...IP address and Subnet Mask set correctly Set the correct IP address and Subnet Mask Refer Refer to Print Service Settings p 326 Is the network between the computer and the machine working Consult wit...

Страница 259: ...eft frame does not update the right frame contents The screen display is distorted Is the window size for the browser too small Change the window size for the browser The latest information is not dis...

Страница 260: ...or a while After the Main Power indicator on the control panel goes out turn the power switch on again If the message persists contact your local Xerox representative A system error has occurred Power...

Страница 261: ...Press Last Original to cancel the scan job Scanned data prior to occurrence of the message can be stored Unable to create file The scanned data size has exceeded the limit To recreate file change the...

Страница 262: ...ection and bad connection of cables Clear the causes shown to the left and run the scan job again Failed to connect to send destination PC Save Add 1 xxx PC Save Add 2 xxx Printer1 xxx Printer5 xxx Ca...

Страница 263: ...r the Scan to PC or Multi Send Scan job A submission error occurred during a Scan to PC or Multi Send Scan job Write permissions are not enabled on the save destination Insufficient storage space of t...

Страница 264: ...efore pulling out the jammed paper Otherwise the jammed paper may be torn and pieces may remain inside the machine causing malfunctions If any piece of jammed paper remains inside the machine the pape...

Страница 265: ...front door 2 Pull out the roll unit with both hands Important Do not open the cutter cover of Roll 1 or Roll 2 When the paper is cut Remove the jammed paper When the paper is not cut Rotate the roll...

Страница 266: ...s in the Bypass Manual Feed Table The following describes how to clear paper jams inside the bypass manual feed table Steps St 1 Pull out the paper toward you to remove it 8 10 3 Paper Jams in the Upp...

Страница 267: ...per from the opening 3 If you cannot see the jammed paper from the opening pull up the green tab A and remove the paper jammed inside the paper feed area 4 Return the A tab back to its original positi...

Страница 268: ...it release lever to open the upper unit 2 Remove the jammed paper from the opening 3 If you cannot see the jammed paper from the opening fold the bypass manual feed table and the fusing unit cover tow...

Страница 269: ...Problem Solving 8 269 8 10 When a Paper Jam Occurs 6 Close the fusing unit cover and the bypass manual feed table 7 Close the upper unit Important Be careful not to pinch your fingers 2 1 1 2...

Страница 270: ...ent table the machine stops and an error message appears on the touch screen Clear the document jam according to the message and reload the document Steps St 1 Pull the document cover toward you until...

Страница 271: ...Problem Solving 8 271 8 11 When a Document Jam Occurs 4 Make sure that the document is not torn wrinkled or folded and reload it according to the message displayed on the touch screen...

Страница 272: ...ed or Scanned Output p 279 8 12 1 To Increase Duration Before Auto Clear When no operation is performed for a certain period the machine is automatically reset auto clear The following describes how t...

Страница 273: ...display the menu screen if not yet displayed 4 Press System Settings Common Service Settings Machine Clock Timers 5 Press Auto Clear 6 Enter the amount of seconds before auto clear is activated by us...

Страница 274: ...een and press Enter Note By factory default the User ID is 11111 3 On the menu screen press Tools 4 Press System Settings Common Service Settings Machine Clock Timers 5 Select Energy Saver Timers and...

Страница 275: ...r Remote Authentication enabled if the use of the Screen After Auto Clear function is restricted the menu screen is displayed instead of the default screen when the Auto Clear feature is turned on Oth...

Страница 276: ...ress the Log In Out button on the control panel 2 Enter the user ID of the system administrator by using the numeric keypad or the keyboard displayed on the screen and press Enter Note By factory defa...

Страница 277: ...el an appropriate one to facilitate identifying the button feature If you have changed the feature and the corresponding feature name is not found in the spare labels set please use a blank label and...

Страница 278: ...s St 1 Press the Log In Out button on the control panel 2 Enter the user ID of the system administrator by using the numeric keypad or the keyboard displayed on the screen and press Enter Note By fact...

Страница 279: ...to calibrate the gaps between the scanning sensors using the calibration chart that came with the machine Steps St 1 Press Scan Sensor Gap Calibration on the Services Home screen 2 Press Auto Adjust 3...

Страница 280: ...8 Problem Solving 8 12 Finding More 280...

Страница 281: ...Settings feature 9 1 System Settings Procedure 282 9 2 Tools Menu List 286 9 3 Common Service Settings 289 9 4 Copy Service Settings 301 9 5 Connectivity Network Setup 309 9 6 Scan Service Settings 31...

Страница 282: ...uthentication under Authentication Security Settings We recommend that you change the system administrator user ID and password immediately after the machine has been installed Refer For information o...

Страница 283: ...t an item to set System Settings Select this to configure or change the default settings for each feature Common Service Settings Allows you to configure the general settings of the machine Refer For...

Страница 284: ...vior Refer For more information refer to Print Service Settings p 326 Setup Select this to register or change stored programs folders and destination addresses Refer For more information refer to Conf...

Страница 285: ...ebooting of the machine to apply the changes pressing Close on the Tools screen displays the Reboot Machine screen 9 1 4 Step 4 Exiting System Administration Mode Steps St 1 Press the Log In Out butto...

Страница 286: ...ay Settings p 293 Paper Tray Series Paper Type p 293 Paper Tray Priority p 293 Paper Type Priority p 293 Color Scan Settings p 294 Attention Light p 295 Light p 295 Buzzer p 295 Maintenance p 296 Dele...

Страница 287: ...nually Configured IPv6 Gateway p 313 Automatically Configured IPv6 Address p 313 Remote Authentication Directory Service p 313 Authentication System Setup p 313 LDAP Server Directory Service p 314 SSL...

Страница 288: ...lid Thin Line p 328 Detailed Settings p 329 Authentication Security Settings System Administrator Settings p 330 System Administrator s Login ID p 330 System Administrator s Password p 331 Authenticat...

Страница 289: ...ings p 293 Color Scan Settings p 294 Attention Light p 295 Maintenance p 296 Other Settings p 296 Detailed Settings p 299 Steps St 1 On the Tools screen press System Settings Common Service Settings R...

Страница 290: ...modes in the following order to reduce power consumption Last operation on the machine Low Power mode Sleep mode Note You cannot disable the functionality of switching to the Low Power and Sleep modes...

Страница 291: ...pt or Copy from Memory mode is exited Off Soft Normal Loud Machine Ready Tone Set the volume of the beep that sounds when the machine is ready to copy or print for example the power is turned on Off S...

Страница 292: ...re is restricted to be used base on the authentication settings the menu screen Services Home is displayed Screen After Auto Clear Allows you to set the screen displayed after Auto Clear Select Last S...

Страница 293: ...er selection is set to Auto The same size of paper is loaded in multiple trays The print job does not specify a paper size and a tray Select from First Second and Exclude from Auto Tray Switching The...

Страница 294: ...trated in the figure below is recognized as yellow and when it is set to 50 the orange is recognized as red The scan color settings specified here are used with Output Color and Adjust Color Density T...

Страница 295: ...System Settings 9 295 9 3 Common Service Settings Steps...

Страница 296: ...e of confidential information of a customer when the machine is returned to Xerox By executing this function all data registered configured on the machine is deleted In normal use do not use this func...

Страница 297: ...efer to Detailed Settings p 299 Allows you to set the Special A Series sizes The factory defaults are Data Encryption Allows you to select whether to encrypt data recorded on the machine s hard disk W...

Страница 298: ...ccurs For information on error messages and remedies refer to Error Messages p 260 Even our customer service representatives cannot see or restore the encryption key Be sure not to lose the encryption...

Страница 299: ...20 mm 5 mm 4 Sets the amount of margin in the negative direction which the machine takes into account when determining whether the original size is of a standard non standard size For example when 5 m...

Страница 300: ...he machine detects for scan 0 254 The lower the value the lower intensity color the machine distinguishes 5 Sets whether to reduce unwanted streaks 66 Other than full color 0 Disabled 1 Less 2 More 0...

Страница 301: ...Copy Tab Features Allocation p 302 Preset Buttons p 302 Copy Defaults p 303 Auto Tray Switching p 304 Variable Length Settings p 305 Auto Mode Paper Type p 306 Auto Mode Rotate Direction p 307 Detail...

Страница 302: ...ity Original Width Image Shift Scan Start Position Edge Erase Invert Image Scan Speed Image Rotation Copy Output Lead Tail Margins and Sample Copy The factory defaults for Frequently Used Features 1 a...

Страница 303: ...entation on the Copy Auto Mode screen Standard Portrait Paper Orientation Sets Paper Orientation on the Copy Auto Mode screen Portrait Reduce Enlarge Sets the default value for Reduce Enlarge on the C...

Страница 304: ...out Adjustment screen Auto Detect A Series Image Shift Sets the default value for Image Shift on the Layout Adjustment screen Off Scan Start Position Sets the default value for Scan Start Position on...

Страница 305: ...range of 210 to 5 000 mm The factory defaults are Series Item Factory Default A series A0 Wide 1189mm A1 Wide 841mm A2 Wide 594mm A3 Wide 420mm JIS B series B1 Wide 1030mm B2 Wide 728mm B3 Wide 515mm...

Страница 306: ...eature to set the paper type used according to the original orientation when running a copy job in the auto mode The factory default is Plain for all sizes Steps St 1 Press Auto Mode Paper Type 2 Sele...

Страница 307: ...terclockwise in which to rotate scanned images if the original is judged to require 90 degree rotation to fit to paper size The factory default is Counterclockwise for all sizes Steps St 1 Press Auto...

Страница 308: ...ss Confirm Change Item Number Copy Service Settings Item Number Description New Value Factory Default 30 Sets the tray for banner sheets 1 Roll 1 2 Roll 2 1 Roll 1 31 Sets the paper length of a banner...

Страница 309: ...Settings p 316 Detailed Settings p 317 Refer For information on the network settings also refer to Setting the IP Address p 209 CentreWare Internet Services allows you to make more detailed settings F...

Страница 310: ...t each item as necessary and click Close LPD Select Enabled when using LPR SMB Select Enabled when using SMB SNMP Select Enabled when using SNMP Application Feature Port LPD SMB SNMP FTP HTTP SOAP Web...

Страница 311: ...Press Protocol Settings 2 Set each item as necessary and click Close Ethernet Rated Speed Allows you to set the transmission rate for the Ethernet interface The factory default is Auto Auto Select thi...

Страница 312: ...the subnet mask Enter the subnet mask in the format of xxx xxx xxx xxx where xxx is a value between 0 and 255 The factory default is 255 255 255 0 IPv4 Gateway Address Allows you to configure the Gat...

Страница 313: ...figured 9 5 3 Remote Authentication Directory Service Steps St 1 Press Remote Authentication Directory Service 2 Set each item as necessary and click Close Authentication System Setup Allows you to se...

Страница 314: ...d on the value entered in the User ID field which should correspond to the attribute specified in Attribute of entered User Name From among values assigned to the found user the value for the attribut...

Страница 315: ...ecause the machine automatically add myhost example com Login Name Allows you to specify a user name used to access the server Set this only when the directory service authentication is required Up to...

Страница 316: ...cipients of the certificate stored on the machine You can select a certificate used for SSL TLS communication Note The certificate must already be registered using CentreWare Internet Services For inf...

Страница 317: ...Confirm Change Refer For information on the item numbers refer to Item Number Connectivity Network Setup p 317 3 Fill in New Value 4 Press Confirm Change Item Number Connectivity Network Setup Item N...

Страница 318: ...fer to the following subsections for more information on each item Preset Buttons p 319 Scan Defaults p 319 Other Settings p 321 Detailed Settings p 322 Steps St 1 On the Tools screen press System Set...

Страница 319: ...n 5 Blueprint File Format Buttons 1 to 5 Allows you to set the output file formats displayed in the first to fifth buttons in File Format on the Scan Job screen Select from Single Page TIFF Multi Page...

Страница 320: ...d Suppression Sets the default value for Background Suppression on the Image Quality screen Auto 0 Threshold Sort Sets the default value for Threshold Sort on the Image Quality screen Normal Adjust Co...

Страница 321: ...splayed for File Format on the Scan Job screen You can select TIFF V6 or TTN2 according to the scanning software you use The factory default is TIFF V6 Multi Send Printer Transfer Format Allows you to...

Страница 322: ...Number Scan Service Settings p 322 3 Fill in New Value 4 Press Confirm Change Item Number Scan Service Settings Item Number Description New Value Factory Default 0 Sets whether to add User ID to the n...

Страница 323: ...s relating to the machine s file save features Refer to the following subsection Stored File Settings p 324 Steps St 1 On the Tools screen press System Settings Stored File Settings Refer For informat...

Страница 324: ...ment are not automatically deleted On Select this to set the time period for storing files The stored files will be deleted after the time specified in Files kept for and Files deleted at passed Note...

Страница 325: ...specified the files are not deleted even if Yes is selected No Select this to retain the documents after the retention period has elapsed Print Job Confirmation Screen Allows you to select whether to...

Страница 326: ...ange 9 8 1 Job Recovery You can use this feature to select whether to print a job which has not been completed at the time the machine was turned off the next time the machine is turned on The factory...

Страница 327: ...ct Mode 1 or Mode 2 The factory default is Mode 1 VPI Font Number Allows you to set the machine to use the fonts specified in data or to force the machine to use the fonts specified here Select from 0...

Страница 328: ...s for offset and overlap are 3 and 0 respectively Detect Long Edge Allows you to set the machine to determine the long edge of originals Select On or Off The factory default is Off Detect Long Edge A0...

Страница 329: ...Print Service Settings This does not apply to a multiple page job submitted via the print driver because one job is printed on a single sheet of paper Item Number Description New Value Factory Defaul...

Страница 330: ...ecurity Settings Refer For information on how to display the Tools screen refer to System Settings Procedure p 282 2 Select the item you want to configure or change 9 9 1 System Administrator Settings...

Страница 331: ...word to log in to the machine as system administrator set Password Entry from Control Panel to On in Authentication under Authentication Security Settings After setting the system administrator s User...

Страница 332: ...e user information registered on the machine for authentication Login to Remote Accounts Select this to use user information registered on the remote authentication server for authentication The facto...

Страница 333: ...er to restrict the Multi Send Scan feature Select Unlocked or Locked The factory default is Locked Print Select this to set whether to restrict the Print feature Select Unlocked or Locked The factory...

Страница 334: ...Refer For information on how to enter characters refer to Text Entry p 44 Password Set a password We recommend that you set a password to enhance security Enter the password using 4 to 12 characters N...

Страница 335: ...and press Reset All User Accounts Select this to delete all information registered for each user Important Selecting this will also delete the folder the user created and the files in the folder This...

Страница 336: ...on feature is disabled We recommend that you set a password to enhance security When On is selected the settings for System Administrator s Password p 331 as well as Password p 334 set under Create Us...

Страница 337: ...the Secure Print setting is ignored even when it is specified in the print driver To save a print job as a Private Charge Print job a User ID must be set using up to 32 single byte characters If the...

Страница 338: ...tion is enabled No Job Viewing Select this not to allow users to view completed jobs The settings applied to Access To and Hide Job Details depends on the settings for Completed Jobs View and informat...

Страница 339: ...rites either once or three times The factory default is Off Important If the machine is turned off during the overwriting unfinished files may remain on the hard disk The overwriting will resume if yo...

Страница 340: ...structions Refer For information on how to set data encryption refer to Data Encryption p 297 For information on how to set password entry from the control panel refer to Password Entry from Control P...

Страница 341: ...in New Value 4 Press Confirm Change Item Number Authentication Security Settings Item Number Description New Value Factory Default 0 Sets how to control print jobs retrieved via LPR FTP connection by...

Страница 342: ...9 System Settings 9 9 Authentication Security Settings 342...

Страница 343: ...hapter 10 Appendix This chapter describes the machine specifications optional components and notes and restrictions 10 1 Specifications 344 10 2 Optional Components 351 10 3 Notes and Restrictions 352...

Страница 344: ...eets minute Important The speed may be reduced due to the image quality adjustment The performance may be reduced depending on the paper type Paper supplying system 2 Roll unit Manual Feed Paper feed...

Страница 345: ...of the roll is less than 100 mm Lead edge 8 mm or less Trail edge 8 mm or less Right Left 5 mm or less Cut sheet Lead edge 5 mm or less Trail edge 5 mm or less Right Left 5 mm or less Power source AC...

Страница 346: ...y Media Size Plain paper Width 210 914 4 mm Length 210 15 000 mm Tracing paper Film Width 210 914 4 mm Length 210 2 500 mm Continuous Copy Pages 99 sheets First Copy Time 35 seconds or less with A0 si...

Страница 347: ...y is at 55 Page Description Language Adobe Postscript 3TM Supported Protocol TCP IP LPR FTP Supported Operating System 2 3 Microsoft Windows XP Microsoft Windows Server 2003 Microsoft Windows Vista Mi...

Страница 348: ...th resolution of 300 dpi or less high speed 101 6 mm sec low speed 50 8 mm sec Output Format Transfer format TIFF PDF JPEG Compression method MMR for black and white scanning JPEG for full color grey...

Страница 349: ...100 0 141 4 200 0 A1 35 3 50 0 70 7 100 0 141 4 A0 25 0 35 3 50 0 70 7 100 0 Standard Size Series Width Height mm Pixel mm Pixel A0 A series 841 19 872 1 189 28 088 A1 A series 594 14 032 841 19 872 A...

Страница 350: ...0 Special A0 880 mm Special A series 880 20 792 1 240 29 296 Special A1 620 mm Special A series 620 14 648 880 20 792 Special A2 440 mm Special A series 440 10 400 620 14 648 Special A3 310 mm 2 Speci...

Страница 351: ...A tray that can hold originals flat after they are ejected rearward from the machine Heavy Document KIT A cover used when scanning a thick original Add System Memory B A memory card used to extend th...

Страница 352: ...f the extractor fan of the machine Cautions when Operating the Machine Do not turn off the power immediately after switching it on This may result in damage to the hard disk and memory and malfunction...

Страница 353: ...ctual result however may vary depending on the status of the printer and or the condition of the media Set Amount Shift Amount Set Amount Shift Amount Set Amount Shift Amount 0 0 17 16 34 33 1 0 18 16...

Страница 354: ...import operation from your computer might failed resulting in deletion of the document data For details on restrictions that apply to the scan feature refer to the Notes section on the Network Scanner...

Страница 355: ...via IPv6 Connection 1 Operates in an IPv4 environment 2 Possible if a domain controller is installed on a network operating in an IPv4 environment 3 Possible for Windows Vista Windows 7 Windows Serve...

Страница 356: ...to the plot mode which is set in the System Settings function has elapsed The Plot Mode Switching Timer is set by factory default to 30 seconds thus printing starts after 1 minute Mode Ensuring Timer...

Страница 357: ...r IPv6 if the machine is in Dual Stack mode the DNS information for both IPv4 and IPv6 is configured the machine is to communicate with a device that is specified using the FQDN and the machine has ju...

Страница 358: ...10 Appendix 10 3 Notes and Restrictions 358...

Страница 359: ...r a stored program 167 changing the specified color on original 84 cleaning 62 cleaning the machine 62 Clear All button 39 Color Scan Settings Common Service Settings 294 Color scanning 130 color scan...

Страница 360: ...atus button 39 Main Power indicator 39 Maintenance Common Service Settings 296 media type 73 handling and storing media 75 media type 73 unusable media 74 message field 41 Mirror Image 117 Multi Send...

Страница 361: ...nable to import scanned data to the computer 256 unable to scan with the machine 255 unable to send scanned data over the network 257 scanning multiple documents as one file 132 Screen Button Settings...

Страница 362: ...Index 362 U usable originals 72 V Variable Length Settings Copy Service Settings 305 W waste toner bottle 55 when a document jam occurs 270 when a paper jam occurs 264...

Страница 363: ...Xerox Wide Format 6705 System User Guide Author Xerox Co Ltd Publisher Xerox Co Ltd Updated Oct 2014...

Отзывы: