10
·
Refer to layout drawing for panel layout.
·
Identify each type of panel.
·
Be sure to note where solid, perforated, electrical, control, and microphone panel locations are
located.
·
It is
IMPORTANT
to keep microphone panel locations as shown! (This will assist installation of
V-technology at a later time.)
·
Start on the right side of the door when standing in the room.
Install panels as follows.
1. Start installing panels inside of room working clockwise.
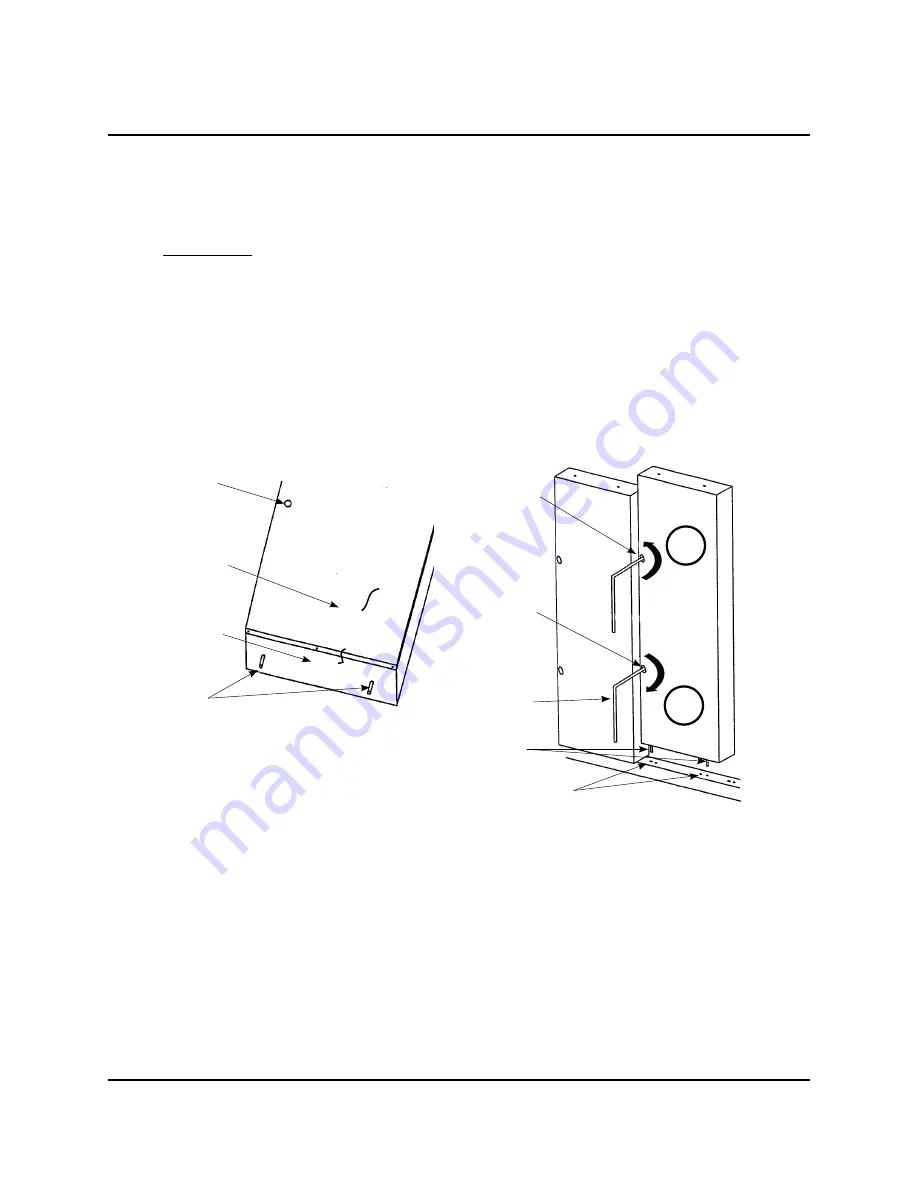
2. Insert two Centering Studs into the bottom surface of each Wall Panel (refer to the illustration below).
a. The Centering Studs are in the wall hardware box.
b. Screw the Centering Studs in
finger tight
.
3. Place each Wall Panels into place, inserting the Centering Studs into the Wall Frame Rail Slots.
Note
: To determine the bottom of the panel, the Roto Lock Hole must always be on the left inside edge
of the Panel.
wall panel installation
iNSTallaTiON
CONTiNuEd
Roto Lock Hole
Centering Studs
Panel Bottom Edge
Panel Inside Surface
Note:
The Upper and Lower Roto Locks turn in opposite directions. This allows the Panel to move
vertically up or down for perfect alignment and seal. Locked Panels must be even at the top and
sealed at the bottom. Refer to the illustration above.
To tighten the Roto Locks, do as follows:
1. Using a 5/16-inch Hex Wrench, turn the Lower Roto Lock,
A
, clockwise until the top of the panel is
flush with the panel next to it.
2. Using a 5/16-inch Hex Wrench, turn the Upper Roto Lock,
B
, counterclockwise until it is tight.
3. Finish tightening the Lower Roto Lock,
A
, by turning it clockwise. Make sure the panels are flush
with each other at the top. Repeat steps if panel is not flush.
roto locks
A
B
Wall Frame Rail Slots
Lower Roto Lock
Upper Roto Lock
Centering Studs
5/16" Hex Wrench
Содержание V-Ready
Страница 36: ...This page is intentionally blank 36...


