


BA EZ17 en* 1.1 * ez17w700.fm
7-21
Maintenance 7
NOTICE
Damage to surface due to centering
D
on lower side.
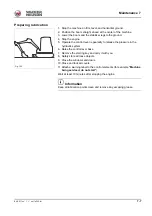
►
Raise the canopy sufficiently as you remove it.
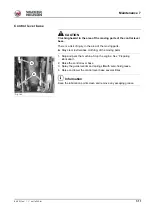
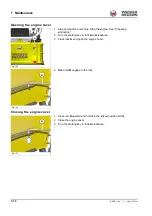
10.Raise the canopy from the anchoring.
11.Swivel the revolving superstructure about 10° to the right to improve
access to screws
E
.
12.Remove the screws
E
on the left and right.
13.Raise as follows:
- Raise the control lever base.
- Remove the starting key and carry it with you.
- Get out of the canopy.
- Close and lock the engine cover and the other covers.
- Remove loose objects from inside the machine.
- Wait until the canopy does not swing any more and is completely
steady.
14.Set down the canopy safely and ensure that it cannot tip over.
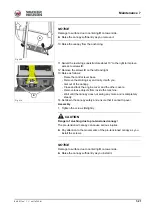
Assembly
1. Tighten the screws
E
slightly.
CAUTION
Danger of crushing due to pre-tensioned canopy!
The pre-tensioned canopy can cause serious injuries.
►
Pay attention to the movements of the pre-tensioned canopy as you
install the screws.
NOTICE
Damage to surface due to centering
D
on lower side.
►
Raise the canopy sufficiently as you install it.
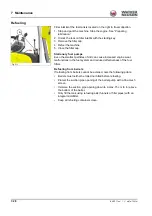
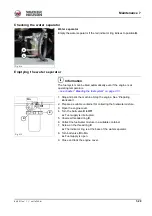
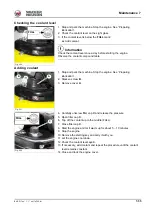
Fig. 209
D
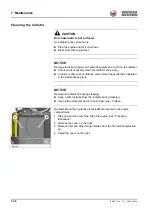
Fig. 210
E
Содержание E13-01
Страница 6: ...EG 2 BA EZ17 en 1 1 ez17konf fm Declaration of conformity Notes...
Страница 36: ...2 22 BA EZ17 en 1 1 Safety_01_0 fm 2 Safety Notes...
Страница 45: ...BA EZ17 en 1 1 ez17e300 fm 3 9 Introduction 3 Warning labels...
Страница 50: ...3 14 BA EZ17 en 1 1 ez17e300 fm 3 Introduction Labels...
Страница 90: ...4 36 BA EZ17 en 1 1 ez17i400 fm 4 Putting into operation Notes...
Страница 158: ...5 68 BA EZ17 en 1 1 ez17b510 fm 5 Operation Notes...
Страница 216: ...7 50 BA EZ17 en 1 1 ez17w710 fm 7 Maintenance Notes...
Страница 220: ...8 4 BA EZ17 en 1 1 ez17b800 fm 8 Malfunctions Notes...
Страница 243: ...BA EZ17 en 1 1 ez17t900 fm 9 23 Technical data 9 Canopy without extra weight Canopy with extra weight Fig 241 Fig 242...
Страница 244: ...9 24 BA EZ17 en 1 1 ez17t900 fm 9 Technical data Dimensions Fig 243...
Страница 246: ...9 26 BA EZ17 en 1 1 ez17t900 fm 9 Technical data Notes...