background image


54 


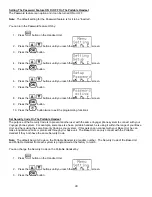
Choose The Preferred Base Unit


You can choose to directly access the C.O. Line on the Preferred Base Unit (if one has been programmed) by: 

1. Press 

the 

 button.  


Содержание CL-2200XP/PBX

Страница 1: ...User Manual CL 2200XP V2 CL 2200XP PBX 900 MHz LONG RANGE CORDLESS PHONE SYSTEM...

Страница 2: ...ng Your Phone On Off 17 On Base Unit On Portable Handset Tone or Pulse Dialing 17 19 Tone Pulse Placing A Call 19 Cellular Dial Mode Normal Dial Mode Answering A Call 20 Redialing Numbers 21 Cellular...

Страница 3: ...ght Portable Handset Only 32 33 Out of Range Beep Portable Handset Only 33 Phone Book 34 Base Unit Portable Handset Power Level Base Unit Portable Handset 35 Ringer 35 37 Base Unit Ringer Melody Volum...

Страница 4: ...ng Messages Deleting Messages Turning On Off Auto Voice Attendant 47 49 Turning On Off Recording Your Messages Memo Message 49 Multiple Systems Numbering Handsets 50 Ring One Or All Portable Handsets...

Страница 5: ...over them 7 Do not use this product near an area where there is a potential of gas leaks or near any fumes that can be explosive If you notice that the equipment is being used in such a hazardous area...

Страница 6: ...0XP Ultra 1 base unit with a corded handset 1 portable handset 1 standard antenna for the portable handset 1 short antenna for the portable handset 1 standard antenna for the base unit 1 desktop charg...

Страница 7: ...7 CL 2200XP H Handset CL 2200XP B Base Unit Standard Handset Antenna Short Handset Antenna Base Unit Antenna Desktop Charger with Power adapter Battery Pack User s Manual...

Страница 8: ...LCD display 8 button confirm send 9 button 10 button clear end 11 Number keys 12 Function buttons select function FLASH or Backspace when dialing Redial Pause button Intercom button Store and recall s...

Страница 9: ...r connecting multiple base units 7 Speaker 8 LCD display 9 button clear end 10 button 11 button confirm send 12 Number buttons 13 Function buttons select function FLASH or Backspace when dialing Redia...

Страница 10: ...Mode FLASH or Backspace when dialing Hold button Adjust microphone sensitivity in Standby Mode Intercom button Voice Scramble select function Save button Redial Pause button Volume Up button Volume D...

Страница 11: ...wer indicator 2 Portable handset charging indicator for front slot 3 Battery charging indicator for rear slot 4 Charging slot for portable handset 5 Charging slot for spare battery 6 DC power jack 7 D...

Страница 12: ...e of your phone system 1 Fixed antenna or antenna plug 2 RJ 11 jacks 3 DC power jack 4 Hook switch 5 Speaker 6 LCD display 7 button confirm send 8 Hold button Adjust microphone sensitivity in Standby...

Страница 13: ...r into the DC power socket at the back of the base unit and the other end into your AC power outlet on your wall The LCD display on your base unit will show STBY ICM which indicates it is in Standby M...

Страница 14: ...hat is already attached to a Portable Handset When a Portable Handset with the battery is placed in the front slot of the charger stand the CPU of the Portable Handset will automatically start monitor...

Страница 15: ...Charging If there is an incoming call while the Portable Handset is being charged the handset will ring normally and you can answer the call If the battery does not have enough power to answer the cal...

Страница 16: ...M which indicates it is in Standby Mode when the power is connected Warning Use only the power adapter supplied Using any other power adapter could cause serious damage to the Base Unit Connecting You...

Страница 17: ...ble Handset will go into standby mode Turn the Portable Handset off by pressing the and holding it down for approximately 3 seconds The screen will say PowerOff and the Portable Handset will turn off...

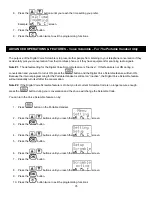
Страница 18: ...t the programming functions Change To Pulse Dialing This unit can be changed to pulse dialing by 1 Press button on the Base Unit 2 Press the buttons until you reach the screen 3 Press the button 4 Pre...

Страница 19: ...dset Making A Cellular Type Dial Call Make a cellular type dial call by 1 Key in the phone number If you make a mistake press the button and it will delete one number at a time Pressing will delete al...

Страница 20: ...an incoming call by pressing any button To change the setting so you can only answer the incoming call by pressing the OK button 1 Press button on the Portable Handset 2 Press the buttons until you re...

Страница 21: ...Press the button to end the call after your conversation Redialing A Number Using The Normal Dial Mode You can redial the last number entered into your phone by 1 Press the button The phone number wi...

Страница 22: ...ttons until you reach the screen 3 Press the button 4 Press the buttons until you reach the screen 5 Press the button 6 Press the buttons until you reach the screen 7 Press the button 8 Press the butt...

Страница 23: ...ring at the same time when there is an incoming call Note The default setting is for this feature to be off or Inactive You can turn this feature on by 1 Press button on the Portable Handset 2 Press...

Страница 24: ...level by pressing the or buttons on the Base Unit and the Portable Handset until you reach a comfortable level There are 8 volume levels ADVANCED OPERATIONS FEATURES Battery Low Alert For The Portable...

Страница 25: ...utton 6 Press the buttons to set the volume you prefer 7 Press the button 8 Press the button twice to exit the programming functions ADVANCED OPERATIONS FEATURES Call Transfer For The Base Unit Portab...

Страница 26: ...cally transfer the call to the base unit If you transfer the call and the person you transferred it to do not answer within 30 seconds the Base Unit or Portable Handset that the transfer originated fr...

Страница 27: ...ase Unit Or Portable Handset You can choose to have access to 40 channels or 80 channels Note The default setting is for 80 channels You can change the number of channels by 1 Press button 2 Press the...

Страница 28: ...digits of the phone number Note The default setting is for this feature to be off inactive You can activate the Call Restriction setting on the Base Unit by 1 Press button on the Base Unit 2 Press th...

Страница 29: ...e buttons until you reach the screen 7 Press the button You will see which means there is no call restrictions set 8 Press the buttons to enter the number you want and then press OK to save this numbe...

Страница 30: ...ss the buttons until you reach the screen 3 Press the button 4 Press the buttons until you reach the screen 5 Press the button 6 Press the buttons to set the Pause Time you require 7 Press the button...

Страница 31: ...m the Base Unit or any of the Portable Handsets All the Portable Handsets will continue to ring until any one Portable Handset answers the call ADVANCED OPERATIONS FEATURES ID Exchange From Base Unit...

Страница 32: ...ote All the Portable Handsets should be numbered first see Numbering Handset in the MULTIPLE SYSTEMS section if you have more than one Portable Handset You can intercom with another party by 1 Press t...

Страница 33: ...ndset Only The Portable Handset can give you an audible tone when it becomes too far away and it can no longer communicate with the Base Unit Note The default setting for the Out of Range Alert is for...

Страница 34: ...s the last 5 phone numbers that were dialed and these 5 numbers are replaced in succession once new numbers are entered You can store your phone numbers by 1 Enter the phone number which you want to s...

Страница 35: ...wer Note The default setting for the Power Output Level is Auto You can change the Power Output Level setting by 1 Press button on the Base Unit or Portable Handset 2 Press the buttons until you reach...

Страница 36: ...ble Handset Note The default setting for the Ringer Melody is Type 1 You can change the Ringer Melody on the Portable Handset by 1 Press button on the Portable Handset 2 Press the buttons until you re...

Страница 37: ...the button 4 Press the buttons until you reach the screen 5 Press the button 6 Press the buttons until you reach the screen 7 Press the button 8 Press the buttons until you reach the ringer setting yo...

Страница 38: ...ect with your Voyager phone system For example someone else has a portable handset he is using it within the range of your Base Unit and he is using the same Security Code as your system If this perso...

Страница 39: ...word on the Base Unit is 1234 The Password on the Base Unit must be set to match the Password on the Portable Handset You can change the Password on the Portable Handset by 1 Press button on the Hands...

Страница 40: ...he purpose of the Security Code is to prevent another user with the same Voyager phone system to connect with your Voyager phone system For example someone else has a portable handset he is using it w...

Страница 41: ...TURES Speed Dialing Speed Dialing can be used to quickly and easily recall commonly used phone numbers by pressing only 3 buttons Storing Speed Dialing Numbers On The Base Unit The Base Unit can store...

Страница 42: ...end the call after your conversation ADVANCED OPERATIONS FEATURES Talk Time Control For The Base Unit Portable Handset The purpose of Talk Time Control is to restrict the amount of time someone can ta...

Страница 43: ...tton and the Digital Voice Scramble feature will turn ON Because the internal programming for the Portable Handset is still set on Inactive the Digital Voice Scramble feature will automatically turn i...

Страница 44: ...ssage is playing from the Base Unit or Portable Handset by pressing the button Note 1 When the memory is full 14 minutes the LCD screen on both the Base Unit and the Portable Handset will show Setting...

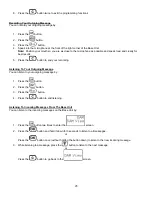
Страница 45: ...ng Listening To Your Outgoing Message You can listen to your outgoing message by 1 Press the button 2 Press the button 3 Press the button 4 Press the button to end listening Listening To Incoming Mess...

Страница 46: ...m This only applies if you have programmed a preferred Base Unit 2 Press to play all messages Press to play new messages Press to delete the current message Press to skip to the next message Press to...

Страница 47: ...Messages OGM You can record up to 3 OGM s The first one can be similar to the following You have reached Voyager Communications For sales press 11 For engineering press 22 For technical support press...

Страница 48: ...corresponding to the OGM number you want to record see above for an explanation on the purpose of each OGM Example and are for DISA features 4 Speak into the microphone at the front of the right corn...

Страница 49: ...Press the button you will see screen 2 Press the button 3 Press the button and you start recording your message screen 4 Press the button you 5 To review the message you just recorded press the butto...

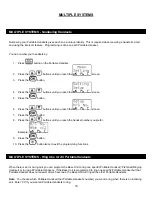
Страница 50: ...n 8 Press the buttons until you reach the handset number you prefer Example 9 Press the button 10 Press the button twice to exit the programming functions MULTIPLE SYSTEMS Ring One Or All Portable Han...

Страница 51: ...system with more than one phone line you can combine up to 9 Base Units and up to 90 Portable Handsets Each Base Unit has to have its own individual identity so you must assign each one with its own...

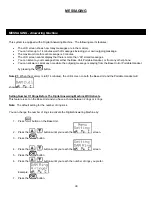
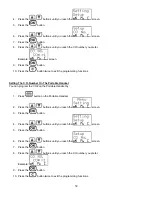
Страница 52: ...ons Setting The C O Number On The Portable Handset You can program the CO on the Portable Handset by 1 Press button on the Portable Handset 2 Press the buttons until you reach the screen 3 Press the b...

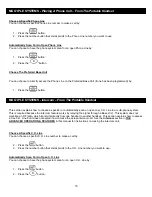
Страница 53: ...hoose a specific or automatically scan an open one C O Line in a multi phone system This is required because the intercom feature works by relaying the signal through a Base Unit This system does not...

Страница 54: ...54 Choose The Preferred Base Unit You can choose to directly access the C O Line on the Preferred Base Unit if one has been programmed by 1 Press the button...

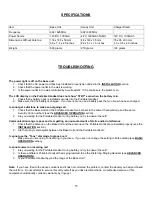
Страница 55: ...e Channel Group and the same Security Code numbers see the ADVANCED OPERATION section 2 Are you waiting for the Portable Handset to ring before you try to answer the call Communication range is poor a...

Отзывы: