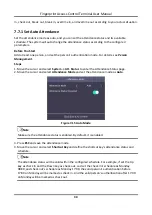
background image

Fingerprint Access Control Terminal User Manual 

22 

Enable center group 1 and the data will be uploaded to the center group. 

EHome   

Enable EHome function and the data will be uploaded via EHome protocol. 

Address Type   

Select an address type according to your actual needs. 

IP Address   

Set the EHome server's IP address. 

Port No.   

Set the EHome server's port No. 

EHome Version   

Set the EHome version according to your actual needs. If you choose V5.0, you should create 
an account and EHome key. If you choose other version, you should create an EHome account 
only. 

Note 


Remember the EHome account and EHome key. You should enter the account name or the 
key when the device should communicate with other platforms via EHome protocol. 


EHome key range: 8 to 32 characters. 


7.4.5 Set Wiegand Parameters 

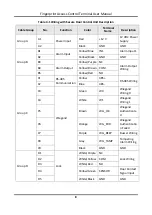
You are able to set the Wiegand direction (send/receive) and the Wiegand mode (Wiegand 
26/Wiegand 34). 

Steps   

1. Move the cursor and select 

Comm.

 → 

Wiegand

2. Set the Wiegand parameters. 

Direction   

Send   

The device can connect to the access controller to upload the card No. via the Wiegand 26 
or the Wiegand 34 mode. 

Receive   

The terminal can connect to the Wiegand card readers. No need to configure the Wiegand 
mode. 

Mode   

Wiegand 26 and Wiegand 34 can be selected. The default Wiegand mode is Wiegand 34. 

Содержание VIS-3013

Страница 1: ...or Outdoor Access Control and Time Attendance Wi Fi TCP IP Wiegand or RS485 Fingerprint Biometric Card Reader and Keypad Reader with Software 125KHz EM Card Compatible 3 000 Users User Manual www visi...

Страница 2: ......

Страница 3: ...LOSS OF DATA CORRUPTION OF SYSTEMS OR LOSS OF DOCUMENTATION WHETHER BASED ON BREACH OF CONTRACT TORT INCLUDING NEGLIGENCE PRODUCT LIABILITY OR OTHERWISE IN CONNECTION WITH THE USE OF THE PRODUCT EVEN...

Страница 4: ...encryption method for fingerprint device only fingerprint template will be saved which is impossible to reconstruct a fingerprint image As data controller you are advised to collect store process and...

Страница 5: ...er Indicates a hazardous situation which if not avoided will or could result in death or serious injury Caution Indicates a potentially hazardous situation which if not avoided could result in equipme...

Страница 6: ...es Reorient or relocate the receiving antenna Increase the separation between the equipment and receiver Connect the equipment into an outlet on a circuit different from that to which the receiver is...

Страница 7: ...duire de brouillage et 2 l utilisateur de l appareil doit accepter tout brouillage radio lectrique subi m me si le brouillage est susceptible d en compromettre le fonctionnement Under Industry Canada...

Страница 8: ...from the device turn off the power at once and unplug the power cable and then please contact the service center Do not ingest battery Chemical Burn Hazard This product contains a coin button cell ba...

Страница 9: ...contact with the device cover because the acidic sweat of the fingers may erode the surface coating of the device cover Please use a soft and dry cloth when clean inside and outside surfaces of the de...

Страница 10: ...via SADP 13 6 3 Activate Device via Client Software 15 Chapter 7 Local Settings 16 7 1 Select Language 16 7 2 Add Administrator 16 7 3 Local Login 19 7 4 Communication Settings 19 7 4 1 Set Network 19...

Страница 11: ...38 7 8 3 Shift Management 39 7 8 4 Manage Holiday Add Search Edit Delete 42 7 8 5 Shift Schedule 43 7 8 6 Export Attendance Report 45 7 9 Data Transfer 46 7 10 Basic Settings 47 7 10 1 Set Time 47 7...

Страница 12: ...Device 70 8 2 13 Move Persons to Another Organization 70 8 2 14 Issue Cards to Persons in Batch 71 8 2 15 Report Card Loss 71 8 2 16 Set Card Issuing Parameters 71 8 3 Configure Schedule and Template...

Страница 13: ...Manage Shift Schedule 110 8 9 5 Manually Correct Check in out Record 113 8 9 6 Add Leave and Business Trip 114 8 9 7 Calculate Attendance Data 116 8 9 8 Attendance Statistics 117 Chapter 9 Remote Conf...

Страница 14: ...ient Configuration 127 10 1 Control Door Status 127 10 2 Set Door Open Duration 128 10 3 Change Super Password 129 10 4 View Access Control Logs 130 A Tips for Scanning Fingerprint 131 B Access Contro...

Страница 15: ...Overview Fingerprint access control terminal is designed with a 2 4 inch LCD display screen Offline operation wired network TCP IP and wireless network transmission modes are supported as well The dev...

Страница 16: ...ultiple languages English Vietnamese Brazilian Portuguese Spanish French Italian Arabic and Thai Accurate data and time display provided by built in electronic clock Check the device running status vi...

Страница 17: ...odels do not support card swiping function For details refer to the actual product Table 3 1 Appearance Description No Description 1 Keypad 2 Door Bell Button 3 Fingerprint Reading Module 4 2 4 inch L...

Страница 18: ...hortcut key of the attendance status 2 Direction Keys Use direction keys to move the cursor in the menu Note If you enable the attendance status function the direction keys can be the shortcut key of...

Страница 19: ...r 2 s to enter the login interface Note If you enable the attendance status function the OK key can be the shortcut key of the attendance status 5 Deleting Key Press the key to delete the letters or n...

Страница 20: ...Fingerprint Access Control Terminal User Manual 6 Chapter 4 Device Wiring 4 1 Terminal Description The terminal diagram are as follows...

Страница 21: ...Fingerprint Access Control Terminal User Manual 7 Figure 4 1 Terminal Diagram...

Страница 22: ...ow Purple NC Alarm Output Wiring B4 Yellow Brown COM B5 Yellow Red NO Group C C1 RS 485 Communication Yellow 485 RS 485 Wiring C2 Blue 485 C3 Wiegand Green W0 Wiegand Wiring 0 C4 White W1 Wiegand Wiri...

Страница 23: ...D7 Doorbell White Brown BELL Doorbell Wiring D8 White Blue BELL 4 2 External Device Wiring Wire the external device The wiring diagram is as follows Figure 4 2 External Device Wiring Note The external...

Страница 24: ...r Control Unit Wiring Note The external power supply and the secure door control unit should use the same GND cable If you want to connect secure door control unit you should set the connection mode a...

Страница 25: ...e times the weight of the device Steps 1 Install 120 gang box into the wall Figure 5 1 Install Gang Box 2 Route the cables through the cable hole of the mounting plate 3 Secure the device mounting pla...

Страница 26: ...User Manual 12 Figure 5 3 Install Device 6 Fix the device with one screw on the mounting plate and complete the installation Figure 5 4 Secure Note The pictures in this documentation are for referenc...

Страница 27: ...keypad to change the input method 3 Press OK to activate the device Note We highly recommend you to create a strong password of your own choosing using a minimum of 8 characters including at least th...

Страница 28: ...d you create a strong password of your own choosing using a minimum of 8 characters including upper case letters lower case letters numbers and special characters in order to increase the security of...

Страница 29: ...Click Activate to open the Activation dialog 6 Create a password in the password field and confirm the password Caution The password strength of the device can be automatically checked We highly recom...

Страница 30: ...nguage is English Note After you change the system language the device will reboot automatically 7 2 Add Administrator After the device activation and system language selection you are required to add...

Страница 31: ...ID refers to the user attendance serial No The ID should be between 1 and 99999999 and should not start with 0 The ID should be used for once Name Enter the new user name Note Press the up or down key...

Страница 32: ...s to the device by the client software For detailed information about scanning the fingerprint see Tips for Scanning Fingerprint Dept Department Select a department in the list and edit the department...

Страница 33: ...B interface to import the user information For details see Data Transfer 3 Press ESC and select Yes to save the settings and exit the page 7 3 Local Login Log in the device as an administrator to mana...

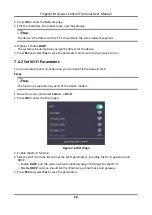
Страница 34: ...7 4 2 Set Wi Fi Parameters You can enable the Wi Fi function and you can transmit the data via Wi Fi Steps Note The function is supported by parts of the device models 1 Move the cursor and select Com...

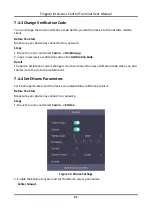
Страница 35: ...ew device verification code in the Verification Code Result The device verification code is changed You should input the new verification code when you add the device to the VezcoGo mobile client 7 4...

Страница 36: ...me account only Note Remember the EHome account and EHome key You should enter the account name or the key when the device should communicate with other platforms via EHome protocol EHome key range 8...

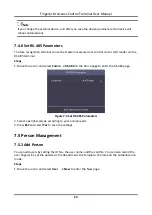
Страница 37: ...Move the cursor and select Comm RS 485 on the Home page to enter the RS 485 page Figure 7 4 Set RS 485 Parameters 2 Select a peripheral type according to your actual needs 3 Press ESC and select Yes...

Страница 38: ...our preference Note The ID refers to the user attendance serial No The ID should be between 1 and 99999999 and should not start with 0 The ID should be unique Name Enter the new user name Note Press t...

Страница 39: ...s via the external fingerprint recorder and apply the fingerprints to the device by the client software For detailed information about scanning the fingerprint see Tips for Scanning Fingerprint Dept D...

Страница 40: ...he main page You can use the USB interface to import the user information For details see Data Transfer 3 Press ESC and select Yes to save the settings and exit the page 7 5 2 Manage Person Search Edi...

Страница 41: ...group for the access control function In the setting duration the attendance will be failed and the door cannot be controlled WK Plan Week Plan Configure the week plan for the access control function...

Страница 42: ...d function Biometric recognition products are not 100 applicable to anti spoofing environments If you require a higher security level use multiple authentication modes If you adopt multiple authentica...

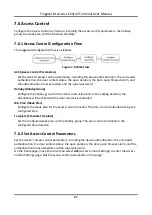
Страница 43: ...maximum times for authentication Super Password Set the device super password After saving the settings you can input the super password in the initial interface to access the door 7 6 3 Set Holiday G...

Страница 44: ...Fingerprint Access Control Terminal User Manual 30 Figure 7 9 Add Holiday Group 3 Add new holiday 1 Select New ACS Holiday Figure 7 10 Add New Holiday...

Страница 45: ...ontrol the door status 4 Press ESC and select Yes to save the parameters and exit the page The configured holiday group will be displayed in the holiday group list 5 Optional You can also search edit...

Страница 46: ...k plan name the week plan time and the periods Note The person can take attendance or control the door status according to the configured week plan 4 Press ESC and select Yes to save the settings and...

Страница 47: ...Template List 2 Move the cursor and select New Figure 7 14 Add New Template 3 Configure the schedule template parameters including the template name the week plan and the holiday group 4 Press ESC an...

Страница 48: ...endance Status page 2 Move the cursor and select Attendance Mode and set the attendance mode as Auto Figure 7 15 Auto Mode Note Make sure the attendance status is enabled By default it is enabled 3 Pr...

Страница 49: ...e Person Management Steps 1 Move the cursor and select System Att Status to enter the Attendance Status page 2 Move the cursor and select Attendance Mode and set the attendance mode as Manual Figure 7...

Страница 50: ...lly change the attendance status before the authentication Before You Start Add at least one person and set the person s authentication mode For details see Person Management Steps 1 Move the cursor a...

Страница 51: ...ked as the configured attendance status according to the schedule If you press the key on the keypad and select a status to take attendance the authentication will be marked as the selected attendance...

Страница 52: ...o enter the department list Select a department from the list and select Edit and press OK to enter the Edit Dept page You can edit the department name view the shift type and the shift name Figure 7...

Страница 53: ...ormal shift and the man hour shift are available to be configured You can set the attendance rule and the attendance checking times in the normal shift You can also set the working hours per day in th...

Страница 54: ...Shift Set the normal shift attendance information including the shift name and the shift period You can also reset the normal shift after editing Before You Start Set the attendance rule For details s...

Страница 55: ...e Set Man Hour Shift Set the man hour shift parameters including the shift name the work duration the latest on work time and the break time Steps Up to 32 man hour shifts can be configured 1 Move the...

Страница 56: ...will not be recorded during the holiday Add Holiday Move the cursor and select Holiday New to enter the New page Enter No name start date and end date Press OK to save the settings Figure 7 25 Add Hol...

Страница 57: ...e same shift schedule to check in out Before You Start Edit department For details see Manage Department Edit Search Reset Set normal shit or man hour shift For details see Set Normal Shift and Set Ma...

Страница 58: ...etails see Set Normal Shift and Set Man Hour Shift Steps Note The schedule shift by individual has higher priority than schedule shift by department If a user has configured both schedule shift by dep...

Страница 59: ...port the abnormal attendance record and the attendance management schedule Steps 1 Plug in a USB flash drive in the USB interface Note The supported USB flash drive format is FAT32 The USB flash drive...

Страница 60: ...formation and the attendance data data after attendance card swiping data for instance You can also import the access control parameters from the USB flash drive Export Data Move the cursor and select...

Страница 61: ...in access control parameters from the USB flash drive Note The supported USB flash drive format is FAT32 The file for importing should be in the root directory 7 10 Basic Settings 7 10 1 Set Time Set...

Страница 62: ...f the DST End Set the end time of the DST 3 Press ESC and select Yes to save the settings and exit the page 7 10 2 Manage System Data Delete the saved event attendance data user data or permission Ste...

Страница 63: ...rmat the keypad sound the voice prompt the volume the sleeping mode the attendance record prompt the authentication mode record delete function and the language Steps 1 Move the cursor and select Syst...

Страница 64: ...n Mode The authentication mode can be switched among Card FP fingerprint Card FP fingerprint Card Password Card FP fingerprint FP fingerprint Password Card FP fingerprint Password and ID employee ID a...

Страница 65: ...is completed remove the USB flash drive Online upgrade The system will gain the upgrade package from the platform to upgrade 7 10 5 Restore Settings Restore system parameters to factory settings or d...

Страница 66: ...r name the card No the start time and the end time 3 Press OK to start searching The result will be displayed on the page 7 10 7 View System Information View system information including system capaci...

Страница 67: ...anual 53 Figure 7 35 Capacity Page View Device Information Move the cursor and select Info Device to enter the Device page You can view the device name the serial No the MAC address the firmware and t...

Страница 68: ...u can add single online device to the client software Steps 1 Enter the Device Management module 2 Optional Click on the right of Device Management and select Device 3 Click Online Device to show the...

Страница 69: ...ronize the device time with the PC running the client after adding the device to the client 8 Optional Check Import to Group to create a group by the device name Note You can import all the channels o...

Страница 70: ...ng the device to the client 8 Optional Check Import to Group to create a group by the device name and import all the channels of the device to this group Example For access control device its access p...

Страница 71: ...other security settings is the responsibility of the installer and or end user 6 Optional Check Synchronize Time to synchronize the device time with the PC running the client after adding the device...

Страница 72: ...evice password Caution The password strength of the device can be automatically checked We highly recommend you change the password of your own choosing using a minimum of 8 characters including at le...

Страница 73: ...u can add them to the client by EHome protocol after entering device ID and key if you have configured their server addresses port No and device IDs Before You Start Make sure the devices have connect...

Страница 74: ...account 8 Optional Perform the following operation s Device Status Click on Operation column to view device status Edit Device Information Click on Operation column to edit the device information suc...

Страница 75: ...e required information of the devices to be added on the corresponding column Note For detailed description of the required fields refer to the introductions in the template Adding Mode Enter 0 or 1 o...

Страница 76: ...asswords and other security settings is the responsibility of the installer and or end user Import to Group Enter 1 to create a group by the device name All the channels of the device will be imported...

Страница 77: ...on module 2 Select a parent organization in the left column and click Add in the upper left corner to add an organization 3 Create a name for the added organization Note Up to 10 levels of organizatio...

Страница 78: ...short and temporary 6 Confirm to add the person Click Add to add the person and close the Add Person window Click Add and New to add the person and continue to add other persons 8 2 3 Issue a Card by...

Страница 79: ...card number will display in the Card No field automatically 9 Click Add The card will be issued to the person 8 2 4 Collect Fingerprint via Client Collecting fingerprints locally means you can collec...

Страница 80: ...supported by the access control device Steps 1 Enter Person module 2 Select an organization in the organization list to add the person and click Add Note Enter the person s basic information first Fo...

Страница 81: ...erson with device operator role he she is authorized to operate on the access control devices Note The Super User Extended Door Open Time Add to Blacklist and Mark as Visitor functions cannot be enabl...

Страница 82: ...e 2 Select an organization in the organization list to add the person and click Add Note Enter the person s basic information first For details about configuring person s basic information refer to Co...

Страница 83: ...lect the CSV file with person information 8 Click Import to start importing Note If a person No already exists in the client s database delete the existing information before importing You can import...

Страница 84: ...ot be imported to the client 1 Enter Person module 2 Select an organization to import the persons 3 Click Get from Device 4 Select the access control device from the drop down list 5 Click Get to star...

Страница 85: ...loss for and click Edit to open the Edit Person window 3 In the Credential Card panel click on the added card to set this card as lost card After reporting card loss the access authorization of this...

Страница 86: ...card number is read successfully Card No Type Select the type of the card number according to actual needs M1 Card Encryption If the card is M1 card and if you need to enable the M1 Card Encryption fu...

Страница 87: ...an be set to one holiday period 3 Optional Perform the following operations to edit the time durations Move the cursor to the time duration and drag the time duration on the timeline bar to the desire...

Страница 88: ...ck Week Schedule tab on the lower panel 2 Select a day of the week and draw time duration s on the timeline bar Note Up to 8 time duration s can be set for each day in the week schedule 3 Optional Per...

Страница 89: ...on details including card number fingerprint linkage between card number and fingerprint linkage between card number and fingerprint card password card effective period etc 1 Click Access Control Acce...

Страница 90: ...You can configure the advanced functions of access control to meet some special requirements in different scene Note For the card related functions the type of access control card only the card s with...

Страница 91: ...e M1 card You can present M1 card on the device Enable EM Card If enable the function the device can recognize the EM card You can present EM card on the device Enable CPU Card Reserved If enable the...

Страница 92: ...arm can be triggered if the door has not been closed in a configured time period If it is set as 0 no alarm will be triggered Super Password The specific person can open the door by inputting the supe...

Страница 93: ...sic Information page Note The displayed parameters may vary for different access control devices There are part of parameters listed as follows Refer to the user manual of the device for more details...

Страница 94: ...ing Detection Enable the anti tamper detection for the card reader Fingerprint Recognition Level Select the fingerprint recognition level from the drop down list Fingerprint Recognition Interval Selec...

Страница 95: ...emain Open or Remain Closed 2 Drag the cursor to draw the time duration which means in that duration of time the configured access group is activated Note Up to 8 time durations can be set to each day...

Страница 96: ...hat need to be deleted and then click in the Operation column to delete the selected time duration s 7 Optional Click in the Operation column to clear all the time duration s in the time bar 8 Optiona...

Страница 97: ...ode and the OEM should range from 1 to 80 bit 6 Set output transformation rule 1 Click Set Rule to open the Set Output Transformation Rules window 2 Select rules on the left list The selected rules wi...

Страница 98: ...in the Available Mode list and they will be added to the selected modes list 3 Click OK After selecting the modes the selected modes will display as icons with different color 4 Click the icon to sele...

Страница 99: ...ameters capture parameters RS 485 parameters Wiegand parameters etc Set Network Parameters After adding the access control device you can set the device log uploading mode and create EHome account via...

Страница 100: ...on should be supported by the device Make sure the device is not added by EHome 1 Enter the Access Control module 2 On the navigation bar on the left enter Advanced Function More Parameters 3 Select a...

Страница 101: ...u can set the access control device s RS 485 parameters including the baud rate data bit the stop bit parity type flow control type communication mode work mode and connection mode Before You Start Ad...

Страница 102: ...wn list Note If you set Communication Direction as Sending you are required to set the Wiegand Mode as Wiegand 26 Wiegand 34 Wiegand 27 or Wiegand 35 6 Click Save The configured parameters will be app...

Страница 103: ...lick Edit Priority to define the priority for the event s which can be used to filter events in the Event Center 4 Set the linkage actions of the event 1 Select the event s and click Edit Linkage to s...

Страница 104: ...e configured linkage settings in the device list and you can edit its event source parameters including event source and linkage target Delete Linkage Settings Select the configured linkage settings i...

Страница 105: ...ol device s linkage actions for the specified person ID When access control device detects the specified person ID it can trigger the alarm output host buzzer and other actions on the same device Step...

Страница 106: ...ot show For setting the user permission refer to Person Management 8 7 1 Control Door Status You can control the status for a single door including opening door closing door remaining the door open an...

Страница 107: ...an view the person information and view the picture captured during access Steps 1 Click Monitoring and select a group from the drop down list on the upper right corner The access records triggered at...

Страница 108: ...the real time events and search the historical events For details refer to View Real Time Events and Search Historical Events 8 8 1 Enable Receiving Events from Devices Before the client can receive t...

Страница 109: ...er the real time event page and you can view the real time events received by the client Event Time For video device event time is the client time when it receives the event For none video device even...

Страница 110: ...andle to enter the processing suggestion and then click Commit Note After an event is handled the Handle button will become Add Remark click Add Remark to add more remarks for this handled event Handl...

Страница 111: ...vice type and then process the events Before You Start Enable receiving events from devices before the client can receive event information from the device see Enable Receiving Events from Devices for...

Страница 112: ...ng type Access Control For the events of access control you can set the following filter conditions device priority status event type card reader type person name card no organization Note Click Show...

Страница 113: ...ptional Select an event and then click Send Email and the information details of this event will be sent by email Note You should configure the email parameters first see Set Email Parameters in the u...

Страница 114: ...ends from workdays Steps Note The parameters configured here will be set as default for the newly added time period It will not affect the existed one s 1 Enter Time Attendance module 2 Click Attendan...

Страница 115: ...default all card readers of the added access control devices are set as attendance checkpoint 1 Enter the Time Attendance module 2 Click Attendance Settings Attendance Check Point to enter the Attend...

Страница 116: ...s Bank Holiday Steps 1 Enter the Time Attendance module 2 Click Attendance Settings Holiday to enter the Holiday Settings page 3 Click Add to open the Add Holiday page 4 Check Irregular Holiday as hol...

Страница 117: ...one or multiple major leave types and click Delete on the right to delete the selected minor leave type s Synchronize Authentication Record to Third Party Database The attendance data recorded in cli...

Страница 118: ...ed timetables are displayed in the list 2 Select an added timetable or click Add to enter setting timetable page 3 Click Break Time to enter Break Time page 4 Click Break Time Settings 5 Add break tim...

Страница 119: ...port Attendance Status Mark Enter the mark and select the color The related fields of attendance status in the report will display with the mark and color Weekend Mark Enter the mark and select the co...

Страница 120: ...ethod First In Last Out The first check in time is recorded as start work time and the last check out time is recorded as the end work time Each Check In Out Each check in time and check out time is v...

Страница 121: ...as checked in but is late for work If the employee exceeds the required time period his her attendance data will be marked as absent Check Out Early Leave for You can set the early leave time duration...

Страница 122: ...See Add General Timetable for details Steps 1 Click Time Attendance Shift to enter shift settings page 2 Click Add to enter Add Shift page 3 Enter the name for shift 4 Select the shift period from the...

Страница 123: ...organizations or persons will list on the right page 3 Set the Expire Date for the shift schedule 4 Set other parameters for the schedule Check in Not Required Persons in this schedule do not need to...

Страница 124: ...hedule to enter Department Schedule page 3 Select the department from the organization list on the left Note If Include Sub Organization is checked when selecting the organization its sub organization...

Страница 125: ...t schedule 1 Click Time Attendance Shift Schedule to enter the Shift Schedule page 2 Click Person Schedule to enter Person Schedule page 3 Select the organization and select the person s 4 Select the...

Страница 126: ...etails Steps Note The temporary schedule has higher priority than department schedule and person schedule 1 Click Time Attendance Shift Schedule to enter the Shift Schedule Management page 2 Click Tem...

Страница 127: ...te it List In list mode you can view the shift schedule details about one person or organization such as shift name type effective period and so on Check the shift schedule s and click Delete to delet...

Страница 128: ...the details In list mode double click the related filed in Date Handling Type Time or Remark column to edit the information Delete Delete the selected items Export Export the attendance handling detai...

Страница 129: ...p perform one of the following operations View Click or to view the added attendance handling information in calendar or list mode Note In calendar mode you need to click Calculate to get the attendan...

Страница 130: ...to calculate the data 4 Click Save The client will calculate the attendance data of the previous day from the time you have configured Manually Calculate Attendance Data You can calculate the attendan...

Страница 131: ...Keep the client running at 1 00 am or it cannot calculate the previous day s attendance data automatically If not calculated automatically you can calculate the attendance data manually For details re...

Страница 132: ...Select a report type 4 Select the department or person to view the attendance report 5 Set the start time and end time during which the attendance data will be displayed in the report 6 Click Report t...

Страница 133: ...ending date and set the sending time as 20 00 00 the client will send the report at 8 p m on Fridays during 2018 3 10 to 2018 4 10 Note Make sure the attendance records are calculated before the sendi...

Страница 134: ...ice parameters remotely 9 1 View Device Information View and set device name view device type serial No version relay number and lock number Select a device from the Device for Management tab and clic...

Страница 135: ...hree kinds of following categories upper case letters lower case letters numbers and special characters in order to increase the security of your product And we recommend you change your password regu...

Страница 136: ...he DST start time and end time Click Save 9 4 System Maintenance You can reboot the device restore the device to the default settings and upgrade the device Reboot On the Device for Management page cl...

Страница 137: ...ort from the drop down list to set the RS 485 parameters 5 Set the baud rate data bit the stop bit parity flow control communication mode working mode and the connection mode from the drop down list 6...

Страница 138: ...ort If you enable the function the system will automatically assign IPv4 address IPv4 subnet mask IPv4 default gateway for the device HTTP Set the HTTP port DNS1 server address and DNS2 server address...

Страница 139: ...EHome information you can add the device via EHome protocol 9 10 Configure Wi Fi Steps 1 On the Device for Management page click Network Wi Fi to enter the Wi Fi Settings tab 2 Check Enable to enable...

Страница 140: ...evice 3 Click Save 9 13 Configure Volume Input or Output Steps 1 On the Device for Management page click Image Audio Input or Output to enter Audio Input or Output tab 2 Move the block to adjust the d...

Страница 141: ...ent See Add Device for Management in User Manual of Guarding Vision for details Link doors to the access control device See the user manual of the access control device for details Steps Note You can...

Страница 142: ...l device to the Mobile Client See Add Device for Management in the user manual of the VezcoGo mobile client for details Steps 1 Enter the Settings page of the access control device On the device list...

Страница 143: ...anual of the device 1 Enter the Settings page of the access control device On the device list page if the device list is in list mode swipe the name of the access control device to the left and tap On...

Страница 144: ...n the right of the access control device to enter the door control page Figure 10 2 The Icon Representing Door The log list will be displayed on the Log section of the page 2 Perform the following ope...

Страница 145: ...can your finger should press your finger on the scanner horizontally The center of your scanned finger should align with the scanner center Incorrect Scanning The figures of scanning fingerprint displ...

Страница 146: ...nd scan again Others If your fingerprint is shallow or it is hard to scan your fingerprint we recommend you to use other authentication methods If you have injuries on the scanned finger the scanner m...

Страница 147: ...ime durations are supported for one holiday schedule One holiday schedule can belong to multiple holiday groups Holiday Group 64 Up to 16 holiday schedules are supported for one holiday group Schedule...

Страница 148: ...ontrol Terminal User Manual 134 Table B 4 Attendance Content Maximum Configurable Parameters Department 32 Normal Shift 32 Man Hour Shift 32 Holiday 32 Holiday Group 64 Schedule by Department 32 Sched...

Страница 149: ...terface will be back to the alarm interface after authentication 3 Deleting by time and deleting all are available when deleting the attendance records Disable Record Delete Set the percentage of the...

Страница 150: ...mary table AttendanceRecord The Attendance Record table AttendanceSchedule The attendance schedule table NormalShift The Normal Shift table ManHourShift The Man Hour Shift table Attendance Schedule Ta...

Страница 151: ...are able to set multiple attendance types Man Hour Shift Table Man Hour Shift Table Create Time 2017 04 26 10 12 20 Shift No Shift Name Work Duration min Latest Start Work Time Period 1 Start End Man...

Страница 152: ...art work time Early Leave Duration min The end work attendance time is earlier than the normal end work time Total The absence time duration of the day Attendance Record Table Attendance Record Table...

Страница 153: ...o The user s card No The user s name Department The user s department Late Times The start work attendance time is later than the normal start work time Late arriving for no more than once every day L...

Страница 154: ...Decimal Digit Manufacturer Code Start Bit 32 Length 8 Decimal Digit 3 Wiegand Data Wiegand Data Valid Data Parity Data Total Length Wiegand data length Transportation Rule 4 bytes Display the combina...

Страница 155: ...use the transformation rule these items are available Depending on the table displayed above the card ID start bit is 0 the length is 32 and the decimal digit is 10 It represents that from bit 0 there...

Страница 156: ......
Отзывы: