background image

S

CANNING


WITH


THE

 TWAIN I

NTERFACE


FROM

 P

APER

P

ORT

101

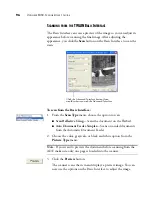
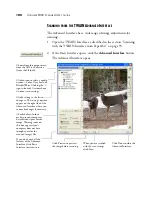
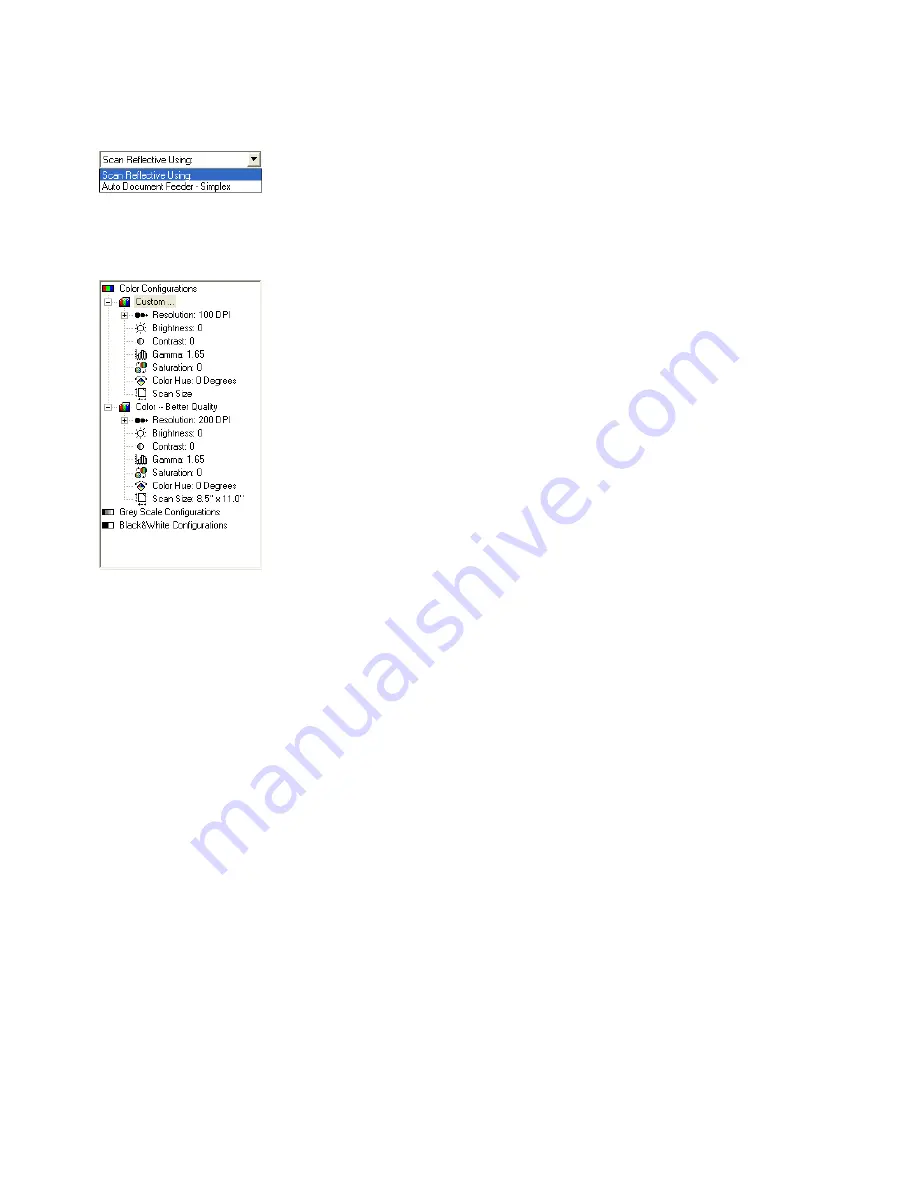
3. From the 

Scan Type

 menu, choose the option to scan:

Scan Reflective Using

—Scans the document on the Flatbed.

Auto Document Feeder-Simplex

—Scans one-sided documents 

from the Automatic Document Feeder.

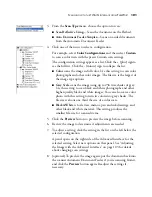
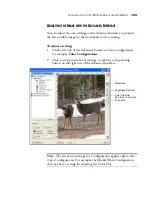
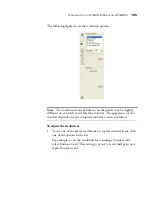
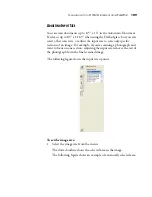
4. Click one of the icons to select a configuration.

For example, select 

Color Configurations

 and then select 

Custom


to scan a color item with the preset Custom scan settings. 

The configuration settings appear as a list. Click the + (plus) sign to 
see the full list. Click the - (minus) sign to collapse the list.

Color


scans the image in full color. Use this setting to scan color 

photographs and other color images. The file size is the largest of 
the image type options.

Grey Scale

 scans the image using up to 256 true shades of gray. 

Use this setting to scan black and white photographs and other 
higher quality black and white images. You can also scan a color 
photo with this setting to turn its colors into gray shades. The 
file size is about one third the size of a color scan.

Black&White

 is for letters, memos, pen and ink drawings, and 

other black and white material. This setting produces the 
smallest file size for scanned items.

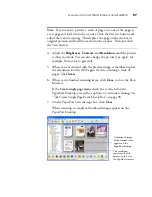
5. Click the 

Preview

 button to preview the image before scanning. 

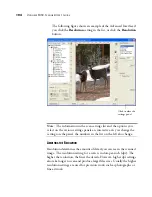
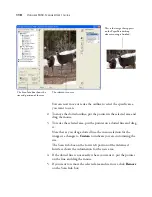
6. Review the image to determine if adjustments are needed. 

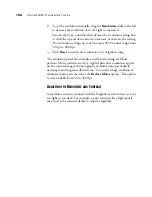
7. To adjust a setting, click the setting in the list on the left below the 

selected configuration.

A panel opens on the right side of the Advanced Interface for the 
selected setting. Select new options on that panel. See “Adjusting 
the Image with the Advanced Interface” on page 103 for details 
about changing scan settings.

8. (optional) To preview the image again, put the document back into 

the scanner Automatic Document Feeder if you’re scanning from it, 
and click the 

Preview

 button again. Readjust the settings if 

necessary.

Содержание OneTouch 9450

Страница 1: ...for Windows Visioneer OneTouch 9450 USB Scanner User s Guide...

Страница 2: ...Visioneer 9450 Scanner User s Guide F O R W I N D O W S...

Страница 3: ...L PURCHASE IF A VALID REGISTRATION IS NOT RECEIVED DURING THE INITIAL 90 DAY PERIOD THE 12 MONTH WARRANTY IS NO LONGER AVAILABLE AND YOUR PRODUCT WARRANTY WILL TERMINATE AFTER THE 90 DAY INITAL PERIOD...

Страница 4: ...ner and Check for Updates 24 Scanning 25 Loading Documents to Scan 26 Scanning From the OneTouch Button Panel 28 Using the OneTouch Button Panel 30 The Default OneTouch Settings on Your Scanner 34 Con...

Страница 5: ...face 96 Scanning from the TWAIN Advanced Interface 100 Adjusting the Image with the Advanced Interface 103 Adjusting the Brightness and Contrast 106 Adjusting Gamma Saturation and Color Hue 108 Adjust...

Страница 6: ...ninstall Your Scanner 134 Step 1 Uninstalling the OneTouch 4 0 Scanner Software 134 Step 2 Uninstalling the PaperPort Software 134 To Install Another Driver 135 Visioneer 9450 Scanner Specifications 1...

Страница 7: ...iv TABLE OF CONTENTS...

Страница 8: ...all parts are included If any items are missing or damaged contact the dealer where you purchased the scanner Warning Do not plug in the USB cable until after you have installed the software Carefully...

Страница 9: ...SIONEER 9450 SCANNER Status Lights Glass Document Pad Reference Frame Document Cover ADF Cable Power jack USB Port ADF port Power On Off Switch Paper Stop Paper Guide Extension Paper Guide Automatic D...

Страница 10: ...Adjust to fit the size of the paper to scan Automatic Document Feeder ADF Feeds a stack of pages onto the glass for scanning The ADF can hold up to 50 pages at a time Lock Locks or unlocks the scanni...

Страница 11: ...bit or True Color 24 bit or 32 bit Resolution set to at least 800 x 600 pixels To set your monitor s colors and resolution Open the Windows Control Panel Double click on Display then select the Setti...

Страница 12: ...Install Card Abbreviated installation instructions Visioneer 9450 Scanner User s Guide On the Installation CD contains detailed installation scanning configuration and maintenance information Online H...

Страница 13: ...case you should allow the installation to proceed if that option is available Alternatively you can turn off the AntiVirus or AntiSpyware software before installing your scanner But if you do make su...

Страница 14: ...rom the top and bottom of the scanner 2 Slide the locking tab on the bottom of the scanner to its unlocked position Note The locking tab protects the scanner s scan head by holding it securely in posi...

Страница 15: ...Guide onto their tabs B on the scanner and slide the Guide down into place The catch tabs C snap into place Refer to the picture on page 2 to see the location of the assembled parts 4 Insert the Paper...

Страница 16: ...he scanner and slide it downward to snap its tabs into place 6 Plug the ADF cable into the ADF port on the body of the scanner Make sure the cable is plugged in securely The ADF will not work if the c...

Страница 17: ...u automatically opens Note If the CD does not automatically start check the following Make sure the CD drive s door is completely shut Make sure the CD was inserted in the drive in the proper directio...

Страница 18: ...ion window opens automatically 3 On the Installation Main Menu click Install Products The next window lists the software that is available to install on your computer 4 Select ScanSoft PaperPort and S...

Страница 19: ...ation windows 8 When installation of PaperPort is finished the Welcome to the OneTouch 4 0 Setup Wizard opens 9 Click Next 10 On the Visioneer License Agreement window read the license agreement If yo...

Страница 20: ...alling this option means that you can use several different methods to scan as explained in this User Guide TWAIN only Only the TWAIN driver is installed You will only have access to the Visioneer 945...

Страница 21: ...your Color Space setting The Color Space setting sets the gamma value for the scanner so scanned items look good on your monitor Gamma controls the brightness of the midtones of colors That setting c...

Страница 22: ...our computer is running AntiVirus or AntiSpyware software you may see messages asking you to allow installation Select the option to allow installation to proceed Note If you want to see more informat...

Страница 23: ...ER S GUIDE If you are installing the scanner on a Windows 2000 computer During the software installation this Digital Signature Not Found message may appear twice Each time this message appears you ca...

Страница 24: ...the power supply into its power port on the scanner 2 Plug the power cord into the power supply and then into a wall outlet Now proceed to the next section Step 4 Connect the USB Cable and Turn on the...

Страница 25: ...ance however your scanner will also connect to a USB 1 1 port The USB symbol as seen in the above diagram identifies the location of the USB port on your computer If the plug does not attach easily ma...

Страница 26: ...1 1 port an information bubble may open explaining that A HI SPEED USB device is plugged into a non HI SPEED USB hub Plug the USB cable into a USB 2 0 port if available or just disregard the message I...

Страница 27: ...receive a message that your computer has found the new hardware or updated the driver database If your computer is running Windows XP you will see the following message If your computer is running Wi...

Страница 28: ...canner and computer are communicating properly 7 Click Close on the Installation Complete window to close and exit the software installer Note To see more information about your scanner click the More...

Страница 29: ...l it on your computer The ArcSoft Scrapbook Suite consists of two applications particularly suited for your scanner Photoimpression Photo imaging software that lets you edit retouch and enhance photos...

Страница 30: ...r to install it now Follow the instructions on the installation windows To view and save the User Guides 1 Click the name of a User Guide you want to view and it will open in Acrobat Reader Use the Ac...

Страница 31: ...se Check for Online Updates from the pop up menu 3 Follow the instructions on the screen and register your scanner by entering your scanner s serial number and your email address The serial number is...

Страница 32: ...scanner s TWAIN interface to scan Select scanning options before scanning put the document in the scanner then click a button on the TWAIN interface window The PaperPort software that you installed f...

Страница 33: ...nsion and adjust the Paper Guide for the size of paper You can also adjust the Paper Stop at the back of the scanner for the size of the paper Pull out the slide on the Stop for letter sized pages Pus...

Страница 34: ...pages into the Automatic Document Feeder To load a single item 1 Place the item on the scanner glass face down 2 Align the item with the arrow on the reference frame 3 Close the cover Important Items...

Страница 35: ...Windows Notification Area at the bottom right corner of the screen The OneTouch Button Panel opens and shows the first five on screen scanning buttons Click the arrows to cycle through the buttons to...

Страница 36: ...tion is PaperPort To cancel scanning click the Cancel button To pause the scanning click the Pause button It will change to a Continue button Put the page back into the scanner and click Continue to r...

Страница 37: ...ification Area at the bottom right corner of the screen The OneTouch Button Panel opens at its Button View which shows the on screen scanning buttons 2 To scan from the panel click the icon you want t...

Страница 38: ...ows on the right side of the panel This number is the Button number The icon indicates the Destination Application for this setting The current name of the setting Your document will be scanned with t...

Страница 39: ...shows the current scanners connected to your computer If the Properties window is not open right click the icon on the Detail View or Button View to open it From the Hardware View and Detail View cli...

Страница 40: ...as available Destination Applications on the OneTouch Properties window The icons on the OneTouch Panel and the OneTouch Properties window are the icons for the particular applications A question mar...

Страница 41: ...ck White 200dpi 8 5 x 11 page Brightness 50 2 PDF PaperPort Black White 300dpi 8 5 x 11 page Brightness 50 3 Print Printer Black White 300dpi 8 5 x 11 page Brightness 50 4 eMail Microsoft Outlook atta...

Страница 42: ...neTouch Properties window 1 Click the OneTouch icon It is located in the Windows Notification Area at the bottom right corner of the screen 2 Right click a button on the OneTouch Button Panel Remember...

Страница 43: ...n the PDF image format To make sure all of your computer s Destination Applications are linked to OneTouch 4 0 click the Refresh button The Destination Application This is the application that opens w...

Страница 44: ...s settings click its icon Click the icon again to close the detailed information Note Some of the options on the OneTouch Properties Window and other OneTouch windows and dialog boxes are grayed out a...

Страница 45: ...re based on the type of destination application you select This example shows the formats that apply to Microsoft Outlook The button names indicate their file types See Selecting Page Format Options o...

Страница 46: ...list select the application where you want documents sent when scanning is finished See Selecting Options for a Button on page 56 to display a full list of the Destination Applications that you can u...

Страница 47: ...the Destination Application the available formats are for text such as txt and rtf However if you select Microsoft Paint as the Destination Application then the available formats are for graphics such...

Страница 48: ...perties that you can select 1 On the OneTouch Properties window click a Destination Application 2 Click the Properties button A OneTouch 4 0 Link Properties dialog box opens for the type of Destinatio...

Страница 49: ...g the folder to receive your scanned items 1 Select the PaperPort folder where you want the file of the scanned image to be located 2 Click OK 3 Click OK or Apply on the OneTouch Properties window Whe...

Страница 50: ...k in the OCR settings boxes for the options you want The options will apply to all the applications in the group Always send a file even when no text was found The scanned file is sent to the OCR read...

Страница 51: ...d in and the application icon appears in step 3 4 Select the icon in Step 3 of the dialog box That is the icon that will appear in the OneTouch Destination List 5 In step 4 of the dialog box select th...

Страница 52: ...applications in the group Convert Bitmaps using Screen Resolution Use this option to ensure that an image will fit on the computer s screen When a computer screen is set to a lower resolution bitmap i...

Страница 53: ...OneTouch Properties window Storage Properties These properties apply to the Destination Application named Transfer to Storage If a CD burner is attached to your computer you also use this dialog box t...

Страница 54: ...7 Click the Browse button to specify the location to store the scanned documents or type a location directly into the box If you are scanning to a shared network drive it must be a mapped drive For m...

Страница 55: ...age as soon as scanning is finished but other email applications do not If you re using one of those applications such as America Online AOL you need to know which folder contains the scanned document...

Страница 56: ...ns See your Windows documentation and AOL user manual for the settings on the Windows Control Panel 4 Select the options for color document handling Convert Bitmaps using Screen Resolution Use this op...

Страница 57: ...u want to do additional image processing such as photo touch up or color correction Both of those file formats tend to be larger than the JPEG format Because JPEG image files can be reduced in size th...

Страница 58: ...o the button currently selected on the OneTouch Properties window Other buttons that have JPG or PDF selected as the Page Format are not affected so you can set the JPEG or PDF file size image quality...

Страница 59: ...ications that are text applications the text format icon changes to match the file type of the application In some cases the Destination Application supports several file types and you can right click...

Страница 60: ...nverted Available with Microsoft Wordpad and Word Excel Spreadsheet The xls file format used by Microsoft Excel HTML Document The htm file format used to create web pages 4 Click OK on the OneTouch Pr...

Страница 61: ...our documents Auto orient page Select this option to check the page orientation and automatically rotate an improperly oriented page image so the text is recognizable by the OCR process Single column...

Страница 62: ...H BUTTON The OneTouch buttons have names that identify their pre set functions such as OCR and PDF but you can edit the names To change the button names 1 Open the OneTouch Properties window 2 Using t...

Страница 63: ...and choose the button for new options 3 Select button options as described below Show All Destinations This option selects all the Destination Application categories The list of Destination Applicatio...

Страница 64: ...ail applications See eMail Properties on page 48 for details about attaching scanned documents to your email messages Storage and CD R W is for either storing scanned documents in a folder or sending...

Страница 65: ...ill be saved in the folder specified in the Folder Copy Options section see the figure on page 59 and the description below You can selectively choose the types of Destination Applications that will h...

Страница 66: ...R W such as Button 7 the location in this section is where your scanned documents are stored When you use the OneTouch 4 0 Burn to CD feature the location is where scanned documents are stored before...

Страница 67: ...reate a new configuration 1 Open the OneTouch Properties window and make sure the Multi Function tab is selected 2 Scroll through the applications in the Select Destination list and click the type of...

Страница 68: ...n Properties dialog box type a name A key icon indicates the configuration is not locked and can therefore be created or edited Clicking the icon toggles between a key and a lock When icon is a lock t...

Страница 69: ...nimum is 50 dpi The higher the dpi setting the sharper and clearer the scanned image However higher dpi settings take longer to scan and produce larger files for the scanned images Brightness and Cont...

Страница 70: ...nter the horizontal and vertical page dimensions in the boxes The maximum size for items scanned with the Automatic Document Feeder is 8 5 x 14 The maximum size for items scanned on the Flatbed glass...

Страница 71: ...a single page on the Flatbed Glass make sure to align the top left corner of the item with the arrows at the top left corner of the Flatbed Glass When using the AutoCrop to Original option with the A...

Страница 72: ...e the image may not scan correctly In that case re scan the page using the paper guides to feed the paper in straight Invert Image Only available for Black White Mode this option reverses the black an...

Страница 73: ...or your eyes see as reflected from the image and gamma controls the brightness of the midtones of the color 9 Drag the sliders to the left and right to change the color settings As you do the image ch...

Страница 74: ...o fit the page Actual size crop image if necessary If the scanned image is too big to be printed or faxed on a single page the image will automatically be cropped around its edges to fit on the page C...

Страница 75: ...RCHIVE A Storage Options tab is on the Scan Configurations dialog box when the selected Destination Application is set as Transfer to Storage You use the options on this tab to select where you want t...

Страница 76: ...ted for each month and week so you can keep track of when you scanned the documents 3 Click the Browse button to specify the location to store the scanned documents or type a location directly into th...

Страница 77: ...rations with Transfer to Storage as the Destination Application and assign each scan configuration to one of the buttons Setting up multiple folders for transfer to storage 1 Using Microsoft Windows c...

Страница 78: ...ich folder it is give the new configuration a name that indicates the folder name such as Storage for Business Receipts 6 Click the Storage Options tab 7 Click the Browse button 8 Select the folder yo...

Страница 79: ...r will now be set as the Storage Location such as Business Receipts 10 Click Apply The new configuration is now listed as a Transfer to Storage configuration 11 Repeat the process to create additional...

Страница 80: ...as the Storage Locations for the new configurations You will now have multiple configurations set up for the Transfer to Storage destination and each configuration scans documents to separate folders...

Страница 81: ...o different locations To change button names see Renaming a OneTouch Button on page 55 Scan to multiple storage folders 1 Insert the documents you want to scan to multiple storage folders 2 Open the O...

Страница 82: ...p those configurations locked and do not edit or delete them That way you will always have the factory settings available If you do edit or delete them and want to get the factory pre sets back again...

Страница 83: ...indicates the configuration is unlocked 5 Edit the settings and click OK 6 Click OK to close the dialog box CONFIGURING BEFORE SCANNING You can manually configure the scan settings before beginning t...

Страница 84: ...ace from PaperPort on page 93 WIA The Windows Image Acquisition Interface WIA opens for you to configure the scanning See Scanning from the WIA Interface on page 119 5 Click OK or Apply on the OneTouc...

Страница 85: ...k CD into your computer s CD Drive 2 Open the OneTouch Properties window 3 Using the arrows choose a button to use for scanning and burning to a CD 4 Select Burn to CD as the Destination Application T...

Страница 86: ...tells you that files are waiting to be burned to the CD 8 Open the OneTouch window and make sure that the Burn to CD Destination Application is still selected and click the Properties button The OneTo...

Страница 87: ...nterface will open and you can use it to continue with the scanning To scan with event forwarding 1 Open the OneTouch Properties window 2 Using the arrows choose a button to use for the event forwardi...

Страница 88: ...you selected for event forwarding A dialog box opens for you to select the application to use for scanning 7 Select the application in the box and click OK Now the application you selected opens and...

Страница 89: ...l processing This is essentially from your scanner to a web ready format in one automatic step To scan and create an HTML web page 1 Open the OneTouch Properties window 2 Using the arrows choose Butto...

Страница 90: ...ns showing your converted page 8 Choose Save As from the Internet Explorer File menu give the page a name and save it in the location you use for your web page files You may also want to write down th...

Страница 91: ...e or process them in any other way If you choose a text format for the file format the documents are also automatically converted by the OCR process into editable text and numbers before being stored...

Страница 92: ...ments or spreadsheets you can have them converted by the OCR process prior to being stored 1 Open the OneTouch Properties window 2 Using the arrows choose Button 7 Archive or any other button if it is...

Страница 93: ...ing the storage location for scanned documents you can select a local folder or a folder on a server or mapped drive You select a mapped drive using the Browse button 1 See Scanning to Multiple Folder...

Страница 94: ...anned documents Servers and mapped drives are represented by an icon that indicates its network connection 4 Click OK Now when you scan using Transfer to Storage as the Destination Application the doc...

Страница 95: ...LAMP POWER SAVING 1 Right click on the OneTouch icon and choose Show Hardware from the pop up menu You can also click the scanner icon at the top of the OneTouch Button Panel If the Hardware View of t...

Страница 96: ...CONFIGURING THE ONETOUCH BUTTONS 89 The Hardware Properties dialog box opens and shows information about your Visioneer 9450 scanner 2 Click the Properties button...

Страница 97: ...ore the scanner powers down from 10 minutes to a maximum of 10 hours 3 Click the arrows for the Lamp timeout setting and choose a time To turn the lamp on and off manually without turning off power to...

Страница 98: ...e shows how to scan with the PaperPort TWAIN interface but many other graphics and imaging applications also comply with the TWAIN standard so you can use your scanner with those applications too To u...

Страница 99: ...TWAIN Basic Interface on page 96 Advanced Interface The Advanced Interface includes all the settings of the Basic Interface plus a wide range of more advanced settings such as color saturation gamma...

Страница 100: ...are for scanning with the TWAIN interface in the PaperPort application To scan an item in PaperPort using the TWAIN interface 1 On the Windows taskbar click Start point to Programs point to ScanSoft...

Страница 101: ...the first time you select from the list while PaperPort initializes the scanner Later on the scanner initializes immediately when you select it from the list Note If the Scan button at the bottom of...

Страница 102: ...aced on the PaperPort Desktop until you indicate the scanning job is finished by clicking Done on the PaperPort Scan window Multiple pages are stacked on the PaperPort Desktop if the type of image fil...

Страница 103: ...flective Using Scans the document on the Flatbed Auto Document Feeder Simplex Scans one sided documents from the Automatic Document Feeder 2 Choose the color grayscale or black and white option from t...

Страница 104: ...ed on the PaperPort Desktop you will see options to continue scanning See The Create Single Page Items Check Box on page 98 7 On the PaperPort Scan message box click Done When scanning is complete thu...

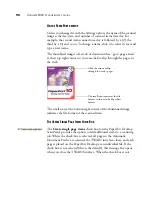
Страница 105: ...the bottom right corner of the thumbnail image indicates the file format of the scanned item THE CREATE SINGLE PAGE ITEMS CHECK BOX The Create single page items check box on the PaperPort Desktop Sca...

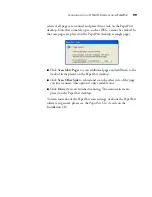
Страница 106: ...More Pages to scan additional pages and add them to the stack of items placed on the PaperPort desktop Click Scan Other Side to reload and scan the other side of the page you just scanned This option...

Страница 107: ...or Grey Scale or Black White Clicking the sign in front of Custom shows Custom s scan settings Click a setting in the list to change it The setting s options appear on the right side of the Advanced I...

Страница 108: ...d white photographs and other higher quality black and white images You can also scan a color photo with this setting to turn its colors into gray shades The file size is about one third the size of a...

Страница 109: ...ess window opens To Cancel scanning while it is in progress click the Cancel button on the progress window 10 When you re finished scanning items click Done to close the Advanced Interface If the Crea...

Страница 110: ...de of the Advanced Interface select a configuration for example Color Configurations 2 Click a setting in the list of settings or click its corresponding button on the right side of the Advanced Inter...

Страница 111: ...a scan is in dots per inch dpi The higher the resolution the finer the details However higher dpi settings also take longer to scan and produce larger files sizes Usually the higher resolution settin...

Страница 112: ...tems click one of the options in the list For example to set the resolution for scanning a business card select Business Card That setting is preset to read small print on a typical business card Note...

Страница 113: ...to its original setting The resolution panel also includes an advanced setting for Moire patterns Moire patterns are wavy rippled lines that sometimes appear on the scanned images of photographs or il...

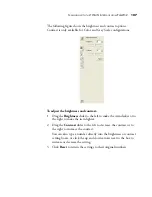
Страница 114: ...e Brightness slider to the left to make the item darker or to the right to make the item lighter 2 Drag the Contrast slider to the left to decrease the contrast or to the right to increase the contras...

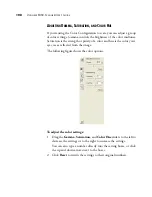
Страница 115: ...urity of a color and hue is the color your eyes see as reflected from the image The following figure shows the color options To adjust the color settings 1 Drag the Gamma Saturation and Color Hue slid...

Страница 116: ...ut size to scan only specific sections of an image For example if you re scanning a photograph and want to focus on one section adjusting the input size removes the rest of the photograph from the fin...

Страница 117: ...or the image size changes to Custom to indicate you are customizing the size The Scan Info box on the lower left portion of the Advanced Interface shows the information for the new area 4 If the dotte...

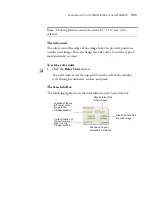
Страница 118: ...units across the top and down the side of the window cycle through centimeters inches and pixels The Scan Info Box The following figure shows the information on the Scan Info box Note Clicking Remove...

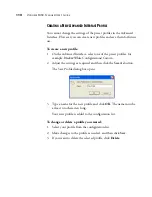
Страница 119: ...iles for example Black White Configurations Custom 2 Adjust the settings as required and then click the Save As button The Save Profile dialog box opens 3 Type a name for the new profile and click OK...

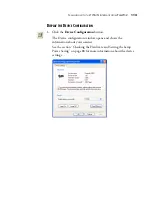
Страница 120: ...CE CONFIGURATION 1 Click the Device Configuration button The Device configuration window opens and shows the information about your scanner See the section Checking the Hardware and Setting the Lamp P...

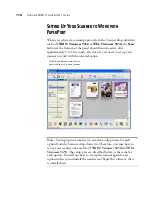
Страница 121: ...to set up your scanner to work with the selected option Note Setting up your scanner is a one time only process for each option from the Scanner drop down list Therefore you may have to set up your sc...

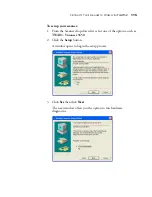
Страница 122: ...our scanner 1 From the Scanner drop down list select one of the options such as TWAIN Visioneer 9450 2 Click the Setup button A window opens to begin the setup process 3 Click Yes then click Next The...

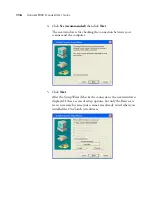
Страница 123: ...cking the connection between your scanner and the computer 5 Click Next After the Setup Wizard checks the connections the next window is displayed It has a series of setup options but only the Basic s...

Страница 124: ...7 6 Click Next The TWAIN Basic Interface opens 7 Insert a page into the scanner face up and the Scan button on the Basic Interface will become active Note If you are setting up the scanner for the WIA...

Страница 125: ...opens that says Basic scan test passed 9 Click Next on the message window The final Setup window opens to let you know the setup process is finished 10 Click Finish Your scanner is now setup for the...

Страница 126: ...ges from scanners digital cameras and other digital devices SCANNING WITH THE WIA INTERFACE FROM PAPERPORT The instructions in this section are for scanning with the WIA interface from the PaperPort a...

Страница 127: ...IDE To scan an item using WIA 1 On the Windows taskbar click Start point to Programs point to ScanSoft PaperPort then click PaperPort The PaperPort desktop opens 2 Click the Scan icon on the PaperPort...

Страница 128: ...pe before you start scanning click Settings The default file type for documents is pdf and the default for photographs is jpg See the PaperPort User s Guide for more information about the PaperPort Se...

Страница 129: ...or when you load several separate scanning jobs into the Automatic Document Feeder at the same time Insert a blank page between them and each job will become a separate stack on the PaperPort Desktop...

Страница 130: ...the Flatbed change the size of the scanned image To do this click and hold the mouse pointer over one of the four sizing boxes on the corners of the previewed image Then drag the box to increase or d...

Страница 131: ...can select new settings before you scan an item to fine tune exactly how you want to scan a particular item To select the scanner settings before you scan 1 On the scan window click Adjust the qualit...

Страница 132: ...ow and choose the dots per inch dpi of the resolution The maximum resolution is 600 dpi the minimum is 50 dpi The higher the dpi setting the sharper and clearer the scanned image However higher dpi se...

Страница 133: ...AMS If your scanner stops scanning due to a paper jam in the Automatic Document Feeder a warning dialog box appears after a few moments To clear a paper jam 1 Open the Automatic Document Feeder cover...

Страница 134: ...ean cloth to rid the glass of dust or other debris CLEANING THE AUTOMATIC DOCUMENT FEEDER You may need to clean the ADF feed mechanism if your scanned documents do not feed easily into the ADF or seve...

Страница 135: ...pad spring may be wearing out You received a replacement pad in the original scanner box and you can also order a new one See the Visioneer 9450 Scanner Parts List on page 137 for ordering informatio...

Страница 136: ...aper jams are a symptom of a worn roller assembly A worn roller can cause documents to feed in skewed at an angle or multiple pages to feed at the same time In both cases paper jams may occur A worn r...

Страница 137: ...o the right until the left side is free from its mounting hole 4 You can now angle the roller assembly out and away from its housing 5 Reverse the procedure to replace the new roller Make sure both si...

Страница 138: ...ly Inspect all cable connections Make sure all the cables are plugged in securely Are the scanner s status lights on Turn on the scanner s power If the lights still don t come on plug the power supply...

Страница 139: ...when the USB cable is plugged back in Unplug the power cable from the scanner and then plug it back in If the scanner does not reconnect 1 Unplug the power cable from the scanner 2 Restart your compu...

Страница 140: ...ease see the documentation that you received with the other scanner for the steps to remove its driver programs You can also use the basic steps in the section To Install Another Driver on page 135 bu...

Страница 141: ...pens and asks if you are sure you want to remove OneTouch 4 0 from your computer Click Yes The OneTouch 4 0 software is removed from your computer 5 Unplug the scanner USB cable 6 Close all open windo...

Страница 142: ...ick the Add or Remove Programs icon c Select OneTouch 4 0 then click on the Remove button d An Add or Remove message box opens and asks if you are sure you want to remove OneTouch 4 0 from your comput...

Страница 143: ...e fluorescent lamp Interface USB 2 0 Full Speed Scanner dimensions Height 7 5 inches 19 cm Width 12 inches 30 5 cm Length 17 5 inches 44 5 cm Weight 10 95 pounds 4 96 kg Operating temperature 50 104 F...

Страница 144: ...bers when ordering replacements for your Visioneer 9450 scanner Part Name Part Number Paperguide assembly 57 0097 000 Paperguide extension 57 0098 000 Paper stopper assembly 57 0099 000 ADF Pad assemb...

Страница 145: ...138 VISIONEER 9450 SCANNER USER S GUIDE...

Страница 146: ...starting manually 10 Color 62 101 color hue 108 options 108 color filter 65 computer restart 131 Configure Before Scan 76 Contrast 62 106 125 create single page items check box 95 98 122 D Destinatio...

Страница 147: ...ettings 34 names 33 55 One Touch icon 28 30 35 One Touch Properties window 31 35 41 options 56 60 P Page Format HTML 82 page format options 50 page settings 63 page size 63 paper guide and stop 3 pape...

Страница 148: ...torage and CD R W 57 Storage Properties 46 Straighten Image 65 system requirements 4 T technical support 131 Text Documents Properties 43 Text Editors 57 text file format 52 Text Formats 51 thumbnail...

Страница 149: ...INDEX 142...

Страница 150: ...Copyright 2006 Visioneer Inc 05 0508 500 visioneer...

Отзывы: