2.8 Operation Notices
◆
Height above sea level is below 1000m.
◆
Operation temperature range:-10˚C~+40˚C.
◆
Relative humidity is below 90%(20˚C).
◆
Preferably site the machine some angles above the floor level,the maximum
angle does not exceed 15˚.
◆
The content of dust,acid,corrosive gas in the surrounding air or substance
can not exceed normal standard.
◆
Take care that there is sufficient ventilation during welding.There is at least
30cm free disstance between the machine and wall.
2.7 Operation Environment
◆
Read safty
instruction
and
Chapter
1 carefully before attempting to use this
equipment.
◆
Connect the ground wire the machine directly
◆
In case closing the power switch, no-load voltage may be exported.Do not touch
the output electrode with any part of your body.
◆
Before operation,no concerned people should be left,Do not watch the arc in
unprotected eyes.
◆
Ensure good ventilation of the machine to improve duty ratio.
◆
Turn off the engine when the operation finished to economize energy source.
◆
When power switch shuts off protectively because of failure.Don’t restart it until
until problem is resolved.
Otherwise,the range of problem will be extended.
AC/DC
SERIES
EQUIPMENT
AC/DC
SERIES
EQUIPMENT
Operation
Operation
29
28
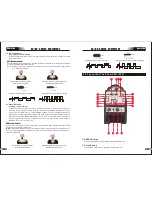
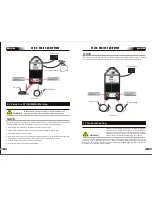
The following set up is known as Straight Polarity or DC electrode positive. This is
commonly used for DC LIFT TIG welding on most materials such as steel and stainless
steel.
1. Switch the ON/OFF Switch (located on the rear panel) to OFF.
2. Connect the work lead cable to the positive output terminal, and the LIFT TIG Torch
cable to the negative output terminal.
3. Connect the gas line/hose to the proper shielding gas source.
4. Slowly open the Argon Cylinder Valve to the fully open position.
5. Connect the work lead clamp to your work piece.
6. The tungsten must be ground to a blunt point (similar to a pencil) in order to achieve
optimum welding results. See illustration. It is critical to grind the tungsten electrode
in the direction the grinding wheel is turning. Grind at a 30 degree angle and never
to a sharp point.
7. Install the tungsten with approximately 1.6mm to 3.2mm sticking out from the
gas cup, ensuring you have correct sized collet.
8. Tighten the back cap.
9. Turn the switch to the “ON” position. The power L.E.D. light should illuminate.
10. Set the welding process to LIFT TIG.
11. Set the Weld Current Control Knob to the desired amperage.
12. You are now ready to begin LIFT TIG Welding.
power supply
Ar./GAS(TIG/WIG)
TIG torch
NOTE

