Troubleshooting 10
0020261188_00 ecoTEC plus Installation and maintenance instructions
29
10.7
Using check programmes
▶
You can also use the check programmes for
troubleshooting. (
→
Page 22)
10.8
Resetting parameters to factory settings
▶
To simultaneously reset all parameters to the factory
settings, set diagnostics code
D.096
to 1.
10.9
Replacing defective components
1.
Carry out the preparatory work before undertaking any
repair work. (
→
Page 29)
2.
Carry out the work required to finish the task before
undertaking any repair work. (
→
Page 33)
10.9.1 Procuring spare parts
The original components of the product were also certified
by the manufacturer as part of the declaration of conformity.
If you use other, non-certified or unauthorised parts during
maintenance or repair work, this may void the conformity of
the product and it will therefore no longer comply with the
applicable standards.
We strongly recommend that you use original spare parts
from the manufacturer as this guarantees fault-free and safe
operation of the product. To receive information about the
available original spare parts, contact the contact address
provided on the reverse of these instructions.
▶
If you require spare parts for maintenance or repair
work, use only the spare parts that are permitted for the
product.
10.9.2 Preparing the repair work
1.
Decommission the product.
2.
Disconnect the product from the power grid.
–
Take all necessary precautions to ensure that it
cannot be switched back on again.
3.
Remove the front casing. (
→
Page 9)
4.
Close the gas stopcock.
5.
Close the service valves in the heating flow and in the
heating return.
6.
Close the service valve in the cold water pipe.
7.
Drain the product to replace hydraulic components.
(
→
Page 37)
8.
Ensure that water does not drip on live components
(e.g. the electronics box).
9.
Use only new seals.
10.9.3 Replacing the burner
1.
Remove the compact thermal module. (
→
Page 34)
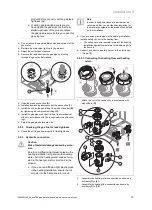
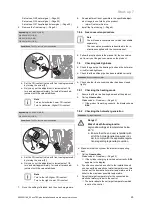
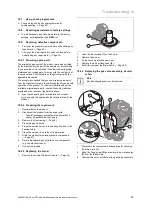
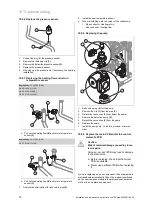
1
2
2.
Undo the four screws
(1)
on the burner.
3.
Remove the burner.
4.
Fit the new burner with a new seal.
5.
Replace the burner flange seal
(2)
.
6.
Install the compact thermal module. (
→
Page 35)
10.9.4 Replacing the gas valve assembly, Venturi
or fan
Note
Each destroyed seal must be restored.
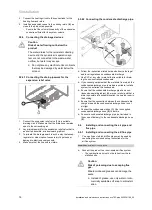
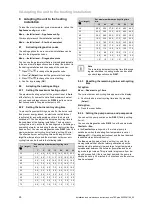
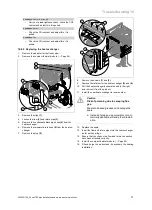
4
3
2
1
1.
Disconnect the test system's silicone pipe for checking
the airflow rate
(1)
.
2.
Undo the fixing screw
(2)
and remove the air intake pipe
(3)
from the intake stub.
3.
Unscrew the union nut
(4)
from the gas valve assembly.

