background image

13 


Section 2: Media, Cartridges, and Knives 


2A. Label and Roll Specifications


Two types of media can be used.   

1.


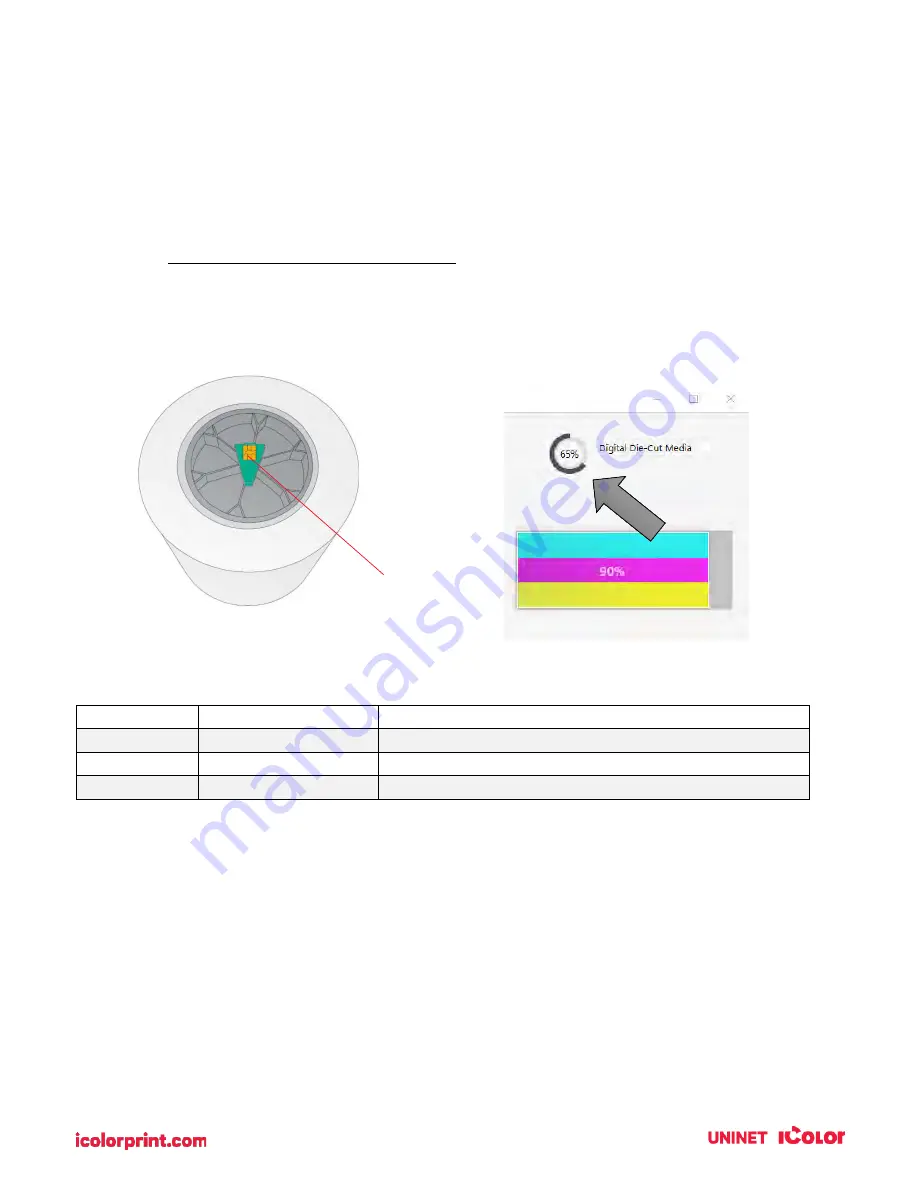
Digital Die-Cut Labels. If you are using the printer to digitally die-cut your desired shapes and 
sizes only UNINET label stock is recommended. This media comes from UNINET with a smart chip 
that identifies the media, tracks the percentage remaining, and automatically sets the sensor type 
to continuous. You will know it is installed when you see the Digital Die-cut Media percentage in 
the upper right corner of UNINET IColor PrintHub. If you do not see this indication, the digital die 
cutter will not be enabled and you will not be able to cut shapes.   


The following media types are currently available from UNINET. We will be adding more as additional 
types are discovered, tested, and validated.  

SKU 

Media  

Description 

ICI475X150HG  High Gloss BOPP 

Durable Synthetic Polypropylene Media, 150 ft 

ICI475X150PG  Premium Gloss Paper 

Premium Paper Media, 150 ft 

ICI475X100MM  Magnetic Material 

White Gloss Magnetic Media, 100 ft 


Other media cannot be used even if you take the chip from new/old UNINET media for the following 
reasons: 


Old chips cannot be reused once they reach 0% remaining. 


Other media has a liner that may be too thin. The liner on UNINET media is specially created for 
our printer to prevent cut through to the wear strip 


The dust created from cutting through the inkjet printable topcoat can be excessive on some 
media. This can cause frequent print cartridge clogging and other problems. 


Smart Chip 

Содержание IColor 250

Страница 1: ......

Страница 2: ... environment this product may cause radio interference in which case the user may be required to take adequate measures This equipment generates uses and can radiate radio frequency energy and if not installed and used in accordance with the instructions may cause harmful interference to radio communications However there is no guarantee that interference will not occur in a particular installatio...

Страница 3: ... Cost Estimator 35 3C Set the Gap Sensor Mode Pre Die Cut Labels Only 36 3D Set the Present Cut Mode 38 3E Adjusting Print Alignment 40 3F UNINET IColor PrintHub Settings 42 3G UNINET IColor PrintHub Printer Settings 42 3G1 Multiple Printer Support 43 Section 4 Printing and Cutting with IColor CustomCUT Software on PC Mac 45 4A Overview IColor CustomCUT 45 4B IColor CustomCUT Software Activation 4...

Страница 4: ...inting from a Mac 85 6A Print Utility Settings 85 6B Adjusting Print Alignment Offset Label Offsets 86 6C Set the Stock Sensor Mode 88 6D Set the Output Mode 89 6E XY Cutter Offsets 91 6F Printing from Swift Publisher 93 6G Creating a Custom Size Mac 99 6H Creating a Full Bleed Print 101 6I Printer Driver Settings 102 Section 7 Troubleshooting 116 7A Solving Pre Die Cut Print Alignment Problems 10...

Страница 5: ...enta yellow process black for both pigment and dye based applications This User s Manual is your complete step by step guide to quickly and easily setting up and printing with your new IColor 250 Label Printer 1A Choosing a Good Location Place the printer on a flat surface in a location with adequate air circulation to prevent internal heat buildup Do not place the printer near heat sources such a...

Страница 6: ...he following items are included in the supply box 1 Power Adapter and Cord 2 6 USB Cable If another USB cable is used it must be 6 2 M or less 3 Color Dye Ink Cartridge Pigment is also available 4 Die Cutting Knife Holder with knife preinstalled 5 Label roll holders Assembly required section 1C 6 Large Roll Hub 7 Small Roll Hub 8 T8 Allen Key and two screws 9 Printed documentation 2 1 3 4 5 6 7 8 ...

Страница 7: ...these instructions to install the roll holders 1 Set the printer on its front so the bottom is facing you 2 Install the movable label roll holder by attaching the hooked end on the rail The bottom of the holder will fit in the notch on the printer Rail Notch Tab Movable Roll Holder Movable Roll Holder ...

Страница 8: ...7 3 Slide the Roll Holder to the far right 4 Install the roll guide by attaching the hooked end to the rail The bottom of the holder will fit in the notch on the printer Notch Roll Guide Roll Guide ...

Страница 9: ...stop 6 Locate the remaining roll holder with the protruding wire Connect the wire to the port on the printer Tuck the wire inside the cavity Stop Wire Push the wire into the cavity as you move the holder closer to the notch Notch ...

Страница 10: ...7 Snap the holder in place so the two screw holes line up with the holes on the printer 8 Install the T8 screws using the INCLUDED Allen key or a Torx T8 screwdriver 9 Rotate the printer back on its feet ...

Страница 11: ...s that the printer is on and ready to receive print jobs The Ink LED will illuminate when a cartridge has 10 or less of its ink remaining The Pause Button is pressed to pause a job to allow for the loading of label stock and ink cartridges The printer pauses after the printing of the current label has finished Front Cover Control Panel Front Cover ...

Страница 12: ...Unload Button is pressed to unload label stock after you receive an End of Roll message in UNINET IColor PrintHub The printer will reverse the label stock through the feed area Interior Die Cutting Carriage Die Cutter Ribbon Cable Upper Guide Shaft Print Carrier Ribbon Cable Print Carrier Knife Collar Handle Die Cutting Knife Lower Guide Shaft Pre Die Cut Rollers Die Cutting Pinch Rollers Cutter W...

Страница 13: ...12 Back Infeed Area Gap Sensor Adjustment Power Switch Movable Throat Guide USB Power Fixed Roller Holder w Chip Reader Fixed Guide Movable Roll Holder ...

Страница 14: ...apes The following media types are currently available from UNINET We will be adding more as additional types are discovered tested and validated SKU Media Description ICI475X150HG High Gloss BOPP Durable Synthetic Polypropylene Media 150 ft ICI475X150PG Premium Gloss Paper Premium Paper Media 150 ft ICI475X100MM Magnetic Material White Gloss Magnetic Media 100 ft Other media cannot be used even i...

Страница 15: ...ou load it into the printer These are available from UNINET Refer to the specifications and settings in the following sections before ordering custom stock from UNINET IMPORTANT Test all custom made label stock with the intended printer before ordering large quantities UNINET will only assume responsibility for custom label stock ordered from UNINET ...

Страница 16: ...tock thickness 1 The ability of the printer to pull the paper through the print area 2 The ability for the sensor to read through the backing if the sensor is set to die cut If you are printing in continuous or reflective label sensing mode number 2 does not apply The fact that the printer must read through the backing in die cut mode will limit the thickness much more than the printer s ability t...

Страница 17: ...he side of the label first so you will want to print the labels sideways Digital Die Cut Media Notes Even though the width of the media is 4 75 inches the drive rollers on either side prevent printing in the areas indicated The knurled rollers that bite into the media to drive it damage the printable surface in this area The actual printable area is 4 25 inches Unprintable Area 4 75 4 25 Unprintab...

Страница 18: ...e cutting 3rd mark from the left 1 25 2 Install the Blue Hub on the open side of the digital die cutting media Move to third mark from Left Digital Die Cutting Media comes with black hub with green chip Blue Hub Note The green hub is not needed for digital die cutting and can be stored in the notch on the movable holder ...

Страница 19: ...et the roll in place so that the blue pin sits in the notch on the roll holder 4 Make sure the green chip holder fits in the corresponding green slot on the roll holder Blue Pin Notch Notch Green Chip Holder ...

Страница 20: ...g in power and switch on the printer 6 Guide the leading edge of the roll into the feed area Move the blue guide to the far side 7 Push until the printer detects the stock grabs it and pulls it through the printer Power Cable Power Switch Blue Guide ...

Страница 21: ...dth of the label stock you are installing You can always fine tune this later 2 Install the Green Hub on the right side of the pre die cut media Green Hub Die Cuts Blank Chip Holder Pre Die Cut Roll Digital Die Cut Roll Smart Chip Black Hub Continuous Media User must install Green Hub Hub Chip comes preinstalled ...

Страница 22: ...21 3 Install the Blue Hub on the left side of the digital die cutting media 4 Set the roll in place so that the blue pin sits in the notch on the roll holder Pre Die Cut Media Blue Hub Blue Pin Notch ...

Страница 23: ...ure the green blank chip holder fits in the corresponding green slot on the roll holder 6 Before feeding the stock you must plug in power and switch on the printer Notch Blank Chip Holder Power Cable Power Switch ...

Страница 24: ...the printer Blue Guide Gap Sensor Position Indicator from right edge of media The position indicator corresponds to the ruler NOT the installed label stock Gap sensor should intersect the gap between labels Note the position of the label sensor Slide the sensor position indicator so that it intersects with the gaps between your labels For most label stock you will not need to move this ...

Страница 25: ...24 2D Replacing the Digital Die Cutting Knife holder Install the included die cutting knife shown here 1 Open the Cover 2 Pull out on the blue handle to loosen the knife collar ...

Страница 26: ...25 3 Install the knife holder 4 Push on the knife so it goes all the way down before pushing the collar in 5 Push the collar to tighten the knife holder and allow it to cut Incorrect Correct ...

Страница 27: ...f the knife holder counterclockwise 3 Remove the knife from the holder You can tap the holder on a hard surface to free the knife from the holder 4 Locate a new knife Remove the molded plastic cover from the knife The plastic cap covers the cutting end of the knife However both sides are sharp The cutting end has an angled carbide tip The top end comes to a point so it can be easily centered in th...

Страница 28: ...eceive low ink warnings at 10 and 0 Press the Load Feed button to continue printing after you receive this warning To change a cartridge follow this procedure 1 Open the front cover That cartridge will automatically move to the right side if it is not already there 2 Press or pinch the tab on the front of the cartridge holder 3 Remove the cartridge ...

Страница 29: ... from its packaging Remove the foil outer package and the tape covering the nozzles 5 Place the new cartridge into the empty carriage Note When installing the cartridge tilt the cartridge at a slight backward angle of approximately 30 degrees ...

Страница 30: ...is pushed back far enough so the ridge on the cartridge is behind the spring loaded pusher on the lid Push down on the cartridge Close the lid on the cartridge by lightly pressing down from the top until you hear a click PUSH DOWN ...

Страница 31: ...t position on the label stock Set the sensor so the side of the slide bar lines up to this measurement See the dashed line in the illustration below Circular Labels If you are using Circular Labels you must adjust the stock sensor to correspond with the very top of the label where the circles are closest together If the sensor is too far to the right or the left the printer will still sense the la...

Страница 32: ...nches For circular labels larger than 4 inches in diameter you must have a black mark printed on the back of the label stock This means that you must change the Stock Sensor Mode to Reflective The printer will now look for the black mark representing the beginning of the next label instead of the die cut For more information on changing the Stock Sensor Mode see section 3C ...

Страница 33: ...uses from the printer itself so the printer must be turned on and communicating for the program to be useful 2 Go to Start Programs UNINET IColor Technology UNINET IColor PrintHub A Adjust alignment sensor mode output mode and advanced settings B If you have multiple UNINET printers connected they will be listed here C Past jobs will show the last 5 jobs along with cost information Click the docum...

Страница 34: ...hrough the label layer on the top but not so deep that you cut through the backing paper liner When you cut through the backing paper your label will not peel cleaning off the backing paper You will also score the wear strip under the cutting knife which can cause the knife tip to break You will also need to replace the wear strip more often if you cut too deep By default the cutter is calibrated ...

Страница 35: ...or decreased follow these steps 1 Print and Cut one copy and then attempt to peel the label from the liner 2 Check for tear If the label tears when you remove it you will need to increase the cut pressure Increase pressure in small increments to avoid overcompensating and cutting through the liner 3 Check the liner Once you peel up the label check the liner If it has been cut through decrease pres...

Страница 36: ...ow the list Enter the actual cost of the cartridge you paid Prints remaining on the currently installed cartridge and total prints on the new cartridge are both displayed To see a printable savable report click on the document icon next to the job you want to see A report will display the information You can print or save the report from this screen You can also change the currency using the drop ...

Страница 37: ...sing mark on the back When you install Digital Die Cutting Label Stock this setting will automatically be set for you 1 Connect the printer via USB and turn on the power The Stock Sensor Mode setting is stored in the printer s internal memory so you will not be able to access it unless the printer is turned on and properly communicating with the computer 2 Go to Start Programs UNINET IColor Techno...

Страница 38: ...be used for irregularly shaped labels circles larger than 4 inches or on any stock where the print starting position cannot be sensed using the label itself Continuous Sensor off If you have continuous stock with no die cut reflective mark or holes set the sensor type to Continuous This will turn off the stock sensor In this mode there is no way to set the print starting position The printer will ...

Страница 39: ...lick on the Output Cut Mode button There are different options available which change if the Cutter is enabled or disabled If the Cutter is disabled the label present options will be available If the Cutter is enabled the present options are no longer available but cut options become available Cutter Options Cut after the button press This setting will cut after you press the Load Feed button on t...

Страница 40: ...ot present In this mode the label stock does not move after the last label is printed This means that part of the last label printed is still in the printer This should be used only if you have a label rewinder attached Present after no activity This setting will present feed all printed labels past the front opening at the end of a print job if the printer does not receive another print job withi...

Страница 41: ...0 senses the beginning of the label with an optical sensor and is capable of printing to top bottom left and right edge Because of this it is necessary to align the printer to work with specific types of label stock The IColor 250 comes factory calibrated to print exactly to the edge of UNINET label stock However due to variations in the left margins and other variables it may be necessary to fine...

Страница 42: ...d label down or toward the printer Subtract from the current value to move the printed label up or away from the printer The value is automatically saved as soon as you set it You may have to make several adjustments to one or more of these values After each adjustment you can click the Test Alignment button to print a small test pattern on the label This will help you find the proper alignment va...

Страница 43: ...after printing completes box UNINET IColor PrintHub automatically opens whenever you send a print job to the printer If you do not want UNINET IColor PrintHub to open in front of other programs you can check the Launch minimized during print option 4 Support Click the Generate Support Report button to generate a zip file on your desktop containing all recent log files Send this to tech support so ...

Страница 44: ... should set it to 2 and for the next printer 3 and so on 3 Click Set You will hear the printer reset and the settings window will turn gray After it resets you will be able to see the settings window again Keep the printer connected 4 Now you can connect to the next printer Windows will automatically install a new driver for that new printer and name it IColor 250 Copy 1 You can rename it later by...

Страница 45: ...en Maintenance Wipes will speed up printing but could also cause poor quality printing Check the Suppress Alignment message to prevent the window from appearing which prompts you to align the cartridge every time a new cartridge is installed Skipping the alignment is faster but can result in poor print quality Stock Feed Settings Adjust these settings only if directed to do so by Tech Support Cali...

Страница 46: ...yout can be set to print only cut only or Print and Cut 4A Overview IColor CustomCUT 1 Layers Layers allow you to see and manipulate layers of imported SVG files or elements added within IColor CustomCUT SVG files can be created in programs like Adobe Illustrator 2 Import Allows you to import flat files and Vector files like AI EPS and SVG which can be a graphic you would like to print a cut file ...

Страница 47: ... existing objects on the page The document controls the artboard or page size Position Size allows you to precisely move objects on the page Fill Stroke feature allows you to change the color of the lines The Style allows you to change whether a particular object should be cut printed or both The Text allows you the change font and size of text objects a Document Use this tab to adjust the page si...

Страница 48: ... be set to Cut However this tab will allow you to adjust this if necessary e Text The text tab allows you to adjust the font size and other properties of text Text can be added using the Text tool from the left side toolbar 6 Library The library contains some preset shapes that you can apply to your document as cut objects or print objects 7 Page Layout This area shows your actual image You can mo...

Страница 49: ...e in your purchase confirmation To Activate follow the activation prompt that appears when you open the software or go to the Help Menu Activate An activation window will appear Enter the activation code with the dashes included Click OK The software is now activated on this computer IMPORTANT NOTE Activation requires internet access ...

Страница 50: ... you can save time and create a smoother cut file using this method IMPORTANT NOTE Before you start with IColor CustomCUT your designer should create the print and cut lines together and save them as two separate layers in the same file You ll be able to see these layers when you import the file into IColor CustomCUT 4C1 Choosing a Label Size Page Layout After you activate your software you will b...

Страница 51: ...own with the arrows 4C2 Import a Vector Image PDF AI EPS SVG The IColor CustomCUT Software allows you to import vector files for printing and cutting You can import the following vector image formats PDF AI EPS SVG To import an image for printing follow these steps 1 Go to the File Menu or shortcut bar choose Import ...

Страница 52: ...51 2 Browse to the file you would like to use and choose Open ...

Страница 53: ...n your page layout You can manually move it on your page or increase the size However a better option is to use the Position Size window Set the size to match the size of the page layout In this case center the image to the page ...

Страница 54: ...l It cannot be buried under other layers that will be printed In this example the cut line layer is setup in Illustrator as an Outline instead of a Fill Either will work but Outline is preferable 4 To view the sublayers and find the cut line click on the arrow to open up the group Click Arrow to open layer groups Note Before printing we recommend clicking the print Preview Button described in sect...

Страница 55: ... choose Print Only 7 To print go to the File menu and choose Print or click the Print Icon on the shortcut bar The print dialog will appear Make sure Print Cut is selected Click the Properties button to access the printer settings such as Print Quality Saturation and Color Matching For a full explanation of printer driver settings see section 5D Layer to be Printed Layer to be Cut ...

Страница 56: ...your software you will be prompted to open or create a new project 1 Choose New Project 2 Set your page size Since all die cutting media is 4 25 wide the standard maximum width is automatically set to 4 25 In this example we have set the size to 4 25 x 4 25 to accommodate approximately a 4 x 4 label TIP Set your page larger than the label size to be cut This will allow you to create a bleed around...

Страница 57: ... PNG TIF GIF IMPORTANT NOTE UNINET recommends imported images are at least 300 dpi The software is optimized for this size Larger DPI images can be manually resized Smaller dpi images will not utilize the maximum quality of the printer and may appear pixelated Images downloaded from websites are typically made to display only onscreen load quickly so they are typically only 72 dpi To import an ima...

Страница 58: ...le will appear on your page layout 7 You can manually move it on your page or increase the size However a better option is to use the Position Size window Set the size to match the size of the page layout In this case set the width to 4 and check the Keep Proportions box ...

Страница 59: ...58 8 Center the image horizontally and vertically to the page ...

Страница 60: ... This is very important You ll know it is selected when the bounding box appears around the image Now click on the Trace Icon 10 There are many options available in the Trace Image window However the most important option is Contrast You should adjust the contrast until the preview shows a single green highlighted image in the shape you would like to cut ...

Страница 61: ... the points on your image to which the knife will travel to cut the label Don t worry if your cut line isn t exactly in the right position or size We ll adjust that later At this point you are just looking for smooth lines that represent the correct shape 12 Note the difference in the preview when you increase and decrease the contrast ...

Страница 62: ...shape of your cut line The cut line will appear on top of your image as a red outline You ll see a trace layer appear in the layer window Contrast to High If contrast is too high you will lose the shape detection and end up with a rectangle cut ...

Страница 63: ...e so that you ll have a bleed With the cut line selected go to the Path menu and select Offset 15 On the Path Offset Window check the Inset Offset box and adjust the amount of offset For this image we chose 0 040 inches You ll see a preview of the new position of the cut line in black ...

Страница 64: ...he shortcut bar The print dialog will appear Make sure Print Cut is selected Click the Properties button to access the printer settings such as Print Quality Saturation and Color Matching For a full explanation of printer driver settings see section 5D Note Before printing we recommend clicking the print Preview Button described in section 4F ...

Страница 65: ... your page size for die cutting is always 4 25 It makes sense to fill up that page with as many labels across as you can Follow these steps to Duplicate images and cut across the page 1 Create your page size In this example we chose 4 25 x 4 25 You can choose a custom size to fit your labels In this case we wanted to choose a height that was able to accommodate 2 rows and two columns of 2 125 x 2 ...

Страница 66: ...ircle tool 5 Draw the circle close to the size of the images You don t have to be accurate on this step since we will be changing the size and position in the next step 6 Set the size to correspond to the actual cut label size you would like In this case we set the size to 2 x 2 so that we have a standard 1 16 bleed around the label Uncheck the Keep Proportions box This will make sure that no labe...

Страница 67: ...66 7 Center the cut line horizontally to the page 8 Using the arrow tool select both image and the cut line by drawing a box around them ...

Страница 68: ...he Object Menu Group This will ensure that the cut stays with the image and in the correct relative location while we move and duplicate the image in the next steps 10 Align the group image and cut the line to the upper left corner ...

Страница 69: ... the gaps to zero We already created a bleed so the cuts will not intersect or be too close to each other with zero gaps between prints 14 To print go to the File Menu and choose Print or click the Print Icon on the shortcut bar The print dialog will appear Make sure Print Cut is selected Click the Properties button to access the printer settings such as Print Quality Saturation and Color Matching...

Страница 70: ... 4F Print Preview Before you print you can click the Preview button to verify what objects will cut and what objects will print Check either Show Cut Lines or Show Printable to see what will print or cut ...

Страница 71: ...nd path set as an outline Set the color to any color that stands out against the design 3 Position the cut line exactly where you want it relative to the design The cut line should be the size of the final label The minimum over bleed should be 0 040 4 The workspace should match the full bleed of the design to be printed 5 Convert fonts to vector graphics by outlining them In Illustrator select th...

Страница 72: ...antages 5A Using BarTender for Pre Die Cut Printing UNINET recommends BarTender for printing only A fully functional Free Edition can be downloaded from the BarTender website https www bartendersoftware com free edition download When you open BarTender you will be given the choice to select an existing label or create a new one using a wizard Use the following instructions as a guide through the w...

Страница 73: ...72 2 Select Blank Template Click Next 3 Select IColor 250 Label Click Next ...

Страница 74: ...73 4 Select Specify Custom Settings Click Next 5 Set the page size width and height to match labels installed in the printer Click Next IMPORTANT Measure the label stock if you are unsure about the size ...

Страница 75: ...ur label shape This is typically Rounded Rectangle for standard labels from UNINET Click Next 7 Set all of the margins to zero You can adjust the left margin and Top of Form in the Label Alignment Section Click Next ...

Страница 76: ...75 8 For a standard label set Rows and Columns to 1 Click Next 9 Set Template Size to be the same as the label size Click Next ...

Страница 77: ...will be set and no picture will be added 11 Select Embedded Picture Click the File Button to browse to the location of your photo graphic file Set the Size Method to Stretch Note the preview to the right Click Next if you are satisfied with the layout of the photo or graphic Otherwise you may try one of the other Size Methods in the drop down menu ...

Страница 78: ...t is correct click Finish Your blank label or label with a background will be displayed You can edit any of these initial settings by going to the File Menu and selecting Page Setup Basic and advanced settings are available on the various tabs ...

Страница 79: ...e on your label Sample Text will appear Edit the text on screen or double click it to open up text settings to change font size and other settings Add Graphic Click the Image button Now click anywhere on your label An Image icon will appear Double click it to open up image settings and browse to the image graphic that you would like to insert Add Barcode Click the Barcode button Now click anywhere...

Страница 80: ...h the Page Label Size set in the driver If you have set your page size to 4 x 4 but your image is 5 x 3 the printer driver will automatically shrink your image to fit inside the 4 x 4 label The result is that the actual printed label is 4 x 2 4 Avoid this by setting your document size or image size to match the label size 3 Choose the right printing program Many different applications are capable ...

Страница 81: ...bel stock If you are printing and cutting using die cutting media you can adjust the position of the cut line to accomplish this Page Size Increase the page size width by 03 inches 1mm Increase the height by 03 inches 1mm If you are using BarTender simply change the size under the File Menu Page Setup If you are using other graphics programs you will need to change the page size in the application...

Страница 82: ...l was not perfectly aligned to begin with See Section 4D TOF Increase the Top of the Form by 0 4mm This will cause the printer to start printing before the label and ensure a fully printed label Some additional adjustments may be necessary if the label was not perfectly aligned to begin with See Section 4D Note It is best to over bleed as little as possible to avoid excess ink on the label backing...

Страница 83: ...ettings will apply to all new designs created in other programs after the preferences were changed Existing labels saved in BarTender will not be affected since the preferences are saved with the label To change these preferences you will have to change printer preferences through BarTender File Menu Printer Settings Click the Start button search for Printers Select Printers and Scanners Select th...

Страница 84: ...here are 4 levels of print quality in the driver The lower the quality the faster the print Quality 1 provides the fastest print available while Quality 4 provides the best quality It is recommended that you experiment with the different levels when designing your label to find a good balance between print quality and print speed Quality 2 is the default Color Matching There are several options av...

Страница 85: ...applied to the label Rotate 180 Degrees Set this setting to Yes to print with the labels right side up as they exit the printer Enable Bi di Set to Yes for the fastest print speed Requires an alignment print after every cartridge change Set to No for better quality print in some cases Launch UNINET IColor PrintHub This setting will open the UNINET IColor PrintHub application Details Select this se...

Страница 86: ...r driver and can be accessed through the Printer Scanners in Mac under Apple Icon System Preferences 1 Connect the printer via USB and turn on the power The IColor 250 Config Utility accesses most of the information it uses from the printer itself so the printer must be turned on and communicating for the program to open 2 Go to the Apple Icon System Preferences Printers and Scanners select the IC...

Страница 87: ...nd cards to 8 5 inches x 11 inches paper you probably are not familiar with an essential part of label printing Print Alignment Standard printers feed a sheet and start printing based on the start of the sheet They also prohibit printing to the edge of the sheet This is to avoid any need for alignment The IColor 250 senses the beginning of the label with an optical edge Because of this it is neces...

Страница 88: ...left or right Add to the current value to move the printed label to the right Subtract from the current value to move the printed label to the left After adjusting the value click the Set Offsets button to send the value to the printer Top of Form TOF This value moves the print start position up or down on the label Add to the current value to move the printed label down or toward the printer Subt...

Страница 89: ...s where the label waste matrix waste is left on the liner Black marks can also be used for irregular shaped labels circles larger than 4 6 inches or on any stock where the print starting position cannot be sensed using the label itself Continuous Sensor off If you have continuous stock with no die cut reflective mark or holes set the Sensor Type to Continuous This will turn off the stock sensor In...

Страница 90: ... the printer does not receive another print job within one second of the last print job in the queue You can use this feature to cut at the end of a multi copy job multi page job or multiple individual jobs in the queue Cut after button press This setting will cut after you press the Load Feed button on the printer This can be used after one label or an entire job This feature is useful if you wil...

Страница 91: ...hould be used only if you have a label rewinder attached Present after no activity This setting will present feed all printed labels past the tear off point at the end of a print job if the printer does not receive another print job within one second of the last print job in the queue You can use this feature to present at the end of a multi copy job a multi page job or multiple individual jobs in...

Страница 92: ... label layer on the top but not so deep that you cut through the backing paper liner When you cut through the backing paper your label will not peel cleaning off the backing paper You will also score the wear strip under the cutting knife which can cause the knife tip to break You will also need to replace the wear strip more often if you cut too deep By default the cutter is calibrated to work wi...

Страница 93: ... or decreased follow these steps 1 Print and Cut 1 copy and then attempt to peel the label from the liner 2 Check for tear If the label tears when you remove it you will need to increase the cut pressure Increase pressure in small increments to avoid overcompensating and cutting through the liner 3 Check the liner Once you peel up the label check the liner If it has been cut through decrease press...

Страница 94: ...rial on how to set up a label using Swift Publisher by Belight When you open the software for the first time you will be asked to choose a Template Select Desktop Publishing Blank Do not choose from the Labels category Choose either blank landscape or portrait Click Choose Download a Free Trial Here https www swiftpublisher com NOTE This section only applies to Pre Die Cut Stock For an explanation...

Страница 95: ...ases you will choose the same size for both However if you change the orientation of the label so you can see text graphics upright on screen but the actual print will be rotated you may need to choose the opposite setting for the label size For example Page Size 3 x 4 Label Size 4 x 3 Do not change the orientation as it will change the page size Orientation is set automatically depending on the p...

Страница 96: ...ll margins to zero This will allow you to create designs that completely fill the label 4 Add Text Barcodes shapes and images to your design Add Text Add Shapes Add Image Change Font Toggle Page Setup menu visibility ...

Страница 97: ...s example we will add an image that we created Click the Insert icon and choose Image from file NOTE You can also add images from the Backgrounds menu included with Swift Publisher Simply drag them to your template ...

Страница 98: ...ll the entire template if that is your intention Adjust the size by clicking the ruler icon in the Inspector with the image selected Check the Fit aspect ratio box and then type in your size Image Selected 7 Now center the image by clicking both the horizontal and vertical centering buttons ...

Страница 99: ...ou can see this is not correct by looking at the preview Always adjust the paper size to match the label stock size installed in the printer 10 In this case we can choose a preset size 4 inches x 3 inches to match the label size installed in the printer Dialog Box Choose Managed Custom Sizes if your label size is not listed ...

Страница 100: ...e Illustrator Photoshop or Acrobat Reader you will need to choose your label page size before you print If the label size you need to use is not already on the list of available page sizes you will need to create a new custom size on the print screen of the program you are using to print 1 Click the Paper Size drop down menu Choose Managed Custom Sizes ...

Страница 101: ... preset size list in this application and any other application on this Mac NOTE If you need to over bleed your image to achieve complete coverage of your label you would use this process to create a custom size that is 03 inches or less larger than your actual label stock For Example 4 03 inches x 3 03 inches for a 4 inches x 3 inches label Set Width and Height Rename Click plus sign to create a ...

Страница 102: ...fset to center the over bleed on the label If you over bleed by 03 inches you will need to decrease the Left Margin Offset by 4 This will center the page size increase so there is an over bleed on both the left and right sides TOF Increase the Top of Form by 4 This will cause the printer to start printing before the label and ensure a fully printed label NOTE It is best to over bleed as little as ...

Страница 103: ...er Settings Printer driver settings are accessible on the print window of any application right before you click print Printing from Swift Publisher Click on the Swift Publisher 5 dropdown menu and choose Printer Features ...

Страница 104: ...103 Printing from Preview Click on the Preview dropdown menu and choose Printer Features ...

Страница 105: ...104 Printing from Adobe Reader First click on Printer to access settings Click on the Layout dropdown menu and choose Printer Features 2 3 1 ...

Страница 106: ... this mode will look lighter than those printed in Photo mode Skin tones especially will look more natural in this mode NOTE Exact color matching of the printed labels to the screen may never be possible since there are factors that affect this out of the drivers control The surface of the label reacts with the ink in the cartridge to produce the color For this reason when printing the same image ...

Страница 107: ... begins You will need to change the Sensor Type setting in the driver preferences to Reflective if you switch to a label with a black mark on the back 3 Improper Label Gap Distance If the gap between labels is too small there will not be enough time for the gap to be detected See Label Specifications 4 Page Size is Bigger than Label Stock Size If the page size set in the driver is larger than the ...

Страница 108: ...nough to cover the label 7B Solving Cut Alignment Offset Problems Cut alignment is calibrated at the factory However it is possible that you may need to adjust the cut line position for certain prints cuts Adjust Cutter Offsets by opening UNINET IColor Print Hub Go to the Printer Settings tab Click on the Advanced Settings button Adjust cutter offsets according to the diagram below To move the cut...

Страница 109: ...ility knife to get under the strip to start it The wear strip is held in place with adhesive so there may be adhesive residue Clean off the adhesive with isopropyl alcohol Remove the liner from the new wear strip Press the strip into place Make sure it is fully seated in the recessed pocket Replacement Wear Strip Label Cut Dust Label cut dust can accumulate at any place along the cut path Paper me...

Страница 110: ... ink can accumulate around the sides of the chute Use a ridged flat edge such as a paring knife to scrape away the ink Ink Accumulation Wipers A software and firmware update may be required Run the update first If you notice that your print quality is poor at the beginning of a print but gets better as it continues to print your ink wipers may have accumulated a combination of cut dust and ink Che...

Страница 111: ... If you have the card you may follow the prompts to complete the cleaning procedure Otherwise you can purchase a pack of ten cleaning cards Email at sales icolorprint com for more information To manually perform a cleaning in UNINET IColor PrintHub go to the Printer Settings tab Advanced Settings Output Cutter Cleaning 1 3 2 ...

Страница 112: ...f a group of labels If the cutting wheel cuts through continuous adhesive backed paper such as IColor 250 digital die cutting media it can accumulate adhesive build up that will eventually cause cutting problems Recommend Cleaning Interval Every 2000 Labels UNINET IColor PrintHub software tracks this and will alert you when cleaning is necessary 2 Peel off the protective strip covering the adhesiv...

Страница 113: ...head nozzles may have dried If you are having print quality problems follow the steps below 1 Before moving on to the next step ensure that the ink level of the color cartridge is more than 10 If the ink level is lower than 10 replace the cartridge 2 Try cleaning the cartridge using the clean function in UNINET IColor PrintHub 3 Determine if printing is now acceptable by printing your image If the...

Страница 114: ...113 4 Prepare items needed for the procedure 5 Soak the paper towels in water for 5 seconds ...

Страница 115: ... Firmly tap the top of the cartridge three times to force the ink out d Wipe Drag the cartridge in the direction indicated e Repeat until all colors are seen on the paper towel After wiping the nozzles the paper towel should show all three colors If all three colors are present proceed to step 8 If the paper towel doesn t show all three colors then repeat step 7 If the paper towel still doesn t sh...

Страница 116: ...t technical support using one of the methods listed below Source Location UNINET IColor Knowledge Base www icolorprint com support Email Support sales icolorprint com Phone Support 1 631 590 1040 Mon Fri 9 a m 5 30 p m EST Dry excess water from cartridge Ensure cartridge contacts are completely dry Printer damage may result if cartridge contacts are not completely dry ...

Страница 117: ... 13mm 5 127mm MEDIA WIDTH Pre Die cut 2 125 54mm to 5 25 133mm Digital Die cut 4 75 121mm 4 25 Printable MAXIMUM PRINT LENGTH 12 305mm OPERATING SYSTEM Windows 7 8 or 10 64 bit Only Mac OS 10 11 or higher DIMENSIONS 13 6 W x 17 D x 9 5 H 345mm W x 432mm D x 242mm H WEIGHT 12 5 lbs 5 7kg POWER Input 100 240 VAC 50 60 Hz 60 watts Output 12 volt 5 amp WARRANTY One year parts and labor lifetime phone ...

Страница 118: ...n the equipment is operated in a commercial environment This equipment generates uses and can radiate radio frequency energy and if not installed and used per the instruction manual may cause harmful interference to radio communications Operation of this equipment in a residential area is likely to cause harmful interference in which case the user will be required to correct the interference at hi...

Отзывы: