background image

76   VIDEOSTUDIO USER GUIDE

Sending a movie by E-mail

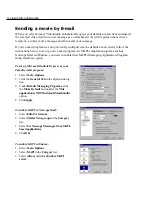
When you select E-mail, VideoStudio automatically opens your default e-mail client and inserts
the selected video clip into a new message as an attachment. As with regular e-mail, enter a
recipient, a subject and a message and then send your message.

If your e-mail program was not previously configured as the default e-mail client, follow the
instructions below to set up your e-mail program. In MAPI-compliant programs such as
Netscape Mail and Eudora, you need to enable their MAPI (Messaging Application Program-
ming Interface) option.

To set up Microsoft Outlook Express as your
default e-mail program:

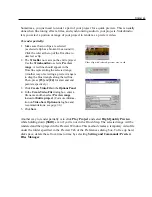
1. Select Tools: Options.
2. Click the General Tab in the Options dialog

box.

3. Under Default Messaging Programs, click

the Make Default button after the This
application is NOT the default Mail handler
option.

4. Click Apply.

To enable MAPI in Netscape Mail:

1. Select Edit: Preferences.
2. Select Mail & Newsgroups in the Category

list.

3. Select Use Netscape Messenger from MAPI-

based applications.

4. Click OK.

To enable MAPI in Eudora:

1. Select Tools: Options.
2. Select MAPI in the Category list.
3. Select Always under Use Eudora MAPI

server.

Содержание DLX-180

Страница 1: ...User Guide Ulead Systems Inc November 2001 ...

Страница 2: ...Microsystems Ulead Systems Inc Ulead the Ulead logo and Ulead VideoStudio are trademarks of Ulead Systems Inc All other product names and any registered and unregistered trademarks mentioned in this manual are used for identification purposes only and remain the exclusive property of their respective owners Sample files Files provided as samples on the program CD can be used for personal demonstra...

Страница 3: ...ements 12 Hardware checkup before using VideoStudio 13 DV IEEE 1394 capture card 13 Analog capture card 15 USB port 15 Installing and running VideoStudio 16 Configuring VideoStudio 17 DV IEEE 1394 capture card 17 Analog capture card 18 USB input device 18 Getting around VideoStudio 19 The Library 23 Library Manager 24 Steps to create your movie 25 Start 27 Creating a new project 27 Selecting a tem...

Страница 4: ...Preview Files Manager 42 Inserting a clip into the Timeline 42 Trimming a clip 43 Working with clips 44 Capturing still images in the Storyboard Step 46 Using color clips 46 Using video filters 47 Effect 49 Creating effects 49 Customizing effects 50 Overlay 51 Inserting video image in the Overlay track 51 Customizing overlays 52 Title 53 Creating text titles 54 Rolling scrolling 56 Fading in out 5...

Страница 5: ...1 Creating an audio file 71 Exporting your movie 72 Burning DVD VCD SVCD 72 Compressing video for the Web 74 Putting a movie on the Web 74 Posting your video on a Web page 75 Sending a movie by E mail 76 Electronic greeting cards 77 Recording back to a DV camcorder 78 Shortcuts 79 Need more help 80 Glossary 81 Index 83 ...

Страница 6: ...complex process of video editing into a simple and fun affair An introduction to digital video Tens of millions of camcorders and personal computers have been sold around the world and video capture cards serve as the connec tion between the two These cards allow the transfer of video data from the camcorder to the computer hard disk The introduction of the IEEE 1394 interface technology also know...

Страница 7: ...ly modifications transitions and special effects to specific segments or even to a single frame And of course portability is a major advan tage of digital video as DV camcorders and tapes are more compact and lightweight to carry around compared to their analog counterparts Analog to digital VideoStudio also supports analog video to allow you to convert video from old High 8 8 mm VHS and S VHS tap...

Страница 8: ...hich you can burn to a CD and play back using a regular CD player Popularly known as the VCD format MPEG 1 enables more than 70 minutes of good quality video and audio to be stored on a single CD ROM disc MPEG 2 A standard for coding video at higher data rates and in an interlaced format MPEG 2 allows multi channel sound recording and enables a resolution four times greater than MPEG 1 It is optim...

Страница 9: ...ckground music from your favorite CDs in formats such as WAV and MP3 All these can be done using drag and drop cut and paste or select and apply operations All the tracks in your movie are then orga nized into a video project file VSP which contains all the video and audio information on how your movie is put together When everything is all set to go your computer collects all information needed t...

Страница 10: ...VD Scene detection while capturing to multiple files Manage your files better During capture break your video into several files automatically based on changes in recording date and time This applies to DV format video SMPTE time code editing For editing jobs that require precise timing such as animation the SMPTE Society for Motion Picture and Television Engineers time code lets you work faster a...

Страница 11: ...o you can create animated logos cartoon clips over live footage and a lot of other interesting effects QuickTime streaming Stream your video over the Web in QuickTime for full frame 640 x 480 full motion 30 fps quality QuickTime is a cross platform standard that supports many file formats and codecs Instant preview Preview your video without having to create a temporary file Select Instant preview...

Страница 12: ...a bigger hard drive higher RAM and faster chip go with it Just remember that technology is changing so rapidly and by evaluating first the kind of video editing projects you plan to do you can better determine the setup that works best for you Following are the system requirements for setting up VideoStudio Microsoft Windows 98 Windows 98 SE Windows Me Windows 2000 Windows XP 450 MHz above CPU spe...

Страница 13: ... A device list on the Device Manager in the Systems Properties dialog box Windows Me Windows 98 Windows 98 supports the Texas Instruments DV driver only but does not provide it Search the drivers if bundled that come with the IEEE 1394 card Check that the following devices are working properly 1394 Bus Controller Sound video and game controllers 1394 camcorder Windows 98 Second Edition Windows 200...

Страница 14: ...s IEEE 802 11 home network attach an IEEE 1394 enabled laptop to a Windows XP based PC and instantly access all other connected devices To run VideoStudio under Windows XP check that the following devices are working properly 1394 Bus Controller 61883 Device Class AVC Device Class Brand name DV Camcorder The brand name depends on the DV camcorder con nected to the IEEE interface card For Windows 9...

Страница 15: ...operly Sound video and game controllers USB port The Universal Serial Bus USB connector lets you attach a wide array of devices to your computer quickly and easily These devices include digital cameras Webcams and just about every computer peripheral Since Windows 98 2000 Me and XP fully support USB installing the driver for this device is quick and easy too Check that the following device is work...

Страница 16: ...up icon Note Skip this step if you already have newer versions of the above supporting applications installed in your PC To run VideoStudio Double click the VideoStudio icon on your Windows desktop OR Select the VideoStudio icon from the VideoStudio program group on the Windows Start menu Installing and running VideoStudio VideoStudio installation screen Please install also the following applicati...

Страница 17: ...ck Capture Step and check if your device is displayed in the Options Panel under Driver Note When your camcorder is in Record mode usually named CAMERA or MOVIE you can still capture real time video directly in VideoStudio even if there s no video tape inserted Configuring VideoStudio Camcorders VCRs and VCD DVD players are common sources of video footage To ensure a smooth interaction between the...

Страница 18: ...if your device is displayed in the Options Panel under Driver Note If your capture device supports multiple video sources the Input Source dialog box allows you to select your desired video source such as Composite Tuner or S Video Likewise if you have multiple audio sources this dialog box allows you to select your desired audio source USB input device To check the setup of VideoStudio for USB in...

Страница 19: ...iting and cropping video clips Timeline Represents the period of time that a clip appears in your movie Library Stores and organizes all of your media clips Load media button Click to add video or audio files to the Library Folder button Click to switch between various library folders Preview Window Shows the current clip video filter effect or title Options Panel Contains controls buttons and oth...

Страница 20: ... to trim a clip Time units Represents the timing of clips in hours minutes seconds and milliseconds Project scroll controls Use the left and right buttons or grab the Scroll Bar to move around your project Insert media files Displays a menu allowing you to place video audio or image clips directly on the project Storyboard and Timeline Click tabs to switch between Storyboard Mode and Timeline Mode...

Страница 21: ...e project You can also select a clip and press the Delete key on your keyboard Context Sensitive Help This button activates the Context sensitive help feature After you click on it your cursor changes to a question mark Move over an object in the program and click again Undo and Redo Any changes you make that you don t like can be instantly fixed or undone by clicking the left button And if you ch...

Страница 22: ...video or audio clip Hold down the Shift to play only the selected duration between Mark in and Mark out on the Trim Bar During playback click the button again to stop System Volume Click and drag the slider to adjust the volume of a clip s audio output or music This adjusts the volume of your speakers at the same time Play Project Provides options to select between Instant Preview or High Quality ...

Страница 23: ...uch as Title or Audio Use your mouse to drag and drop single or multiple clips from the Library to its destination In the Storyboard Step you can drag and drop clips simultaneously from the Library to the Timeline whether you are in Timeline Mode or Storyboard Mode The Library The Library is a storage depot for everything you need to create a movie video clips video filters audio clips still image...

Страница 24: ...Manager organizes your custom Library folders These folders help you store and manage all kinds of media files To use the Library Manager 1 Click Settings and Commands then select Library Manager You can also click the Folder arrow 2 Select a media type from the Available custom folder list 3 Click New to display the New custom folder dialog box and create a new folder Enter a name under Folder na...

Страница 25: ...t is possible to have a number of different projects using the same clips The Start Step is for creating a new project file or opening an existing one This is the very first and required step whenever you want to work in VideoStudio See page 27 Once a project is opened in VideoStudio video can be recorded directly to your computer s hard disk in the Capture Step Footage from a videotape can be cap...

Страница 26: ... allows you to superimpose one clip over another as an added effect to your movie On top of what you can do using Effects you can use Overlay feature to add a professional touch to your work See page 51 No movie would be complete without opening and closing titles You can design and animate your text title in any Windows True Type font color and size or choose from various presets in the Library S...

Страница 27: ...box When you capture or insert your first video clip into the project VideoStudio automati cally checks the properties of the clip and your project If properties such as file format frame size etc are not identical VideoStudio displays a message and gives you the option to have the project settings auto matically adjusted to match the clip s proper ties Changing the project settings allows VideoSt...

Страница 28: ... a template from Available project templates which includes all templates you created previously See page 29 Select the one that most closely matches the type of movie you want to create 4 ClickOK To open an existing project 1 Click Open Project or the Start menu arrow and select Open Project 2 Select the project file VSP you want to open If you are not sure where the file is use Browse and then c...

Страница 29: ... s settings VideoStudio allows you to reuse the settings of previously created video files This makes it easier to create several projects with exactly the same properties Template from an existing video file allows you to create a template based on the settings of previously created AVI and MPEG video files Previous template reuses the settings of the last project template used Video is displayed...

Страница 30: ...ates with your custom settings This means you can set precise values for frame rate frame size video data rate audio bit rate compres sion and other attributes To create a new template 1 ClickSettingsandCommands Templates Manager to display the Templates Manager dialog box 2 Then click New to display the New Template dialog box 3 Select a file format and enter a template name and its description T...

Страница 31: ...er device control correct timecode on the DV tape is a must To do this before shooting your video use the standard playback SP mode and shoot a blank video for example leaving the lens cover on while recording without interruption from start to end of a tape Capture Video Transfers video from your source to your hard disk Capture Image Captures a single frame as a still image from your source to y...

Страница 32: ...pture Tab and clear Enable pressing OK to capture Capturing DV video To capture DV video 1 Connect your camcorder to the IEEE 1394 capture card Turn it on and set it to Play or VTR VCR mode Check your device manual for specific instructions 2 Open a new project 3 In the Capture Step click Play in Navigator 4 When you get to the part of the video you want to record click Capture Video on the Captur...

Страница 33: ...capture and set other attributes If you are capturing from a USB device or analog source also select Video format from the Options menu to specify the desired frame size 5 Click Capture Video to start capturing 6 Click Capture Video again or press Esc to stop capturing Note This feature is only available if the analog capture card supports RGB 24 or YUV capture Please see the manual of your captur...

Страница 34: ... times and you want to separate them into different clips or files You can divide footage during capture or after being captured Note This splits the footage into multiple files based on the date and time of recording The captured files are inserted into the Video Track To use Split by Scene on captured DV AVI files 1 Load the DV formatted AVI file into the Library 2 Right click its thumbnail and ...

Страница 35: ... the captured file size Seamless capture is not available in VFW Video For Windows capture Note VideoStudio automatically detects your file system and performs seamless capture only in a FAT 32 partition file system The NTFS system does not have the 4GB limitation Capturing still images In addition to video VideoStudio also allows you to capture still images The image format can be BMP or JPEG and...

Страница 36: ...ote Batch capturing can be achieved only when you are using a DV tape and the IEEE 1394 card for computer connection Capture Video Captures the listed tasks all at once Play Selected Tasks Allows you to preview selected tasks before capturing Modify a task Changes the timecode of either the starting or the ending point Deletes all tasks Removes all tasks on the list Tasks list Displays all the tas...

Страница 37: ...rt of the video you want to record press F3 Then press F4 to mark out the task 5 Continue to play the video and then repeat step 4 as needed 6 Click Play Selected Tasks to view the selected segments on tape Click Modify a task to change a marked segment You can also double click a task and enter a new timecode 7 ClickCaptureVideo 8 Batch capture starts based on all or selected if any tasks The pro...

Страница 38: ...ect rolling Each picture represents an event in your movie an event being a video clip or a transition Thumbnails show at a glance the chronologi cal order of events in your project You can drag and drop clips to insert and arrange them Transition effects can be inserted between clips Selected clips can be trimmed in the Preview Window See page 43 for more information on trimming Click Minimize to...

Страница 39: ...ou precise control over trimming and editing Use the Zoom controls or click the Ruler menu to adjust the ruler units Click Fit in window to see the entire project displayed on one screen If you have a mouse with a scroll button the scroll button can be used to scroll through the timeline Tracks The Timeline is divided horizontally into the Video Overlay Title Voice and Music Tracks To switch to di...

Страница 40: ...r an arrow button for modification Fade in out Gradually increases decreases the volume of the clip for a smooth transition Click Settings and Commands Preferences to set the fade in fade out duration Export Displays a drop down menu that allows you to output your clip to Ulead DVD Wizard or as a Web page E mail attach ment DV recording or Greeting Card Video mark in out Displays the starting endi...

Страница 41: ...The first allows you to preview changes in your project without the need to create a temporary preview file The latter renders a preview file and provides a quick preview right after Play Project in Navigator For faster previews you may choose to play only a part of your project The selected range of frames to preview is referred to as the preview area and it is marked as a red bar in the Ruler Pa...

Страница 42: ...w files and not the actual VSP project 3 Click Delete All to remove all temporary preview files of all VSP projects 4 Click Close Insert Media Files Inserting a clip into the Timeline To add video clips to the Timeline you can use drag and drop or browse and select depending on where your clips are located To insert a video clip into the Timeline Select a clip in the Library and drag and drop it t...

Страница 43: ... the Timeline to select it 2 Drag the yellow Trim handles on either side of the clip to change its length The Preview Window reflects the position of the Trim handle in the clip 3 To trim frame by frame refer to the Video mark in out timecodes in the Options Panel These represent precise positions of frames in the Timeline 4 Other clips in your project automatically reposition themselves according...

Страница 44: ... Enter a length of time for the clip Mark in shows the timecode representing the first frame of the clip and Mark out shows the timecode for the last frame 4 ClickApply Note Changes made in the Video duration box only affect the Mark out point The Mark in point remains unchanged Video duration Displays and sets the length of time of the clip Arrow buttons Use these to fine tune your trimming Video...

Страница 45: ...ntly when you make changes you may wish to make a permanent change to the clip and save the edited file Again VideoStudio gives you a margin of safety in that it saves the trimmed video to a new file and does not alter the original file You can press Delete or drag the thumbnail to remove it from the Library or even remove the original file to recover disk space To break a clip into multiple files...

Страница 46: ...ned Using color clips Color clips are simply solid colored backgrounds that are useful for titles and transitions For example black clips can be used for an effective fade to black transition Place your opening credits over the top of the color clip and then use a cross fade effect to create smooth transition into your movie See page 49 You can insert a new color to the Color Library and control i...

Страница 47: ... in a clip By specifying the different start and end values you can control the intensity and speed of a filter as it moves from the first frame to the last To apply a video filter to a clip in the Timeline 1 Select a video clip in the Timeline 2 Select the Video Filter folder in the Library or click the Storyboard menu arrow and select Video Filter 3 Click a video filter in the Library to apply t...

Страница 48: ...stomization Available options depend on the selected filter 5 You may also preview the result through Navigator If you want to change the filter click another thumbnail Shift up down video filter buttons Add to Timeline button Advanced options button Clicking Options displays a dialog box which allows you to fine tune your filter Advanced options can be applied to the first and the last frames onl...

Страница 49: ...ons Panel to suit a specific purpose VideoStudio studio allows you to mix and match a variety of preset effects while editing your project Effective use of this feature can add a professional touch to your work Creating effects The Library provides a wide range of preset transitions from cross fades to explosions We will deal with the details of these effects later For now you just need a project ...

Страница 50: ...ration by using the yellow Trim handles in the Timeline Border Color Select a size for the border in pixels on the left and choose a color by clicking the color box Soft edge Soft edge applies to the border of the effect to blend two clips together more smoothly The soft edge buttons are unavailable if there no border on the clip Direction These buttons control the direction of motion in the trans...

Страница 51: ... in the Storyboard Track You can drag and drop clips and images color clips are not available in Overlay to arrange their order You can also apply a motion style effect that controls the way the overlay clip blends with the clips in the Video Track To insert a clip to the Overlay Track 1 Select Video Image in the Folder list or click Load video Load image to browse and select a file 2 Drag and dro...

Страница 52: ...e in fade out duration Motion style Click the arrow to display all available motion styles Choosing Static superimposes the clip over the storyboard clip Position Sets the placement of the video clip image with reference to the window You can choose from 9 set positions or adjust the clip image manually Zoom ratio Magnifies or reduces the video clip image accordingly Click the arrow or enter a val...

Страница 53: ...g one Reset Reverts to original settings Apply Applies new settings to the title clip Character color Sets the color of the selected text Border Shadow Applies or removes text border and shadow effects Title While a picture may be worth a thousand words text effects in your video productions add clarity and comprehensibility Besides what production quality movie would be complete without opening a...

Страница 54: ...ou cannot create a new title over an existing title clip 3 Type in your title in the Preview Window and use the style buttons to customize fonts Options are available in the Editing Tab 4 To add effects to your title switch to the Animation Tab Then select an effect from the Type drop down list and choose the desired animation options in the Options Panel 5 ClickAdd Animation Tab Each option here ...

Страница 55: ...Notes Once a title clip has been inserted onto the Timeline you can adjust its duration by either dragging the handles or entering a duration value on the Editing Tab To see how the title appears on the underlying video clip select the title clip and then click Play Clip or drag the Preview Bar handle The Library can also be used to store title clips To add a title clip to the Library drag it from...

Страница 56: ...etermine whether the whole title Text moves or parts of the title Char Word or Line scroll one at a time To add a title from the Library 1 Select Title from the Folder list Then drag a preset title thumbnail from the Library into the Title Track 2 Click the Preview Window to edit the selected preset text title Use the Editing Tab to enter new text or modify font styles Use the Animation Tab to add...

Страница 57: ...d of displaying your titles is to fade your text in from invisible to crisp and clear and then back to invisible again This works especially well for opening credits with a slow fade or as captions with a quicker fade To create fading titles 1 Select a text title or create a new one 2 On the Animation Tab in the Options Panel select Fade from the Type drop down list 3 Select a fading option Cross ...

Страница 58: ...l clips click Load audio Incidentally the VideoStudio CD also comes with several audio clips ready for you to use These clips are mostly short sound effects clips and can be very humorous when used in your movies or can be used to create additional ambience Details of the Timeline showing the two audio tracks with WAV and MP3 file clips Insert media files Voice Track Music Track Load audio Note Yo...

Страница 59: ...ecording process Clicking it again stops recording Record with Preview Plays the video clip when you click Record This allows you to accurately synchronize the voiceover with the video Duration Sets the length of time of the music clip You can also modify the duration by moving the two yellow Trim handles on the Timeline Video mark in out Displays the start end point of an audio clip after trimmin...

Страница 60: ...joy it better This technique is often used in television documentaries and news stories Before recording a narration always check the audio settings in Windows For example in Windows 98 click Start Programs Accessories Entertainment Volume Control In the Volume Control dialog box click Options Properties In the Properties dialog box select Recording and in the volume controls list select Microphon...

Страница 61: ...movie you first have to record the music you want with your computer This creates a WAV file which is the digital audio data from your CD VideoStudio now supports a number of additional file formats including MP3 MP3s are an exciting new way to share music over the Internet and there are thousands of songs available for you to download Recording audio from a CD VideoStudio s audio versatility allo...

Страница 62: ...ough the Options Panel Customizing background music You can drag and drop audio clips to move them or add them to the Library From the Timeline a selected audio clip has two yellow handles that can be used for trimming Again just grab a handle and drag it to shorten a clip either from the beginning or end To trim an audio clip 1 Click an audio clip in the Library or in the Timeline 2 Click and dra...

Страница 63: ...is probably easiest to just delete the clip from one of the audio tracks Any changes made with this control applies to the entire clip Fade Background music that starts and ends gradually is commonly used to create smooth transi tions If you record an entire musical piece this is probably not a problem since most of them have a beginning and ending However if you only want to use a portion of a mu...

Страница 64: ...he Finish Step without even opening a project That is if you simply want to save a project file which you can work on later Creating and saving a video file Click Play Project and select High Quality Preview to save or render your project at any time But if you want to save your project as a new file with the same properties you need to click the Finish Step and click Save Project in the Options P...

Страница 65: ... way of selecting a preview range is to drag the blue triangle along the red line Then press F3 and F4 for start and end points respectively 3 Click Create Video File in the Options Panel 4 In the Create Video File dialog box enter a file name and then select Preview range instead of Entire project For more informa tion on Video Save Options dialog box and recommendations see page 66 5 ClickSave A...

Страница 66: ...o Save Options dialog box where you can set your preferences When selecting an option always remember to watch out for possible incompatibility prob lems Available options depend on your file format The following can help you choose options and set values for files in AVI format Note You can also click Help for further information in the Video Save Options dialog box Video Save Options Ulead Video...

Страница 67: ...e the same settings AVI Tab Under Compression choose the codec or type of compression software you will use to create your video All digital video is com pressed in some way and video clips cap tured to your computer are already using some kind of codec Check your captured clip s properties and if possible use the same settings Some video capture cards record uncompressed video in which case you s...

Страница 68: ...e AVI Tab to specify a specific medium for playback If you have a Target playback device in mind right now select it from the list Data rate is calculated in kilobytes per second KBps This is the speed at which your computer can move data to and from CD ROMs and disk drives You can set the Tolerance to let the data vary a little otherwise VideoStudio will stop and warn you if the data rate is too ...

Страница 69: ...e Finish Step 2 Click Create Video File arrow to display a submenu of file types 3 Choose NTSC VCD or PAL VCD depending on your TV standard The Create Video File dialog box is displayed Enter a file name and click Save to render your movie Note MPEG 1 is a highly compressed format that maintains very good quality Once the file is created you can use Ulead DVD Wizard to write burn the CD on your CD...

Страница 70: ... your camcorder to the MPEG 2 format perform frame accurate editing and create a final movie in the same format You can further use the Ulead DVD Wizard to create a DVD that can be played directly on a home DVD player or your PC s DVD ROM To create an MPEG 2 file for DVD 1 Open your project and click the Finish Step 2 Click Create Video File arrow to display a submenu of file types 3 Choose NTSC D...

Страница 71: ...ay the Audio Save Options dialog box 4 Fine tune your audio attributes and click OK 5 Enter a file name and click Save Project Playback Project Playback is used to output your entire project or part of it to a DV camcorder or a video monitor This also gives you a full screen preview of your movie either on a PC or TV monitor Click Project Playback in the Options Panel of the Finish Step Creating a...

Страница 72: ...n Exporting your movie VideoStudio allows you to export your video files in various media formats You can output your work in formats like DVD VCD SVCD send it as an e mail attachment upload it to your Web page convert it to an electronic greeting card and even record it back to your camcorder or VCR Exporting the output can be done by clicking Export in either the Storyboard Step or Finish Step B...

Страница 73: ...le you want to use for your introduction video in the Add Introduction Video dialog box Click Next 5 Select a preset template layout in the Select Menu Template dialog box You can also customize the background and enter text captions Click Next 6 Use the remote control to observe the behavior of your DVD VCD SVCD project in the Playback Simulation dialog box Click Next 7 Select the folder location...

Страница 74: ...f motion or action are not well suited to this medium Compressing video for the Web When putting video on the Web you have to consider that it is going to be played on someone else s computer It is therefore advisable to use codecs found on many computers Cinepak and Indeo are good choices MPEG 1 is the de facto format for video on the Web It is currently used in VCDs and provides high compression...

Страница 75: ...ive links to the associated movie file To export your video on a Web page 1 Select a video clip from the Library If you want to use a project make sure you have already rendered it using Create Video File 2 Click the Storyboard Step or Finish Step In the Storyboard Step click the Video Tab in the Options Panel Then click Export and select Web Page In the Finish Step click Export in the Options Pan...

Страница 76: ... Mail and Eudora you need to enable their MAPI Messaging Application Program ming Interface option To set up Microsoft Outlook Express as your default e mail program 1 Select Tools Options 2 Click the General Tab in the Options dialog box 3 Under Default Messaging Programs click the Make Default button after the This application is NOT the default Mail handler option 4 ClickApply To enable MAPI in...

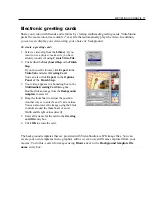
Страница 77: ... can also click Export in the Options Panel of the Finish Step 3 Your video appears in a bounding box in the Multimedia Greeting Card dialog box Double click an image from the Background template to select it 4 Drag the thumbnail to adjust the position Another way is to enter X and Y axis values You can also resize the image using the black controls around the thumbnail or enter Width and Height v...

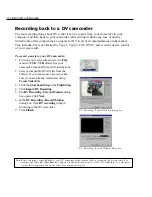
Страница 78: ... your camcorder s manual for specific instructions 2 Select a compatible DV AVI file from the Library If you want to use a project make sure you have already rendered it using Create Video File 3 Click the Storyboard Stepor the Finish Step 4 ClickExport DVRecording 5 The DV Recording Preview Window dialog box opens Click Next 6 In the DV Recording Record Window dialog box click DV recording to beg...

Страница 79: ...Library You can only paste a clip to a media type library similar to it e g image clip to image library Pressing Ctrl while selecting clips Allows you to select multiple clips Double clicking on Track Invokes the corresponding step Double clicking on Clip Invokes the corresponding step and selects the clip Pressing Shift while selecting clips Allows you to select multiple clips in the same track o...

Страница 80: ...more help For technical support on VideoStudio visit the following Web sites America http support ulead com Germany http www ulead de tech tech htm Japan http www ulead co jp tech tech htm Taiwan http www ulead com tw tech tech htm ...

Страница 81: ...ver A software program that controls the connection between a specific device and a computer Effect In VideoStudio an effect is a special computer generated transition between two video clips Frame A single image in a movie Frame Rate The number of frames per second in a video NTSC video is commonly 29 97 frames per second fps but smaller video files can be created on the computer by using lower f...

Страница 82: ...CDs are great sources for music clips Storyboard A storyboard is a visual representation of your movie Individual clips are represented as image thumbnails on the timeline Streaming This is a relatively new Internet technology that allows large files to be played as they are being downloaded Streaming is commonly used for large video and audio files Template A work pattern in a software program It...

Страница 83: ...udio clips 58 Color clips 46 Overlay clips 51 Title clips 53 Transition effects 49 Video clips 42 Closing credits 53 56 Codec 67 Color clips 46 Configuring Ulead VideoStudio 17 Create Video File 64 Creating a color clip 46 Creating audio files 71 Creating CDs DVD VCD SVCD 71 72 Creating video files 64 MPEG 1 for VCD 69 MPEG 2 for DVD 70 Video Save Options 66 D Data rate 68 Deleting clips in Librar...

Страница 84: ...pening and closing credits 53 Options Panel Audio Step Music Tab 59 Voiceover Tab 59 Capture Step Batch Capture Tab 36 Capture Settings Tab 31 Effect Step 50 Overlay Step Editing Tab 52 Motion Tab 52 Storyboard Step Filters Tab 48 Video Tab 40 Title Step Animation Tab 54 Editing Tab 53 Overlay clips Customizing overlays 52 Inserting video image clip 51 Overlay Step 26 51 P Play Project 41 Preview ...

Страница 85: ...ents 12 T Templates Manager 30 Timeline 39 Title safe area 55 Title Step 26 53 Titles Adding a title 54 Animated titles 56 Autotrim 58 Fade in out 57 Modifying a title 55 Vertical titles 55 Tolerance 68 Tracks 39 Transition effects Creating effects 49 Customizing effects 50 Trim Bar 43 Trimming audio clips 62 Trimming video clips From the Timeline 43 In the Options Panel 44 Save Trimmed Video 45 W...

Отзывы: