


920.1020.12
31
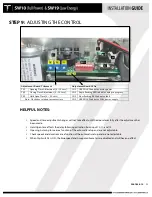
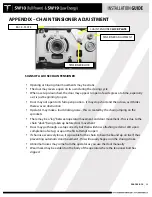
ADJUSTING THE CHAIN TENSIONER
•
1. At the tensioner pivot point, loosen the lock nut at the Tensioner Adjustment.
•
2. At tensioner block, loosen the Allen-head screw (do not remove it).
•
3. Insert 4mm Allen wrench into the tensioner adjustment and apply tension counter
clockwise to increase tension on the chain.
•
4. Rotate chain tensioner lock plate clockwise so the plate is pressing against the back plate
•
5. Re-torque the tensioner block screw while maintaining chain tension - These bolts are
generally torqued to around 3.7ft lbs.
•
6. Re-tighten the lock nut at the pivot point.
•
7. When complete, double check physical stops for 0 and 90 degree door position - adjust if
necessary.
•
8. Launch a new setup at the control and ensure everything works ok. Any time the stroke
of the operator has changed, a new setup will be required.
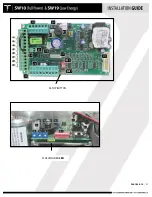
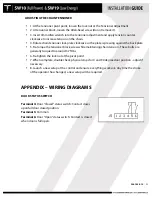
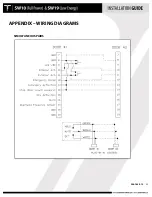
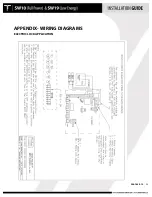
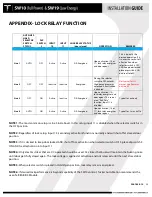
APPENDIX – WIRING DIAGRAMS
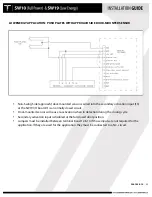
DOOR STATUS SWITCH
Terminal 4:
Door “Closed” status switch: Contact closes
upon full door closed position.
Terminal 5:
Common
Terminal 6:
Door “Open” status switch: Contact is closed
when door is full open.
Содержание SW10
Страница 11: ...920 1020 12 11 PUSH ARM ...
Страница 27: ...920 1020 12 27 SETUP BUTTON FLASHING RED LED ...
Страница 33: ...920 1020 12 33 APPENDIX WIRING DIAGRAMS SIMULTANEOUS PAIRS ...
Страница 35: ...920 1020 12 35 APPENDIX WIRING DIAGRAMS ELECTRIC LOCK APPLICATION ...
Страница 36: ...920 1020 12 36 APPENDIX WIRING DIAGRAMS SW10 PAIR WITH BEA PARALLAX SYSTEM ...
Страница 37: ...920 1020 12 37 APPENDIX WIRING DIAGRAMS SW10 Single Pair WIth BEA LZR Microscan Sensors ...
Страница 38: ...920 1020 12 38 APPENDIX WIRING DIAGRAMS SW10 Single With Push Plates Torpedo Sensors For Secondary Activation ...
Страница 42: ...920 1020 12 42 APPENDIX TUCKER LOGO ...


