


920.1020.12
16
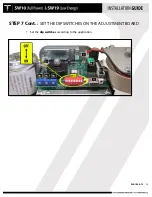
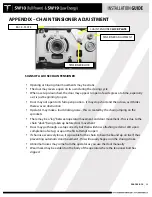
STEP 6:
ADJUSTING THE MECHANICAL STOPS
•
CAUTION – DO NOT REMOVE THE STOPS
•
IMPORTANT - This step may be optional depending on your application
•
The mechanical stops are located on the top or bottom of the operator, depending on the
hand of the door.
•
The opening direction is always counter-clockwise rotation when viewed as shown above
•
Loosen the bolts on the desired stop (do not remove bolts) and move to the desired
position
•
Re-tighten bolts securely and test the door travel stroke
Содержание SW10
Страница 11: ...920 1020 12 11 PUSH ARM ...
Страница 27: ...920 1020 12 27 SETUP BUTTON FLASHING RED LED ...
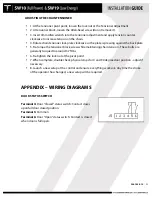
Страница 33: ...920 1020 12 33 APPENDIX WIRING DIAGRAMS SIMULTANEOUS PAIRS ...
Страница 35: ...920 1020 12 35 APPENDIX WIRING DIAGRAMS ELECTRIC LOCK APPLICATION ...
Страница 36: ...920 1020 12 36 APPENDIX WIRING DIAGRAMS SW10 PAIR WITH BEA PARALLAX SYSTEM ...
Страница 37: ...920 1020 12 37 APPENDIX WIRING DIAGRAMS SW10 Single Pair WIth BEA LZR Microscan Sensors ...
Страница 38: ...920 1020 12 38 APPENDIX WIRING DIAGRAMS SW10 Single With Push Plates Torpedo Sensors For Secondary Activation ...
Страница 42: ...920 1020 12 42 APPENDIX TUCKER LOGO ...


