TAC-7X
MANUAL
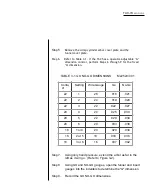
Step 10. Verify that these dimensions comply with specifications.
Step 11. Install the crimp cylinder arbor cover plate removed in Step 4
and 5.
Step 12. Connect the air supply to the sleeve valve.
Step 13. Set the power on-Off switch to on.
Step 14. Close the the sleeve valve.
CAUTION
KEEP HANDS CLEAR OF THE TRANSFER MECHANISM
DURING OPERATION AND WHEN CLOSING THE SLEEVE
VALVE.
Step 15. Verify a contact is seated in the transfer tip and that the transfer
tip is in the ready-to-crimp position.
Step 16. Using a conductor of proper material and gauge, strip it to the
proper strip length. If applicable, set the operator adjustable
"G" dimension control to the proper setting.
Step 17. While being careful that all conductor strands enter the funnel
without bending back, insert the conductor into the funnel until
it bottoms out.
Step 18. When the conductor bottoms out, the crimp cycle will
initiate.
Step 19. When the crimping cycle is complete, the funnel will open; at
this time, remove the conductor.
When the funnel opens, remove the conductor smoothly by
simply pulling it towards yourself.
Step 20. Inspect the crimp per required specifications.
Содержание TAC-7AE
Страница 6: ...Figure 1 1 TAC 7X Front View ...
Страница 8: ... Figure 1 2 Wire Insertion Through Funnel ...
Страница 12: ...Figure2 1 Pneumatic Hook Up ...
Страница 14: ... Fiqure 2 4 Track Drop Tube Escapement ESCAPEMENT SYSTEM _ _ _ BR ASSEMBL I TRA ...
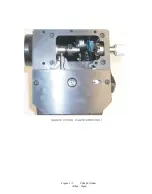
Страница 18: ... ARBOR COVER PLA TE REMOVED Figure 3 1 Crimp Cylinder Arbor Open ...
Страница 20: ... ARBOR COVER PLAT E REMOVED Figure 3 2 Crimp Cylinder Arbor Closed ...
Страница 23: ... Crimp Inspection Points Improper Crimps ...
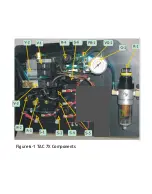
Страница 33: ...Figure 6 1 TAC 7X Components ...
Страница 34: ...Figure 6 2 Control Box Components Figure 6 2 TAC 7X Components Right View ...
Страница 35: ...PLC Controller Switching Power Supply Vibratory Feed Controller Figure 6 3 TAC 7X Components Left View ...
Страница 37: ...Figure 6 3 Contact Track Feed Air Adjustments ...
Страница 42: ... Figure 6 4 Indenter Plate Removal ...
Страница 43: ...HOSE CLAMP CAREFULL Y REMOVE Figure 6 5 Indenter Replacement ...
Страница 47: ...Figure 6 6 Indenter Adjustment ...
Страница 52: ...TAC 7X Pneumatic Diagram ...


