background image


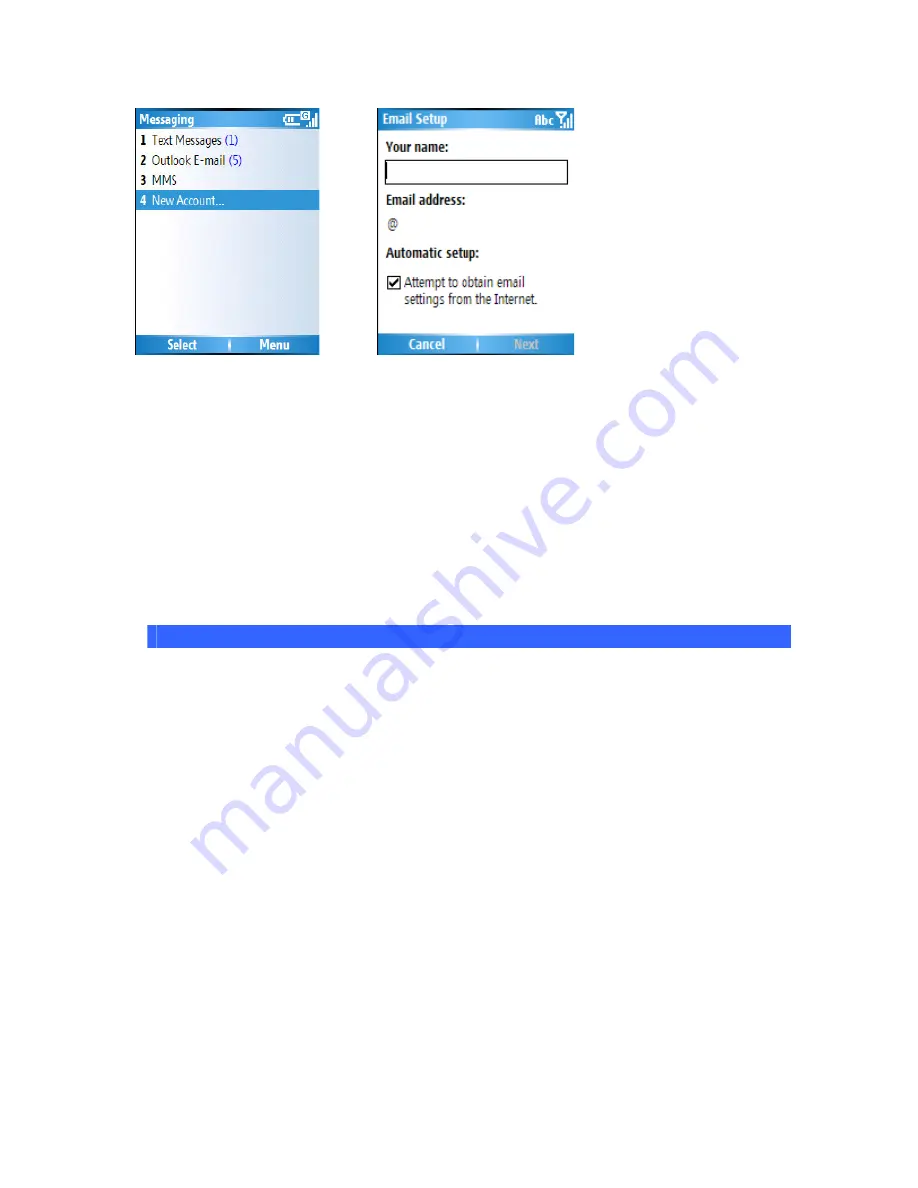
3. On the next screen choose the option Your 

Email

 provider: 

Other (POP3/IMAP) 


4. In 

Your name

, enter your display name for e-mail messages.   

Note:

 If the account is set up successfully, you will be prompted to send and receive 

e-mail. If not, you must click Next and set up the account manually which is described in 
the following pages. 

 
5. In 

E-mail address

, enter the e-mail address for this account.   

6. Select 

Attempt to obtain 

Email 

settings from the Internet 

and click

 Next

.  


Set up an Internet email account manually 

No. 

SETTING 

DESCRIPTION 

1  

User name 


Usually the first part of your e-mail address, which appears 
before

 at the 

sign (@). 


2  

Password 


Choose a strong password. You will have the option to 
save your password, so that you do not need to enter it 
each time you connect to your e-mail server. 


3  

Domain 


The domain name. This may or may not be required by 
your Internet Service Provider.   


4  

Server type 


The type of e-mail server that hosts your mailbox (POP3 
or

 IMAP

).  


Содержание RG4-E01

Страница 1: ...TOSHIBA RG4 E01 User Manual Version 1 0 Copyright 2006 TOSHIBA CORPORATION All rights reserved ...

Страница 2: ...works may not support all language dependent characters and services This wireless device is a 3GPP GSM Release 99 terminal supporting GPRS service and is designed to support also Release 97 GPRS networks However there may be some compatibility issues when used in some Release 97 GPRS networks For more information contact your service provider IMPORTANT SAFETY INFORMATION The device is not charged...

Страница 3: ... the plastic used in the phone s manufacture Do not store the phone in cold areas When there is a difference in temperature between the room and the phone condensation can form inside the phone causing damage to the electronic circuits Do not open the phone unless absolutely necessary for example to install the battery or SIM card We recommend that you go to your dealer when problems arise with ei...

Страница 4: ...t from that to which the receiver is connected 4 Consult the dealer or an experienced radio TV technician for help Caution Changes or modifications not expressly approved by the manufacturer responsible for compliance could void the user s authority to operate the equipment INTERFERENCE WITH MEDICAL EQUIPMENT FUNCTIONS This product may cause medical equipment to malfunction The use of this device ...

Страница 5: ...rn off the handset Do not leave the handset charger battery pack Stereo Earphone or BluetoothTM Stereo Headset outdoors in a bathroom or wherever water or any other fluid is used Do not place the handset charger or battery pack near cups vases or other containers of fluids Exposure to water or other fluids may cause electric shock overheating rupturing or fire Do not use excessive force when inser...

Страница 6: ...s the risk of a fire or explosion such as in a petrol station Doing so may ignite the gases and start a fire or explosion Turn off the handset and do not charge it wherever gases may be present petrol station etc Do not swing the handset by its strap a video output cable the Stereo Earphone or BluetoothTM Stereo Headset Doing so may cause an injury accident or damage Turn off the handset while you...

Страница 7: ...ch it Failing to do so may attract lightning and cause electric shock When thunder is heard stop using the handset and move to a safe place such as inside a building If the battery pack fails to charge in the specified time stop charging immediately failing to do so may cause overheating rupturing or fire When inserting the rapid charger plug into an AC household outlet make sure that a metal stra...

Страница 8: ...h as at home consult with the individual medical device manufacturer about the possible influence of radio waves The above information conforms to The Guidelines on Use of Mobile Phones and Other Devices to Prevent Electromagnetic Wave Interference with Electronic Medical Equipment Electromagnetic Compatibility Conference Japan April 1997 as well as refers to The Investigative Research Report on t...

Страница 9: ...lectric shock or malfunction Keep magnetic cards away from the handset and make sure that a magnetic card is not trapped when closing the handset Failing to do so may cause the magnetic data on a cash card credit card telephone card or floppy disk to be lost Do not use the handset in a vehicle if it affects in vehicle electronic devices Use of the handset in some types of vehicles may in some rare...

Страница 10: ... cause injury or damage to the LCD display Do not use the mobile light and flashlight for purposes other than taking pictures recording videos or lighting Doing so may dazzle the eyes and cause impaired vision or other injury Make sure things like paper cloth and bedding are not placed on the handset during charging using a USB connection AC adapter etc Failing to do so may cause overheating fire ...

Страница 11: ...e light close to eyes Doing so may cause eye damage Be especially careful not to take pictures or record videos with the mobile light too close to the eyes of infants Do not use excessive force when inserting or removing the USIM card Doing so may cause malfunction Be careful not to injure a hand or finger when removing the card Use only a USIM card designated for the handset Failing to do so may ...

Страница 12: ...ry 21 Chapter 2 Personalizing your phone 22 2 1 Home Screen 22 To copy an image to your phone for use as a Home screen 22 Changing the Home screen appearance 22 An alternative method to set an image as the Home screen 23 2 2 Ring Tone 23 Specifying the sound for an event 24 To change the current profile 24 Customizing a Profile 24 2 3 Settings 25 To set the alarm 25 Entering owner information 25 C...

Страница 13: ...Insert a three second pause in a dialing sequence 33 Insert an international country code 34 3 5 Video Telephony 34 Making a video call 34 Answering a video call by pressing any key 34 Answering or ignoring a video call 34 Chapter 4 Getting connected 34 4 1 Automatic setup of your data connections 35 4 2 Manual setup of your data connections 35 Introduction 35 Create a GPRS connection 35 Create a ...

Страница 14: ...complete e mail message 53 Download an attachment 54 View an attachment 54 Add a picture to an e mail message 55 Digitally Sign a message 55 Change between e mail folders and accounts 55 5 3 MMS 55 Running the MMS program 56 Creating and sending MMS 56 Add a recipient 56 Adding a Picture or Video 56 Adding text to the message 57 Template 57 Selecting a message background colour 57 Additional items...

Страница 15: ...ntact 76 Create a SIM contact 76 View and edit a contact information 76 Delete a contact 77 Add a picture to a contact 77 Remove a picture from a contact 77 Assign a ring tone to a contact 78 Send contact information 78 Assign a category to a contact 78 7 2 Calendar 78 Schedule an appointment 79 Make an appointment recurring 79 Update an appointment 79 Delete an appointment 79 Change the display o...

Страница 16: ...text on Web pages 99 Go to a Web page in the History list 99 Show or hide pictures on Web pages 99 View a favorite 100 Clear history cookies or temporary files 100 Send a link via email 100 7 8 Using Java 100 To start the Java program 100 To install a Java application 101 Selecting the Jad or Jar 101 To run a Java MIDlet 101 To Exit the JAVA application 101 7 9 Wireless Manager 102 To turn the tel...

Страница 17: ... Supported Operating Systems 114 The following mobile device operating systems are supported by ActiveSync 4 2 114 A 3 Regulatory Notices 115 Agency identification numbers 115 European Union Notice 115 Compliance with these directives implies conformity to the following European Norms 115 Important Health and Safety Information 116 Heed service markings 119 Use product with approved equipment 119 ...

Страница 18: ... the Home key 1 Recently used programs are shown here Click on an icon to run it again 2 Your wireless service provider s name 3 The Date and time 4 Click to access the details of missed calls 5 Display of appointments 6 The current profile 7 Click here to read new messages 8 Click to display all program icons 9 Display the status indicators these are described in the next section 10 Click to open...

Страница 19: ...rcase Radio connected or no signal T9 T9 text input mode uppercase Radio off t9 T9 text input mode lowercase Battery level T9 T9 text input mode caps lock Very low battery Numeric input mode Battery charging Voice mail at both lines No battery or battery fault Voice mail at line 1 No SIM card installed Voice mail at line 2 GPRS available Roaming GPRS connected Ringer off 1 3 Entering Information I...

Страница 20: ... 2 6 6 6 9 9 To select another character from the same key as you have just been using you need to pause before starting to type again For example to type the word cab you would type 2 2 2 wait 2 wait 2 2 You can set the amount of time you need to pause from Start Settings Accessibility Multi press Timeout T9 Mode To create a word using the T9 mode you press the numbers that contain the letters to...

Страница 21: ...ing to 123 mode press and hold the corresponding key for 1 second More tips on text entry In both Multipress and T9 mode the first letter of a sentence phrase is capitalized To switch among Uppercase Lowercase and Caps lock Press to switch among Uppercase Lowercase and Caps lock Deleting characters Press Back to delete a single character Press and hold the Back key to delete all the characters in ...

Страница 22: ... an image to your phone for use as a Home screen 1 If necessary please install the ActiveSync software on your PC first which is available in the accompanying CD Chapter 6 Connect the phone to your PC using a USB cable is probably the simplest method 2 On your PC copy the image file you want The file format must be gif jpg or bmp 3 In ActiveSync on your PC click Explore and double click My Windows...

Страница 23: ...u Use as Home Screen 4 Use NAVIGATION button to select the portion of the picture you want to use and click Next 5 Under Adjust the transparency select a higher percentage for a more transparent picture or a lower percentage for a more opaque picture 6 Click Finish 2 2 Ring Tone A ring tone is a sound made by the phone to indicate an incoming call This sound can be different for different persons ...

Страница 24: ...nt to hear a sound 3 Repeat for each event and click Done To change the current profile The Profile feature defines how your phone notifies you of incoming calls alarms etc For example Normal For day to day use Device will ring Silent Device will not ring or vibrate Meeting vibrates as you are in a meeting 1 On the Home screen click Profile Type Example Profile Normal 2 Click a new profile and cli...

Страница 25: ...he device If the battery is fully discharged then your personal settings are also preserved To change the format of the date for your region set this using the Regional Settings menu described later on To set the alarm 1 On the Home screen click Start Settings Clock Alarm Alarm 2 In Alarm choose one of the following Off to turn the alarm off On to turn the alarm on 3 In Alarm time enter the time f...

Страница 26: ...guage 3 In Locale select the locale for the language you selected The locale option automatically changes the format of the remaining options such as date time and currency according to the locale you specify 4 Click Done Note The phone automatically warns you that the phone must be powered off and on again for the changes to take effect Changing power management settings You can use Power Managem...

Страница 27: ...me screen click Start Settings Security Disable SIM PIN 2 Enter your current PIN and click Done Note If you fail to enter the correct PIN for your SIM card after 3 attempts you will need to contact your Service Provider for the Personal Unblock Key PUK Do NOT attempt to guess the PUK thereafter as it will render your SIM card permanently inoperative after a 10 incorrect PUK attempts Changing your ...

Страница 28: ...ill be prompted for the password 3 Uncheck the Prompt if device unused for field 4 Click Done Note Please make a note of the password Otherwise to make use of the phone again would require the phone to be hard reset and your personal data erased during the hardware reset To lock the phone quickly press and hold the volume up key to display the Quick List select Device lock and repeat steps 2 4 abo...

Страница 29: ...ith either the Phone or Enter key Making a call from the contact list 1 On the Home screen click Start Contacts 2 Select the contact and press TALK If you have a long list of contacts you can use a shortcut to find the contact you want Enter the first few letters of the contact s name When you do this the phone searches through the contact list and displays the name To call the contact press TALK ...

Страница 30: ...or locked the phone Dialing the last number called On the Home screen press TALK twice Creating a speed dial A speed dial is a short cut using one or more digits of your numeric keypad to call a frequently used phone number by pressing that number on the keypad You can create a speed dial for a phone number e mail address or Web page address that is stored in Contacts 1 On the Home screen click St...

Страница 31: ... screen click Start More More Speed Dial 2 Select the speed dial and click Edit 3 Make any changes and click Done Deleting a speed dial 1 On the Home screen click Start More More Speed Dial 2 Select the speed dial to delete 3 Click Menu Delete 3 2 Receiving a call Answering a call by pressing any key Normally the green Phone button is the default button to answer an incoming call To override this ...

Страница 32: ...nd call is disconnected or it is diverted to voice mail if you have subscribed to this service Making a second call while already in a call It is possible to make a second call while you are already in a call To do this press Menu Hold to place the first call on hold Then dial the second number and press the TALK key Your first call will remain on hold You may swap between the two calls by pressin...

Страница 33: ...all will not be in Speakerphone mode automatically even if you left the function switched on in the previous call 3 4 Special Dialing requirements Insert a manual pause in a dialing sequence Calls to certain networks may require a pause in between the dialed digits To do this 1 On the Home screen click Start Contacts 2 Click the contact in whose phone number you want to insert a pause 3 Select the...

Страница 34: ...o call 1 On the Home screen press Talk key 2 Input phone number in dial pad screen 3 Click Menu Video call Video call will be made immediately Answering a video call by pressing any key Normally the green Phone button is the default button to answer an incoming call To override this and use any button to answer instead 1 On the Home screen click Start Settings 2 Click Phone Call Options 3 Select A...

Страница 35: ...access the internet using their network Create a GPRS connection GPRS is a packet based wireless communication service which allows users to send and receive data with their mobile phones in applications such as Email and web browsing Normally use of this service is charged by the Service Provider based on the data traffic volume Every network connection is different You should gather all of the r...

Страница 36: ...tion you may need to add a proxy connection to allow your phone to access the internet or WAP services Every network connection is different and your service provider will be able to advise if there is a requirement for this You should gather all of the relevant information or network settings you need before starting this process 1 On the Home screen click Start Settings Connections 2 Click Proxy...

Страница 37: ...he following information In Description enter a name for the connection In VPN type select the type of VPN In Server enter the VPN server name In Connects from select the type of network from which you will connect to the VPN typically The Internet In Connects to select the type of network to which you will connect typically My Work Network In User name enter your user name for the VPN In Password...

Страница 38: ...d Menu Work URL Exceptions 3 Click Menu Add 4 In URL Pattern enter the URL and click Done Separate multiple URLs with a semicolon Note You should not create URL exceptions for URLs on the Internet Above is an example of an intranet URL which has been successfully An intranet URL can be either IP addresses in your work intranet or a FQDN Fully Qualified Domain Name Use a specific connection to conn...

Страница 39: ...or even if the devices are switched off When the devices are switched back on or are moved into range they will be connected with each other without needing to bond them again Bluetooth has 3 modes Off On and Visible When the Bluetooth is Off there is no power to the Bluetooth radio and so it does not function When Bluetooth is set to On your device will be connected to the devices it is already b...

Страница 40: ...t the device with which you want to create a Bluetooth partnership and click Add 4 In Passcode if you want to use a passcode recommended for enhanced security enter an alphanumeric passcode between 1 and 16 characters and click Done Otherwise leave the passcode blank and click Done 5 Enter the same passcode on the other partner device and respond to any prompts from it also To make your device vis...

Страница 41: ...hip 1 Ensure that Bluetooth is turned on and that your device is visible 2 When prompted to accept a Bluetooth partnership with the other devices click Yes 3 In Passcode if you want to use a passcode recommended for enhanced security enter an alphanumeric passcode between 1 and 16 characters and click Done You must enter the same passcode that was entered on the device requesting the Bluetooth par...

Страница 42: ...t 5 Select a numbered COM port from the list If the port cannot be created it is on use Select a different numbered port 6 To use this COM port to communicate only with devices with which your device has a Bluetooth partnership select the Secure Connection check box 7 Click Done 4 4 Beams The term Beam is used to describe the short range transferring of information between two units Beaming only r...

Страница 43: ...e beamed information 1 Do as the following Bluetooth is set with a tick against the option Make this device visible to other devices and is within close range 2 You will be notified when data is being received on your device 3 Once the information has finished being transferred you will be asked whether you wish to store the item Click Yes to keep it or No to discard Chapter 5 Messaging This chapt...

Страница 44: ...eld enter the mobile phone number of recipients Insert a semicolon between multiple recipients You may also choose a contact by pressing Menu Add Recipient 4 Click Send The Text messages is sent immediately In the To field you can enter phone numbers from your contact list quickly Press ENTER when the cursor is in this field A new screen displays the contact list for your selection Press ENTER aga...

Страница 45: ...m an open message click Reply on bottom left corner or Menu Reply All bottom right corner 2 Enter messages in the message area 3 Click Send Forward a message 1 From an open message click Menu Forward Enter a message in the message area 3 Choose a recipient to send the message to either type in the name or click Menu Add recipient 4 Click Send ...

Страница 46: ...e you can send or receive emails you will need to setup an email account There are different types of email accounts supported by the phone These are described in the next few pages Internet email account POP3 IMAP Exchange Server Outlook Set up an Internet email account automatically 1 On the Home screen click Start Messaging 2 Select New Account ...

Страница 47: ... this account 6 Select Attempt to obtain Email settings from the Internet and click Next Set up an Internet email account manually No SETTING DESCRIPTION 1 User name Usually the first part of your e mail address which appears before at the sign 2 Password Choose a strong password You will have the option to save your password so that you do not need to enter it each time you connect to your e mail...

Страница 48: ...se note that if you select this and your ISP does not support an SSL connection you will not be able to connect to receive e mail 9 Outgoing mail server The name of your outgoing e mail server SMTP 10 Outgoing server requires au thentication Your outgoing e mail server SMTP may require authentication Note Your user name and password from above will be used 11 Outgoing server settings Your outgoing...

Страница 49: ...e the necessary information as listed in the table above Usually the manual setup is needed if the automatic setup failed as described in the previous section Now you re ready to set up your account 1 On the Home screen click Start Messaging and select an account 2 Click Menu Options New Account Select Other POP3 IMAP click Next 3 In Your name enter your display name for e mail messages 4 In E mai...

Страница 50: ... sending and receiving messages with your Exchange Server click Start ActiveSync You will get this prompt on your phone if your Exchange Server is qualified to install the feature called MSFP Microsoft Messaging and Security Feature Pack For example Exchange Server 2003 with SP2 has the option to install this One of the benefits is the ability for the Server to push new e mails as they arrive to t...

Страница 51: ... and select an account The Inbox message list displays your received messages To quickly view new messages click the message notification area on the Home screen Create an e mail message 1 On the Home screen click Start Messaging 2 Select an e mail account 3 Click New 4 In To Cc and or Bcc field enter recipient s e mail addresses Insert a semicolon between multiple addresses 5 In Subject field ent...

Страница 52: ...his facility You can use it when creating a new message or replying to an e mail When the message screen appears click Menu My Text Create and add a signature to message For each account in Messaging you can specify a signature to be automatically inserted into messages that you send 1 On the Home screen click Start Messaging and select an account 2 Click Menu Options Signatures 3 Scroll to the ac...

Страница 53: ...l message 1 On the Home screen click Start Messaging and select an account 2 Select the message to download To stop this process click Menu Stop Send Receive If your Exchange Server is qualified to install the feature call MSFP Microsoft Messaging and Security Feature Pack one of the benefits is the ability for the Server to push new e mail as they arrive to your phone for example exchange Server ...

Страница 54: ...wnloaded the next time your phone connects to the Server to send receive e mail The frequency of this is determined by the Schedule setup during your ActiveSync configuration described in Chapter 6 After you scroll down to the filename shown click again and the attachment file will be downloaded when your phone connects to your server to send receive e mails again Once the file has been downloaded...

Страница 55: ...nu Switch Accounts Outlook Email 2 Click New 3 Click Menu Message Options 4 Select Sign message and click Done Change between e mail folders and accounts 1 Click Start Messaging Outlook Email 2 Click Folders 3 You can select the new folder you wish to view Note S MIME encryption and digital signatures for Windows Mobile based devices are available only with Exchange Server 2003 Service Pack 2 or a...

Страница 56: ... recipient You should add a recipient to your message You can directly enter a phone number into the To field or you may select a contact from your contact list To choose a contact select Menu Recipients Add The MMS composer is able to deliver the message to more than one user just input a semicolon between recipients Adding a Picture or Video To add an image to the message highlight the Insert Pi...

Страница 57: ... choosing Menu Option Background A list of colours will be displayed for you to choose Additional items Just as email you may add people in copy cc or blind copy bcc to your message You may also set the urgency of the message a delivery time delay for the sending of the message an expiry time for the message and request delivery and read report To set these requirements go to Menu Options Send Opt...

Страница 58: ...ad unread Mark current item as an unread read one Download Messages If you have chosen only to take notification of MMS messages and not to download the whole message you can mark a message for download At the next Send Receive the mes sage will be downloaded Options Change the account options for the MMS account Send Receive Force a Send or Receive of MMS messages that are pending Setting up a da...

Страница 59: ...vider Press Done when you have entered all these details On the screen shown next select your MMS entry by name and choose Menu Set as Default A tick will appear next to its name Now press the Home key to return to the Home Screen Your device is now configured for MMS 5 4 Pocket MSN Pocket MSN on your mobile device provides almost instant access to your MSN Hotmail inbox your MSN Messenger contact...

Страница 60: ...redentials After obtaining credentials complete the following tasks 1 Set up a connection with your phone refer to Chapter 4 Getting connected that enables you to connect to the Internet 2 Set up an MSN Messenger account For more information see Set Up an Account 3 Sign in to MSN Messenger For more information see Sign In and Out To obtain a Passport go to http www passport com To create a Hotmail...

Страница 61: ... already without having to sign into Hotmail also View your Hotmail Inbox 1 In your Hotmail inbox click Start Pocket MSN MSN Hotmail 2 To synchronize your Hotmail inbox so you see your latest e mail messages click Menu Send Receive mail Write and send E mail 1 Click New at the bottom of the Hotmail inbox screen 2 In the To field enter an e mail address 3 In Subject enter the subject of the e mail ...

Страница 62: ...lick Menu Delete The message is deleted immediately Note You can also attach Picture and Voice Note files 3 In Subject enter the subject of the e mail 4 Click Menu Insert File to select a file 5 Enter a message in the body of the e mail and then click Send Option and Settings With Pocket MSN Options you can manage your password settings For instructions select the task below Clear the MSN password...

Страница 63: ...s After you have signed into Messenger you will be able to perform the functions below To add a contact click Menu Add Contact and then follow the directions on the screen To delete a contact select the contact click Menu Delete contact Click Yes to permanently delete the contact Manage Contacts To block a contact from seeing your status and sending you messages select the contact and click Menu B...

Страница 64: ... desired status description such as Away Read a Message When you receive an alert that a new message has been received click Chat to switch to that chat or Ignore to stay in the current chat To switch between chats click Menu Chats and then select the contact to resume chatting Send a Message 1 Select the contact you want to send a message to 2 Click Menu Send message 3 Enter your message in the t...

Страница 65: ...mobile device and PC or device and Exchange server is always consistent If you make a change in one place the next time you synchronize the change is automatically made to the corresponding information on the other computer No matter where you are viewing the information you know it s up to date You may connect to your PC using a cable or Bluetooth connection ActiveSync can also make it possible f...

Страница 66: ...ync your phone to your PC the very first time instead of synchronizing the phone with Exchange Server Data will be downloaded via your PC and will save you the charges for traffic volume over the cellular connection in addition syncing via your mobile phone network will take longer than with your PC locally If you do not intend to sync directly with Microsoft Exchange Server do not select the opti...

Страница 67: ...To sync with Exchange Server instead of your PC click the box above and enter the Exchange Server details as shown below ...

Страница 68: ...ck the connection and that your User name Password settings above are valid also Note Ensure that you select correctly in the drop down box for the sync Source below The remaining screenshots will sync with the option Windows PC You can view additional settings information by selecting and clicking Settings below ...

Страница 69: ...For example you may choose to synchronize details of your Calendar for the past two weeks only ...

Страница 70: ...c below depends on how much data is to be synchronize d Typically it should not take more than 2 4 mins or even less depending on the data volume and responsiveness of your PC Once the synchronization has completed successfully details from your selected data types will be shown on your home screen For example in the diagram below an upcoming Calendar appointment and unread emails are displayed ...

Страница 71: ...zation settings on the phone disconnect it from your PC 1 On the phone Home screen click Start ActiveSync Menu Options 2 Select one of the information types 3 Do one of the following To view or change settings for an information type when available click Settings To view or change settings for a computer or Exchange Server click Menu Settings 4 Change the amount of information to be synchronized o...

Страница 72: ...If this is the first time you have connected to this PC via Bluetooth you must complete the Bluetooth wizard on the phone and set up a Bluetooth partnership with the PC before synchronizing 5 Click Sync 6 When finished click Menu Disconnect Bluetooth 7 To preserve battery power turn off Bluetooth Note Ensure that the PC ActiveSync Serial port corresponds to the PC s Bluetooth Serial port configura...

Страница 73: ...for Contacts and Calendar from your phone click Start ActiveSync Menu Options and select from the list as preferred see example below Connect your phone to your PC via Bluetooth or USB cable next In this example you will also need to setup your PC ActiveSync to select either The Internet for your phone to contact your Exchange Server thru your PC ...

Страница 74: ...connect it from your PC You can also refer to some of the screenshots in the previous section of Install and setup ActiveSync with Exchange Server 1 On the phone Home screen click Start ActiveSync Menu Configure Server If you have not yet set up sync with Exchange Server this will say Add Server Source 2 In Server address enter the name of the server running Exchange Server and click Next 3 Enter ...

Страница 75: ...ing your Media Your device is able to synchronize media from your PC such as music and video This is described in detail in Chapter 7 Note You can start and stop synchronization only if your phone already has a sync relationship with a PC or Exchange Server Chapter 7 Application Multimedia The phone is installed with some applications for you to make better use of your device The features and func...

Страница 76: ...nds you a message you can create a contact from Call History or from the message by clicking Menu Save to Contacts To save an existing contact to your SIM open the contact and click Menu Save to SIM Create a SIM contact Contacts can be created and stored on a subscriber identity module SIM If you move the SIM to another phone your SIM contacts are moved as well 1 On the Home screen click Start Con...

Страница 77: ... contact to delete 3 Click Menu Delete Contact Add a picture to a contact 1 On the Home screen click Start Contacts 2 Click the contact 3 Click Menu Edit 4 Click Picture 5 Do one of the following Click the picture you want to add Click Camera and take a picture 6 Click Done Remove a picture from a contact 1 On the Home screen click Start Contacts 2 Click the contact 3 Click Menu Edit 4 Click Menu ...

Страница 78: ...the contact information and click Send Assign a category to a contact You can use categories to help you organize and group your contacts 1 On the Home screen click Start Contacts 2 Click the contact 3 Click Menu Edit 4 Click Categories this appears further down the list of items for the contact selected 5 Select the category you want and click Done Note Categories are shared between your appointm...

Страница 79: ...urring 1 On the Home screen click Start Calendar 2 Click the appointment and click Edit 3 Scroll down to Occurs and click one of the recurrence options 4 Click Done Update an appointment 1 On the Home screen click Start Calendar 2 Click the appointment and click Edit 3 If the appointment is recurring click Yes to edit only the current occurrence or click No to edit the series 4 Make your changes a...

Страница 80: ... press BACK Change the display of the work week 1 On the Home screen click Start Calendar 2 Click Menu Options and do one of the following To specify the first day of the week in First day of week click Sunday or Monday To specify the number of days you want to appear in a week in Week view click 5 day week 6 day week or 7 day week 3 Click Done Change the reminder time By default the reminder time...

Страница 81: ...things which need to be done This can be a one off or a recurring task and reminders can be set to display a message when the task needs to be done by Create a task 1 On the Home screen click Start Tasks 2 In the Enter new task here box press the enter key first and the box will be blanked out for you to enter the task name When finished with entering the task name press ENTER A new task item will...

Страница 82: ... screen click Start Tasks 2 Select the task and click Menu Delete Task Mark a task as complete 1 On the Home screen click Start Tasks 2 Select the task and click Complete Change a completed task to incomplete 1 On the Home screen click Start Tasks 2 Select the task and click Activate Locate a task 1 On the Home screen click Start Tasks 2 In the task list do one of the following To sort the list cl...

Страница 83: ... picture Point the camera at the subject and either Press the Capture button at the bottom left of the screen Press the camera button on the side of the device Press Menu to bring up the list of options Mode here you can set the camera mode Choose from Photo Select from single timer and burst Video Recording videos Album This launches the Pictures and Videos application where you can review the im...

Страница 84: ...g and Stop Capture to finish The total length of video is determined by the amount of free memory in your device Location for Storing Pictures and Videos All pictures and video files taken with this phone are saved onto the phone s memory However you can set the smartphone to save them onto a miniSD card To do this 1 Ensure that a miniSD card has been inserted into the phone 2 Press Menu Setting G...

Страница 85: ... preview previous next picture in turn on the preview screen Functions in Pictures Videos Press the Menu key to see the options available in the application Send Send pictures to other recipients by means of MMS or email Beam transfer pictures to other users using Bluetooth Save to Contact Set a picture as an icon representing a specified contact which is shown within the details of contact Delete...

Страница 86: ...s like file name size etc Options Sets the properties of the pictures and videos application 7 6 Windows Media Player Overview of Windows Media Player Mobile You can use Windows Media Media 10 Mobile for Smartphone to play digital audio and video files that are stored on your phone or on the Web By default Windows Media Player Mobile can play the following types of files Windows Media Audio WMA Wi...

Страница 87: ...kip to the next file NAVIGATION up Increase the volume NAVIGATION down Decrease the volume Turn the sound on or off quickly mute 0 Switch to full screen during video playback Change rating NAVIGATION right hold Fast forward a file NAVIGATION left hold Rewind a file Overview of screens and menus Windows Media Player Mobile has three primary screens Playback screen The screen that displays the playb...

Страница 88: ...of each screen is a menu called Menu The commands on this menu change depending upon which screen you are viewing Overview of the Playback screen commands Overview of the Now Playing screen commands Overview of the Library screen commands Overview of Now Playing screen commands THIS COMMAND DOES THIS Library Displays the Library so you can choose a file to play Move Up Moves the selected item up i...

Страница 89: ...d play files that are stored on your phone or storage card but that are not in the library Open URL Lets you play a file on a network such as the Internet Properties Displays information about the selected file Overview of licenses and protected files Protected files are digital media files that are secured with a license to prevent unauthorized distribution or playback The license specifies how y...

Страница 90: ...sary on the Library screen click Menu Library and then select the library that you want to use for example Storage Card 3 Select a category for example My Music or My Playlists select the item that you want to play such as a song album or artist name and then click Play Note To play a file stored on your phone but that is not in a library on the Library screen click Menu Open File Select the item ...

Страница 91: ...s that protected files and album art are copied to your phone correctly Please ensure that you have completed the one off steps in Chapter 6 for ActiveSync first and that the checkbox for Media Player has been ticked also in your PC ActiveSync as shown below as one off steps again for Media Player Select Media to get the next screen below Note if this is greyed out for any reason please see the No...

Страница 92: ...Click this now and follow thru the steps in screenshots ...

Страница 93: ......

Страница 94: ...To synchronize content to your phone automatically do the following 1 On your computer start Windows Media Player 10 ...

Страница 95: ... click Automatic select the Customize the playlists that will be synchronized check box and then select the playlists that you want to synchronize 4 Click Finish The files begin synchronizing to your phone The next time you connect your phone to your computer while the desktop version of Windows Media Player 10 is running synchronization will start automatically ...

Страница 96: ...nc List as shown below Note Always use the desktop version of Windows Media Player 10 to synchronize copy files to your phone For example do not use Windows Explorer to drag and drop files from your computer to your phone Always synchronize files to a storage card that is inserted into your phone Do not synchronize to a storage card that is inserted into a storage card reader ...

Страница 97: ... Media Center Edition For more information about the Copy to CD or Device feature start the desktop version of Windows Media Player 9 Series and then press F1 Audio files copy faster if the desktop Player is configured to automatically set the quality level for audio files copied to your phone For more information see the desktop Player Help If you get an error message in your PC Windows Media Pla...

Страница 98: ...y while using Windows Media Player Mobile a number of resources are available on the Web to help you troubleshoot the issue including a list of frequently asked questions FAQ For more information see the Troubleshooting Windows Media Player Mobile page at the Microsoft Web site http go microsoft com fwlink LinkId 29195 7 7 Internet Explorer Mobile Open Internet Explorer On the Home screen click St...

Страница 99: ...Web page in the History list 1 On the Home screen click Start Internet Explorer 2 Click Menu History 3 Select the Web page and click Go Note To return to the Web page you were viewing press BACK Show or hide pictures on Web pages 1 On the Home screen click Start Internet Explorer 2 Click Menu View Show Pictures A check mark next to Show Pictures indicates that pictures will be displayed on Web pag...

Страница 100: ...emory 4 Select the type of memory to clear 5 Click Clear click Yes and then click Done Send a link via email 1 On the Home screen click Start Internet Explorer 2 Go to the Web page you want to send 3 Click Menu Tools Send Link via E mail 4 Select Text Messages or Outlook E mail A new message is created with the page address inserted in the message body 7 8 Using Java The phone supports Java applic...

Страница 101: ...l be shown in the window Choose one from this list to install it Selecting the Jad or Jar You will be shown the details of the MIDlet you are proposing to install Press Continue to proceed with the installation If the java file is not signed with a trusted certificate then you will be prompted if you wish to install it Once the file has downloaded you will be asked where you wish to store the down...

Страница 102: ...icon and selecting it Alternatively you may press the 3 key When a cross appears by the receiver icon the device is in flight mode for the telephone element You will not be able to make or receive telephone calls nor use the data network of your operator However Bluetooth may still be active while the telephone element is switched off if you so wish To turn the telephony element back on click on t...

Страница 103: ...his will take you to the Bluetooth screen described in chapter 4 3 To enable and disable all wireless elements To switch both the Bluetooth and Telephony on or off at once press the All selection or press 1 on the keypad 7 10 TOSHIBA Sharing Application TOSHIBA Sharing enables you to use two functions Remote Keyboard and Remote Screen Using Remote Keyboard you can scroll a PC application displayed...

Страница 104: ...e main console of PC side To start sharing Then do the following steps on the phone side 1 On the home screen click Start More Sharing 2 2 Click the radio button to choose a remote feature keyboard or screen TOSHIBA Sharing Application main screen description Remote KB If the Remote KB feature is selected the device could scroll a PC application using its navigation keys Shown below is the key ass...

Страница 105: ... are Bluetooth USB and Wi Fi Port To set the port of TOSHIBA Sharing click Menu Port Shown below is the port setting screen Passcode To set the passcode of TOSHIBA Sharing click Menu Passcode Shown below is the passcode setting screen Note In the TOSHIBA Sharing Application main screen if you select Next without setting passcode This screen appears also and asks you to set the passcode before usin...

Страница 106: ... various levels x2 200 x4 400 and x8 800 The following operations can be performed Long press Volume Up key to lunch the application Press End key to close the zooming application and back to the home screen Zoom in increasing zoom level through LSK key Zoom In menu will be disabled on level X8 Zoom out decreasing zoom level through RSK key Zoom Out menu will be changed to End on level X2 Scrollin...

Страница 107: ...dy list 3 Press Call button on the bottom left Answering a call To answer a call while hearing ringing tone Press Call button on the bottom left Answering a call automatically In addition to answering a call by pressing Call button while hearing ringing tone you can let VoIP answer a call automatically if you activate this function When 10 seconds have passed after a call is received this applicat...

Страница 108: ... Service Mute To restore microphone while you re talking Press Menu Use Voice Service Mute again Switching to handsfree mode When you begin to talk you can hear your party s voice from your receiver To hear his her voice from your embedded speaker as handsfree mode 1 Press Menu Use Voice Service Handsfree To hear his her voice from your receiver again 1 Press Menu Use Voice Service Handsfree again...

Страница 109: ...In addition if two or more network adapters are shown designate a network adapter to use If you check Automatic answer box Toshiba VoIP answers a call automatically after answering timer has expired Your calling party can record his her voice message after hearing answering message Troubleshooting Wrong User Name or Password Make sure you set your user name or password properly Cannot call an VoIP...

Страница 110: ... side by monitoring bluetooth communication status If a lock or unlock command comes the service program locks or unlocks PC by calling the functions of Gina Graphical Identification and Authentication There are three types of lock methods Screen Lock Screen Saver Logoff There is a registration program in PC side that makes the linkage relation of PC and SP1 By running this program you can select ...

Страница 111: ...hed on and warms up to its normal operating temperature moisture can form inside the device which may damage the circuit boards internally Avoid dropping or any hard knocks to the phone as these shocks can damage the internal circuit boards If you need to clean the phone wipe it with a soft clean cloth avoid use of cleaning solvents or detergents DO NOT use water to clean the LCD screen Do not att...

Страница 112: ...ling the most recently added program first Follow the section on removing programs in order to do this Also verify that the program is designed to be run on this telephone by comparing the requirements to the information given in the phone under Start Settings About After a reset you will need to re install all the programs you had previously To hard reset your phone 1 Click Start Settings More Pe...

Страница 113: ...ttery warning appears do the following 1 Immediately save your current data 2 Synchronize with your PC to charge the battery 3 Turn off your phone For information about charging the battery see the Quick Start Guide DANGER OF EXPLOSION IF BATTERY IS INCORRECTLY REPLACED TO REDUCE RISK OF FIRE OR BURNS DO NOT DISASSEMBLE CRUSH PUNCTURE SHORT EXTERNAL CONTACTS EXPOSE TO TEMPERATURE ABOVE 60 C 140 F ...

Страница 114: ...P Tablet PC Edition Microsoft Windows XP Media Center Edition Microsoft Outlook 2000 Microsoft Outlook XP or Microsoft Outlook 2003 messaging and collaboration clients required for synchronization to the desktop or portable computer of e mail Calendar Contacts Tasks and Notes Outlook 2003 is recommended Microsoft Office 2000 Microsoft Office XP or Microsoft Office 2003 Microsoft Internet Explorer ...

Страница 115: ...ng essential requirements under article 3 2of the R TTE directive 1999 5 EC ETSI TS 151 010 1 V7 0 1 2006 02 Digital cellular telecommunications system Phase 2 Mobile Station MS conformance specification Part 1 Conformance specifications EN 50360 2001 Product standard to demonstrate the compliance of mobile phones with the basic restrictions related to human exposure to electromagnetic fields 300 ...

Страница 116: ...patible batteries and accessories Using incompatible items may permanently damage the phone Do not connect the phone to any other device without reading the provided documentation The other device may be incompatible When making emergency calls from your phone ensure that the phone is switched on and in service Interference may affect your phone s performance Once you move away from the source of ...

Страница 117: ...e functionality of inadequately shielded medical devices Consult a physician or the manufacturer of the device to ensure safe procedure Your phone may interfere with the functionality of any inadequately shielded electronic system in a motor vehicle Examples of this type of system include air bags and fuel injection You should contact the manufacturer of the vehicle to ensure that it is properly s...

Страница 118: ...manufactured not to exceed the emission limits for exposure to radio frequency RF energy set by the Federal Communications Commission of the U S Government The guidelines are based on standards that were developed by independent scientific organizations through periodic and thorough evaluation of scientific studies The standards include a substantial safety margin designed to assure the safety of ...

Страница 119: ...W kg As SAR is measured utilizing the devices highest transmitting power the actual SAR of this device while operating is typically below that indicated above This is due to automatic changes to the power level of the device to ensure it only uses the minimum level required to reach the network The World Health Organization has stated that present scientific information does not indicate the need ...

Страница 120: ...ctronic or electrical waste equipment by relocating over to the specified collection point of recycling of such hazardous waste Isolated collection and proper recovery of your electronic and electronical wates equipment at the time of disposal will allow us to help conserving natural resources Moreover proper recycling of the electronic and electrical waste equipment will ensure safety of human he...

Отзывы: