background image


The Keyboard 

Portégé A100 

5-7 

Portégé A100

 Version   

2

   Last Saved on 25.11.2003 16:19 

ENGLISH using  Palau30 Online.dot –– Printed on 28.11.2003 as  


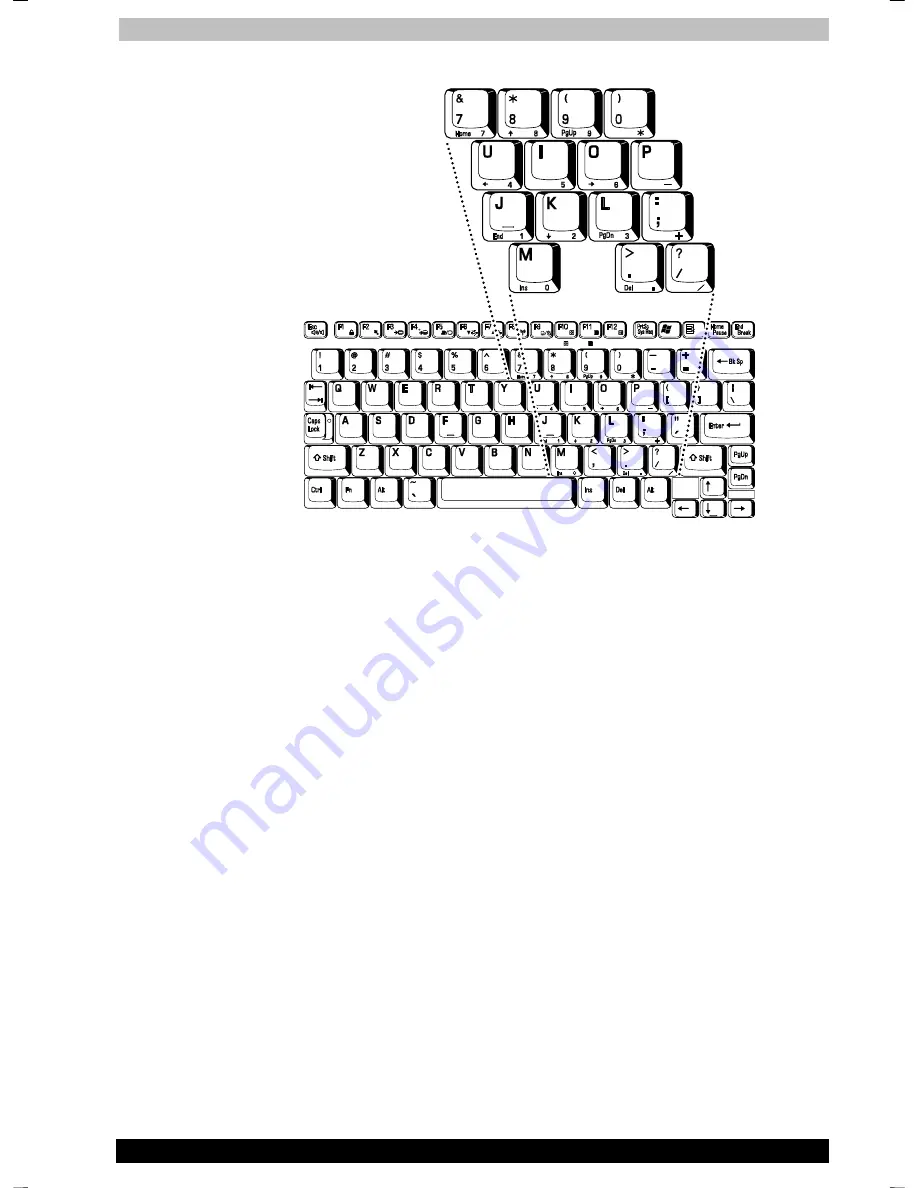
The numeric keypad overlay 

Temporarily using normal keyboard (overlay on) 

While using the overlay, you can temporarily access the normal keyboard 
without turning off the overlay: 

 1.  Hold 

Fn

 and press any other key. All keys will operate as if the 

overlay were off. 

  2.  Type uppercase characters by holding 

Fn

 + 

Shift

 and pressing a 

character key. 

 3.  Release 

Fn


to continue using the overlay. 

Temporarily using overlay (overlay off) 

While using the normal keyboard, you can temporarily use the keypad 
overlay without turning it on: 

  1.  Press and hold down 

Fn

.  

  2.  Check the keyboard indicators. Pressing 

Fn

 turns on the most 

recently used overlay. If the Numeric mode indicator lights, you can 
use the overlay for numeric entry. If the Arrow mode indicator lights, 
you can use the overlay for cursor and page control. 

 3.  Release 

Fn

 to return to normal keyboard operation. 

Содержание Portege A 100

Страница 1: ...Choose freedom Choose freedom computers toshiba europe com Portégé A100 Portégé A100 PORTÉGÉ A100 PORTÉGÉA100 PORTÉGÉ A100 PORTÉGÉ A100 PORTÉGÉ A100 PORTÉGÉA100 User s Manual ...

Страница 2: ...between the computer and the manual Trademarks IBM PC and PS 2 are trademarks of International Business Machines Corporation Intel Pentium and Centrino are registered trademarks and SpeedStep is a trademark of Intel Corporation Windows and Microsoft are registered trademarks of Microsoft Corporation Photo CD is a trademark of Eastman Kodak Bluetooth is a trademark owned by its proprietor and used ...

Страница 3: ...y Statement This product is designed to work with and is compatible with the following networks It has been tested to and found to conform with the additional requirements conditional in EG 201 121 Germany ATAAB AN005 AN006 AN007 AN009 AN010 and DE03 04 05 08 09 12 14 17 Greece ATAAB AN005 AN006 and GR01 02 03 04 Portugal ATAAB AN001 005 006 007 011 and P03 04 08 10 Spain ATAAB AN005 007 012 and E...

Страница 4: ...mance of procedures other than those specified may result in hazardous radiation exposure 3 To prevent direct exposure to the laser beam do not try to open the enclosure Location of the required label CAUTION This appliance contains a laser system and is classified as a CLASS 1 LASER PRODUCT To use this model properly read the instruction manual carefully and keep this manual for your future refer...

Страница 5: ...n bilve udsat for utilladellg kraftig stråling APPARATET BOR KUN ÅBNES AF FAGFOLK MED SÆRLIGT KENDSKAB TIL APPARATER MED LASERSTRÅLER Indvendigt i apparatet er anbragt den her gengivne advarselsmækning som advarer imod at foretage sådanne indgreb i apparatet at man kan komme til at udsætte sig for laserstråling OBS Apparaten innehåller laserkomponent som avger laserstråining överstigande gränsen f...

Страница 6: ...computer on your lap or if you keep your hands on the palm rest for example your skin might suffer low heat injury If the computer has been used for a long time avoid direct contact with the metal plate supporting the I O ports It can become hot The surface of the AC adaptor can become hot when in use This condition does not indicate a malfunction If you need to transport the AC adaptor disconnect...

Страница 7: ...ture designed to reduce the risk of lost data or damage to the product when used outside recommended conditions To avoid risk of lost data always make back up copies of data by periodically storing it on an external storage medium For optimum performance use your computer product only under recommended conditions Read additional restrictions under Environmental Conditions in your product Resource ...

Страница 8: ...equences resulting from the use of this product in working environments that are not approved are not the responsibility of TOSHIBA Europe GmbH The consequences of the use of this product in non approved working environments may be Interference with other devices or machines in the near surrounding area Malfunction of or data loss from this product caused by disturbances generated by other devices...

Страница 9: ...ecause Wireless LAN products operate within the guidelines found in radio frequency safety standards and recommendations TOSHIBA believes Wireless LAN is safe for use by consumers These standards and recommendations reflect the consensus of the scientific community and result from deliberations of panels and committees of scientists who continually review and interpret the extensive research liter...

Страница 10: ...ot related to our company we do not take any responsibility Usage Restrictions Do not use the Wireless Products for controlling equipment Equipment directly linked with human life corresponds to the following Medical equipment such as life support systems equipment used in operations etc Exhaust systems for gases such as poisonous gas etc and exhaust systems for smoke Equipment that must be set up...

Страница 11: ...n Do not turn ON the Wireless Communication switch in aircraft or in places that generate or can generate radio interference Radio waves can potentially affect them causing an accident due to malfunction Monitor possible radio interference or other troubles to other equipment while the product is used If any effect is caused turn OFF the Wireless Communication switch Otherwise radio waves can pote...

Страница 12: ...9 Options 1 11 Chapter 2 The Grand Tour Front with the display closed 2 1 Left side 2 2 Right side 2 3 Back side 2 3 Underside 2 5 Front with the display open 2 6 Indicators 2 8 AC adaptor 2 10 USB diskette drive optional 2 11 Fixed optical media drive 2 12 Portégé A100 User s Manual Manual contents xviii Equipment checklist 1 1 Conventions xix xiii ...

Страница 13: ...ia care 4 9 Using a optional USB diskette drive 4 10 Wireless LAN 4 12 LAN 4 13 Using the microphone 4 15 Using the internal modem 4 15 Cleaning the computer 4 18 Moving the computer 4 18 Heat dispersal 4 19 Chapter 5 The Keyboard Typewriter keys 5 1 F1 F12 function keys 5 2 Soft keys Fn key combinations 5 2 Windows special keys 5 6 Keypad overlay 5 6 Generating ASCII characters 5 8 Chapter 6 Powe...

Страница 14: ...kette drive 8 10 External monitor 8 10 TV 8 10 i LINK IEEE1394 8 17 Security lock 8 19 Chapter 9 Troubleshooting Problem solving process 9 1 Hardware and system checklist 9 3 TOSHIBA support 9 17 Appendix A Specifications Appendix B AC Power Cord and Connectors Appendix C Display Controller and Modes Appendix D If your computer is stolen Appendix E ASCII Character Codes Appendix F Wireless LAN App...

Страница 15: ...ntroduction and The Grand Tour chapters to familiarize yourself with the computer s features components and accessory devices Then read Getting Started for step by step instructions on setting up your computer If you are an experienced computer user please continue reading the preface to learn how this manual is organized then become acquainted with this manual by browsing through its pages Be sur...

Страница 16: ... tips on care of the computer diskettes and CD DVDs Chapter 5 The Keyboard describes special keyboard functions including the keypad overlay and hotkeys Chapter 6 Power and Power Up Modes gives details on the computer s power resources and battery save modes Chapter 7 HW Setup and Passwords explains how to configure the computer using the HW Setup program It also tells how to set a password Chapte...

Страница 17: ...ons A distinctive typeface identifies the key top symbols as they Key operation Some operations require you to simultaneously use two or more keys We identify such operations by the key top symbols separated by a plus sign For example Ctrl C means you must hold down Ctrl and at the same time press C If three keys are used hold down the first two and at the same time press the third ABC When proced...

Страница 18: ...your attention Each type of message is identified as shown below Pay attention A caution informs you that improper use of equipment or failure to follow instructions may cause data loss or damage your equipment Please read A note is a hint or advice that helps you make best use of your equipment xx ...

Страница 19: ...ed in this manual may not function properly if you use an operating system that was not preinstalled by TOSHIBA Equipment checklist Hardware Carefully unpack your computer Save the box and packing materials for future use Check to make sure you have all the following items Portégé A100 Portable Personal Computer Universal AC adaptor and power cord Modular cable Portégé A100 User s Manual 1 1 ...

Страница 20: ...ows TOSHIBA Utilities Sound Driver LAN Drivers Wireless LAN Driver Microsoft Internet Explorer DVD Video Player TOSHIBA Power Saver TOSHIBA Console TOSHIBA Controls Online manual Documentation Portégé A100 Portable Personal Computer User s Manual Portégé A100 Quickstart Microsoft Windows XP manual Safety Instruction Manual Warranty Information Product Recovery disk CD ROM or DVD ROM Tools Utilitie...

Страница 21: ...ed Intel SpeedStep technology Other processors may be offered Some models of the computers carry Intel Centrino technology which is based on three separate technologies of Intel Pentium M Intel PRO Wireless Network Connection and Intel 855 Chipset Family Memory Slot The slot accepts a 128 256 512 or 1 024 MB memory module can be installed in the two memory slots for a maximum of 2GB system memory ...

Страница 22: ...A CD DA CD I CD Text CD R CD RW Display The computer s LCD panel supports high resolution video graphics The screen can be set at a wide range of viewing angles for maximum comfort and readability Built in 12 XGA TFT 1024 horizontal 768 vertical pixels up to 16 M colours Graphics controller Graphics controller maximizes display performance Refer to Appendix B for more information Keyboard Built in...

Страница 23: ...tion of a monaural microphone External monitor 15 pin analog VGA port supports VESA DDC2B compatible functions Universal Serial Bus USB 2 0 The computer has four Universal Serial Bus ports that comply with the USB 2 0 standard which enables data transfer speeds 40 times faster than the USB 1 1 standard The ports also support USB 1 1 i LINK IEEE1394 This port enables high speed data transfer direct...

Страница 24: ...90 and V 92 are supported only in USA and Canada Only V 90 is available in other regions LAN The computer is equipped with a LAN card that supports Ethernet LAN 10 Mbit s 10BASE T and Fast Ethernet LAN 100 Mbit s 100BASE TX It is preinstalled as a standard device in some markets Wireless LAN Some computers in this series are equipped with a Wireless LAN mini PCI card that is compatible with other ...

Страница 25: ...e default is TOSHIBA Console Internet button A push on a button starts the Internet browser software Mail button A push on a button starts mail software Hot keys Key combinations let you quickly modify the system configuration directly from the keyboard without running a system configuration program Keypad overlay Keys with gray lettering make up the keypad overlay which lets you use the keyboard ...

Страница 26: ...is feature turns power to the computer off when the display panel is closed and turns it back on when the panel is opened You can specify the setting in the When I close the lid item of the Setup Action tab in TOSHIBA Power Saver Auto power on This feature lets you set a time and date for the computer to turn on automatically The feature is useful for receiving remote communications while you are ...

Страница 27: ...This section describes preinstalled utilities and tells how to start them For details on operations refer to each utility s online manual help files or readme txt files TOSHIBA Power Saver To access this power savings management program open the Control Panel click Performance and Maintenance and click the TOSHIBA Power Saver icon HW Setup This program lets you customize your hardware settings acc...

Страница 28: ...hat provides easy access to help and services It is the default function launched by the TOSHIBA Console button Drag n Drop CD DVD This easy to use software lets you record CD DVDs with just a few mouse clicks You can create CD DVDs in several formats including audio CDs that can be played on a standard stereo CD player and data CDs to store the files and folders on your hard drive This software c...

Страница 29: ...it as a spare or replacement Universal AC Adaptor If you use your computer at more than one site it may be convenient to purchase an additional Universal AC Adaptor for each site so you will not have to carry the adaptor with you USB FDD Kit A 3 1 2 diskette drive accommodates 1 44 megabyte or 720 kilobyte diskettes It connects to a USB port You cannot format 720 kilobyte diskettes on Windows XP b...

Страница 30: ...ow shows the computer s front with its display panel in the closed position DISPLAY LATCH POWER SOURCE SYSTEM INDICATORS Front of the computer with display closed Display latch This latch secures the LCD panel in its closed position Push the latch to open the display Power source system indicators LEDs let you monitor the status of various computer functions Details are given in the Indicators sec...

Страница 31: ...ards and CardBus PC cards Keep foreign objects out of the PC card slot A pin or similar object can damage the computer s circuitry Wireless communication switch Slide this switch to the right to turn off Wireless LAN and Bluetooth functions Slide it to the left to turn on the functions Microphone jack A standard 3 5 mm mini microphone jack enables connection of a monaural microphone or other devic...

Страница 32: ...for CDs and DVDs CD RW DVD ROM drive Some models are equipped with a full size CD RW DVD ROM drive module that lets you run CD DVDs without using an adaptor You can also write CDs Security lock slot A security cable attaches to this slot The optional security cable anchors your computer to a desk or other large object to deter theft Back side The figure below shows the computer s back side DC IN 1...

Страница 33: ...lug the modem cable from the telephone jack 2 Do not connect the modem to a digital telephone line A digital line will damage the modem External monitor port This 15 pin port lets you connect an external monitor i LINK IEEE1394 port Connect an external device such as a digital video camera to this port for high speed data transfer You must connect the AC adaptor when you use i LINK Universal Seria...

Страница 34: ... sure the display is closed before turning over your computer TAB TAB BATTERY PACK BATTERY RELEASE LATCH The underside of the computer Battery pack The battery pack powers the computer when the AC adaptor is not connected The Batteries section in Chapter 6 Power and Power Up Modes describes how to access the battery pack Additional battery packs can be purchased from your TOSHIBA dealer to extend ...

Страница 35: ...t with the display open Display hinge The display hinge holds the display screen at easy to view angles Display screen The full color LCD displays high contrast text and graphics and is compatible with the industry standard Video Graphics Array VGA The LCD consists of up to 1024 768 pixels or dots The computer has a Thin Film Transistor TFT display Refer to Appendix B When the computer operates on...

Страница 36: ...s Touch Pad control buttons Control buttons close to the Touch Pad let you select menu items or manipulate text and graphics designated by the on screen pointer Microphone A microphone lets you record sound into your applications Stereo speakers The speakers emits sound generated by your software LCD Sensor switch This switch senses when the LCD panel is closed or opened and activates the Panel Po...

Страница 37: ...r in Resume mode this indicator glows orange when the computer shuts down Refer to the Power indicators section in Chapter 6 Power and Power Up Modes Main battery The Main battery indicator shows the condition of the charge Green means fully charged and orange means being charged Refer to Chapter 6 Power and Power Up Modes Disk The Disk indicator glows green when the computer is accessing a disk d...

Страница 38: ...s The figures below show the positions of the keypad overlay indicators and the Caps Lock indicator When the F10 key indicator glows the keypad overlay lets you control the cursor When the F11 key indicator glows the keypad overlay lets you enter numbers Keypad overlay indicators When the Caps Lock indicator glows the keyboard is in all caps mode Caps Lock indicator ARROW MODE INDICATIOR NUMERIC M...

Страница 39: ... to the computer It can automatically adjust to any voltage from 100 to 240 volts and to a frequency of either 50 or 60 hertz enabling you to use the computer in almost any region To recharge the battery simply connect the AC adaptor to a power source and the computer See Chapter 6 Power and Power Up Modes for details The AC adaptor Some of the features described in this manual may not function pr...

Страница 40: ...he Disk In Use indicator when you use the diskette drive Do not press the eject button or turn off the computer while the light is glowing Doing so could destroy data and damage the diskette or the drive 1 The external diskette drive should be placed on a flat horizontal surface when in use Do not set the drive on an incline greater than 20o while it is operating 2 Do not set anything on top of th...

Страница 41: ...Pacific Islands Central America South America Caribbean 5 Russia Indian Subcontinent Africa North Korea Mongolia 6 China Writable discs This section describes the types of writable CD DVD discs Check the specifications for your drive to for the type of discs it can write Use Drag n Drop CD DVD to write compact discs Refer to Chapter 4 Operating Basics CDs CD R discs can be written only once The re...

Страница 42: ...OM drive The full size CD RW DVD ROM drive module lets you record data to rewritable CDs as well as run either 12 cm 4 72 or 8 cm 3 15 CD DVDs without using an adaptor The read speed is slower at the center of a disc and faster at the outer edge DVD read 8 speed maximum CD read 24 speed maximum CD R write 24 speed maximum CD RW write 24 speed maximum ultra speed media Formats The drives support th...

Страница 43: ...omputer explains product liability Connecting the AC adaptor Opening the display Turning on the power Windows XP Starting up for the first time setup Turning off the power Restarting the computer Restoring the Windows system If you are a new user follow the steps in each section of this chapter as you prepare to operate your computer All users should be sure to carefully read the section Windows X...

Страница 44: ...ly accessible The temperature should be 5 to 35 degrees Centigrade 41 to 95 degrees Fahrenheit and the relative humidity should be 20 to 80 percent Avoid areas where rapid or extreme changes in temperature or humidity may occur Keep the computer free of dust moisture and exposure to direct sunlight Keep the computer away from heat sources such as electric heaters Do not use the computer near liqui...

Страница 45: ...omputer to let you freely adjust the display The display should be angled to reduce glare and maximize visibility If you use a paper holder set it at about the same height and distance as the computer Seating and posture The height of your chair in relation to the computer and keyboard as well as the support it gives your body are primary factors in reducing work strain Refer to the following tips...

Страница 46: ...o vary your activities If possible schedule a variety of tasks into your work day If you must spend long periods at the computer finding ways to break up the routine can reduce stress and improve your efficiency Sit in a relaxed posture Good positioning of your chair and equipment as described earlier can reduce tension in your shoulders or neck and ease back strain Vary your posture frequently Oc...

Страница 47: ...s and use of them may produce heat and smoke or even result in fine or rupture 1 Use only the AC adaptor supplied with your computer or an equivalent adaptor that is compat ible Use of any incompatible adaptor could damage your computer TOSHIBA assumes no liability for any damage caused by use of an incompatible adaptor 2 When you connect the AC adaptor to the computer always follow the steps in t...

Страница 48: ...n battery and DC IN 15V indicator on the front of the computer should glow Opening the display The display panel can be rotated in a wide range of angles for optimal viewing 1 Push the display latch on the front of the computer to unlatch the display panel 2 Lift the panel up and adjust it to the best viewing angle for you When you open the display hold it with both hands and lift up slowly Openin...

Страница 49: ...kette is in the drive press the eject button and remove the diskette 2 Open the display 3 Press and hold the computer s power button for two or three seconds Turning on the power Starting up for the first time When you first turn on the power the computer s initial screen is the Microsoft Windows XP Startup Screen Logo Follow the on screen directions for each screen During setup you can click the ...

Страница 50: ...urn the computer or devices back on immediately Wait a moment to let all capacitors fully discharge Hibernation mode The hibernation feature saves the contents of memory to the hard disk when the computer is turned off The next time the computer is turned on the previous state is restored The hibernation feature does not save the status of peripheral devices 1 Save your data While entering hiberna...

Страница 51: ...tion by pressing Fn F4 See Chapter 5 The Keyboard for details To enter Hibernation mode follow the steps below 1 Click start 2 Select Turn Off Computer 3 Open the Turn Off Computer dialog box Hibernate is not displayed 4 Press the Shift key The Standby item will change to Hibernate 5 Select Hibernate Automatic Hibernation The computer will enter Hibernate mode automatically when you press the powe...

Страница 52: ...r utility 2 To restore operation from Standby mode press the power button or press any key The latter action works only if Wake up on Keyboard is enabled in HW Setup 3 If the computer automatically enters Standby mode while a network application is active the application might not be restored when the computer wakes up from Standby 4 To prevent the computer from automatically entering Standby mode...

Страница 53: ...OSHIBA Power Saver Utility described in the Control Panel Open Performance and Maintenance and open TOSHIBA Power Saver 3 Press the power button This feature must be enabled Refer to the Setup Action tab in TOSHIBA Power Saver Utility described in the Control Panel Open Performance and Maintenance and open TOSHIBA Power Saver When you turn the power back on you can continue where you left when you...

Страница 54: ...einstall the Windows operating system the hard disk will be reformatted and all data will be lost Make sure you have a backup copy of your data before you perform a complete system recovery 1 Load the Product Recovery disk in the fixed optical media drive and turn off the computer s power 2 Hold down the F12 key and turn on the power When In Touch with Tomorrow TOSHIBA appears release the F12 key ...

Страница 55: ...finger tip across it in the direction you want the on screen pointer to go Touch Pad and Touch Pad control buttons Two buttons below the keyboard are used like the buttons on a mouse pointer Press the left button to select a menu item or to manipulate text or graphics designated by the pointer Press the right button to display a menu or other function depending on the software you are using Do not...

Страница 56: ... of the Touch Pad Adjusting the sensitivity of your Touchpad You can adjust the sensitivity settings of Touchpad to your own preferences When your Touchpad is too sensitive or not sensitive enough to your finger pressure please read the following instructions to adjust the sensitivity settings 1 Open the Control Panel window 2 Double Click Mouse The Mouse Properties window appears For some functio...

Страница 57: ...m 3 15 CD DVDs without an adaptor An ATAPI interface controller is used for CD DVD ROM operation When the computer is accessing a CD DVD an indicator on the drive glows Use the WinDVD 4 application to view DVD Video discs If you have a CD RW DVD ROM drive refer also to the Writing CDs on CD RW DVD ROM drive section for precautions on writing to CDs If you have a DVD Multi drive refer also to the W...

Страница 58: ...ill need to turn the CD DVD at an angle when you place it in the tray After seating the CD DVD however make sure it lies flat as shown in next figure 1 Do not touch the laser lens Doing so could cause misalignment 2 Do not keep foreign matter from entering the drive Check the back edge of the tray to make sure it carries no debris before closing the drive 4 Press gently at the center of the CD DVD...

Страница 59: ... eject button Closing the CD DVD drawer Removing discs To remove the CD DVD follow the steps below and refer to figure below Do not press the eject button while the computer is accessing the optical media drive Wait for the CD ROM indicator to go out before you open the drawer Also if the CD DVD is spinning when you open the drawer wait for it to stop before you remove it 1 To pop the drawer parti...

Страница 60: ...W DVD ROM drive Depending on the type of drive installed you may be able to write CDs The CD RW DVD ROM drive lets you write as well as read CD ROMs Observe the precautions in this section to ensure the best performance for writing CDs For information on loading and unloading CDs refer to the Using optical media drive section CD R discs can be written only once CD RW discs can be rewritten many ti...

Страница 61: ...ically in the background Do not use hard disk utilities including those intended to enhance HDD access speed They may cause unstable operation and damage data Write from the computer s HDD to the CD Do not try to write from shared devices such as a LAN server or any other network device Writing with software other than Drag n Drop CD DVD has not been confirmed Therefore operation with other softwa...

Страница 62: ...DISC Backup function of Drag n Drop CD DVD Drag n Drop CD DVD cannot record in packet format You might not be able to use the DISC backup function of Drag n Drop CD DVD to back up a DVD R RW disc that was made with other software on a different DVD R RW recorder If you add data to a DVD R disc that you have already recorded to you might not be able to read the added data under some circumstances I...

Страница 63: ... Handle your media with care The following simple precautions will increase the lifetime of your media and protect the data stored on them CD DVDs 1 Store your CD DVDs in the container they came in to protect them and keep them clean 2 Do not bend the CD DVD 3 Do not write on apply a sticker to or otherwise mar the surface of the CD DVD that contains data 4 Hold the CD DVD by its outside edge or t...

Страница 64: ...your diskettes Foreign particles inside the diskette s jacket can damage the magnetic surface 6 Magnetic energy can destroy the data on your diskettes Keep your diskettes away from speakers radios television sets and other sources of magnetic fields Using a optional USB diskette drive A 3 1 2 diskette drive connects to the computer s USB port It accommodates 1 44 megabyte or 720 kilobyte diskettes...

Страница 65: ...re The following simple precautions will increase the lifetime of your diskettes and protect the data you store on them 1 Store your diskettes in the container they came in to protect them and keep them clean If a diskette is dirty do not use cleaning fluid Clean it with a soft damp cloth 2 Do not slide back the diskette s protective metal covering or touch the diskette s magnetic surface Fingerpr...

Страница 66: ...ure to enable WEP encryption function Otherwise your computer will allow the illegal access by outsider through Wireless LAN to cause illegal intrusion eavesdropping and loss or destruction of stored data TOSHIBA strongly recommend the customer to enable the WEP function 2 TOSHIBA is not liable for the eavesdropping of data due to the use of Wireless LAN and the damage thereof Wireless communicati...

Страница 67: ...gabits per second 10BASE T and Fast Ethernet LAN 100 megabits per second 100BASE TX This section describes how to connect disconnect to a LAN Do not install or remove an optional memory module while Wake up on LAN is enabled Wake up on LAN does not work without the AC adaptor Leave it connected if you are using this feature LAN cable types The computer must be configured properly before connecting...

Страница 68: ...damage may occur 1 Turn off the power to the computer and to all external devices connected to the computer 2 Plug one end of the cable into the LAN s jack Press gently until you hear the latch click into place Connecting the LAN cable 3 Plug the other end of the cable into a LAN hub connector Check with your LAN administrator before connecting to a hub Disconnecting LAN cable To disconnect the LA...

Страница 69: ...vate Mute click start point to All Programs point to Accessories point to Entertainment and click Volume Control In the Master Volume panel you can use the slide bars to adjust the volume level or click Mute at the bottom of the panel Using the internal modem If you purchased a computer model with a preinstalled internal modem read this section for directions on connecting the modem Refer to the o...

Страница 70: ...ou select a telephony location the corresponding region is automatically selected and it becomes the modem s current region setting Properties menu Click the icon with the secondary mouse button to display properties menu on the screen Setting You can enable or disable the following settings AutoRun Mode Region Select Utility starts automatically when you start up the operating system Open the Dia...

Страница 71: ...e used to connect a modem Connect the end of the modular cable with the core to the computer 1 In case of a lightning storm unplug the modem cable from the telephone jack 2 Do not connect the modem to a digital telephone line A digital line will damage the modem 1 Plug one end of the modular cable into the modem jack 2 Plug the other end of the modular cable into a telephone jack Connecting the in...

Страница 72: ...n a soft clean cloth and wipe the screen gently with the cloth Never spray cleaner directly onto the computer or let liquid run into any part of it Never use harsh or caustic chemical products to clean the computer Moving the computer The computer is designed for rugged durability However a few simple precautions taken when moving the computer will help ensure trouble free operation Make sure all ...

Страница 73: ...ing on the fan Use the Cooling Method item of the Basic Setup tab in TOSHIBA Power Saver Maximum Performance Turns on the fan first then if necessary lowers the CPU processing speed Performance Uses a combination of the fan and lowering the CPU processing speed Battery optimized Lowers the CPU processing speed first then if necessary turns on the fan When the CPU temperature falls to a normal rang...

Страница 74: ... marks and special symbols that appear on the screen There are some differences however between using a typewriter and using a computer keyboard Letters and numbers produced in computer text vary in width Spaces which are created by a space character may also vary depending on line justification and other factors The lowercase l el and the number 1 one are not interchangeable on computers as they ...

Страница 75: ...are key combinations that enable disable or configure specific features Some software may disable or interfere with soft key operations Soft key settings are not restored by the Standby feature Emulating keys on enhanced keyboard A 101 key enhanced keyboard layout The keyboard is designed to provide all the features of the 101 key enhanced keyboard shown in figure above The 101 102 key enhanced ke...

Страница 76: ...e enhanced keyboard s numeric keypad Press Fn Ctrl to simulate the enhanced keyboard s right Ctrl key Hotkeys Hotkeys Fn a function or Esc key let you enable or disable certain features of the computers Sound mute Pressing Fn Esc in a Windows environment turns sound on or off When you press these hotkeys the current setting will be displayed as an icon Instant security Press Fn F1 to blank the scr...

Страница 77: ...id entering Hibernation unexpectedly a dialog box appears for verification However if you check the checkbox in the dialog box it will not appear from the next time Display selection Press Fn F5 to change the active display device When you press these hot keys a dialog box appears Only selectable devices will be displayed Hold down Fn and press F5 again to change the device When you release Fn and...

Страница 78: ...s both Bluetooth and Wireless LAN functions you can press Fn F8 to select which type of wireless communication you want to use When you press these hot keys a dialog box will appear Continue holding down Fn and press F8 to change the setting If wireless communication is turned off Disabled Wireless Communication Switch will be displayed If no wireless communication device is installed no dialog bo...

Страница 79: ...of the keyboard with white letters make up the numeric keypad overlay The overlay provides the same functions as the numeric keypad on the 101 102 key enhanced keyboard in next figure Turning on the overlays The numeric keypad overlay can be used for numeric data input or cursor and page control Arrow mode To turn on the Arrow mode press Fn F10 The Arrow mode indicator lights Now try cursor and pa...

Страница 80: ...t and pressing a character key 3 Release Fn to continue using the overlay Temporarily using overlay overlay off While using the normal keyboard you can temporarily use the keypad overlay without turning it on 1 Press and hold down Fn 2 Check the keyboard indicators Pressing Fn turns on the most recently used overlay If the Numeric mode indicator lights you can use the overlay for numeric entry If ...

Страница 81: ...nerating ASCII characters Not all ASCII characters can be generated using normal keyboard operation But you can generate these characters using their ASCII codes With the overlay on 1 Hold down Alt 2 Using the overlay keys type the ASCII code 3 Release Alt and the ASCII character appears on the display screen With the overlay off 1 Hold Alt Fn 2 Using the overlay keys type the ASCII code 3 Release...

Страница 82: ...nditions whether an AC adaptor is connected whether a battery is installed and what the charge level is for the battery Power on Power off no operation Main battery fully charged Operates No charge LED Main battery green DC IN 15V green No charge LED Main battery green DC IN 15V green Main battery partially charged or no charge Operates Charge 1 LED Main battery orange DC IN 15V green Quick charge...

Страница 83: ... 15V and Power indicators on the system indicator panel alert you to the computer s operating capability and battery charge status Battery indicators Check the Main Battery indicator to determine the status of the main battery The following indicator lights indicate the battery status Flashing orange The battery charge is low The AC adaptor must be connected to recharge the battery Orange Indicate...

Страница 84: ...goes off when one minute has elapsed since you last turned the power off when one minute has elapsed since you opened the display panel and have not pressed the Power button The Power button light glows differently depending on the status of your computer Status Power on Standby Power off Hibernation Disabled Always off Mode 1 default Glows blue Glows yellow Glows orange Mode 2 Glows blue Alternat...

Страница 85: ...is powered off in Standby mode and the AC adaptor is not connected the Battery pack supply power to maintain data and program in memory If the Battery pack is completely discharged Standby mode does not function and the computer loses all data in memory To ensure that the Battery pack maintains its maximum capacity operate the computer on battery power at least once a month until the Battery pack ...

Страница 86: ...ing Indicates a potentially hazardous situation which could result in death or serious injury if you do not follow instructions Caution Indicates a potentially hazardous situation which if not avoided may result in moderate or minor injury or property damage Note Provides important information Danger 1 Never try to dispose of the Battery pack by burning or expose it to a heating device such as a m...

Страница 87: ...austic electrolyte fluid leaked from a Battery pack to contact your eyes skin or clothing If caustic electrolyte fluid should contact your eyes immediately wash your eyes with large amounts of running water and seek medical attention to help prevent eye damage If electrolyte fluid should contact your skin immediately wash it under running water to prevent rash If it contacts your clothes promptly ...

Страница 88: ...connecting the AC adaptor Never remove the Battery pack while the computer is in Suspend or Standby mode Data will be lost Note 1 Never remove the Battery pack while the Wake up on LAN function is enabled Data will be lost Before you remove a Battery pack disable the Wake up on LAN function 2 To ensure the Battery pack maintains maximum capacity operate the computer on battery power once a week un...

Страница 89: ... Use only the computer connected to an AC power source or the optional TOSHIBA Battery charger to charge the Battery pack Do not attempt to charge the Battery pack with any other charger Time The following table shows the approximate time required to fully charge a discharged battery Charging time hours Battery type Power on Power off Battery pack 3 to 12 or longer 2 5 RTC battery 8 Doesn t charge...

Страница 90: ...harge the battery until the Main battery indicator glows green Repeat the steps two or three times until the battery recovers normal capacity Leaving the AC adaptor connected will shorten battery life At least once a month run the computer on battery power until the battery is fully discharged then recharge the battery Monitoring battery capacity Remaining battery power can be monitored in TOSHIBA...

Страница 91: ...e the battery contained to begin with How you use optional devices such as a PC card to which the battery supplies power Enabling Resume mode conserves battery power if you are frequently turning the computer off and on Where you store your programs and data Closing the display when you are not using the keyboard saves power Operating time decreases at low temperatures The condition of the battery...

Страница 92: ...cate a low battery go to step 4 4 Connect the AC adaptor to the computer and the power cord to a power outlet The DC IN 15V indicator should glow green and the Main battery indicator should glow orange to indicate that the Battery pack is being charged If the DC IN 15V indicator does not glow power is not being supplied Check the connections for the AC adaptor and power cord 5 Charge the Battery p...

Страница 93: ...ry pack follow the steps below When handling Battery packs be careful not to short circuit the terminals Also do not drop hit or otherwise apply impact do not scratch or break the casing and do not twist or bend the Battery pack 1 Save all necessary data and shutdown Windows before you turn off your computer 2 Disconnect all the cables from the AC adapter and other external devices 3 Close the dis...

Страница 94: ...k is a lithium ion battery which can explode if not properly replaced used handled or disposed of Dispose of the battery as required by local ordinances or regulations Use only batteries recommended by TOSHIBA as replacements 1 Be sure the computer s power is off and all cables are disconnected 2 Install a Battery pack onto the battery cover Installing the Battery pack 3 Insert the Battery pack ba...

Страница 95: ... Enter the password 3 Press Enter If you enter the password incorrectly three times in a row the computer shuts off In this case you must turn the computer back on to retry password entry Power up modes The computer has the following power up modes Boot Computer shuts down without saving data Always save your work before you turn the computer off in boot mode Hibernation Data in memory is saved to...

Страница 96: ...puter so that power turns off automatically when you close the display panel When you open the panel power turns on in Standby or Hibernation mode but not in boot mode If the panel power off function is enabled and you use Shut down Windows do not close the display until the shut down function is completed System Auto Off This feature turns the system off automatically if it is not used for a set ...

Страница 97: ...cessing HW Setup Click start click Control Panel click Printers and Other Hardware and select TOSHIBA HW Setup to run HW Setup HW Setup window The HW Setup window contains the following tabs General Password Device Config Display CPU Boot Priority Keyboard USB LAN and Button setting There are also three buttons OK Cancel and Apply OK Accepts your changes and closes the HW Setup window Cancel Close...

Страница 98: ... Select Registered to display the following prompt Enter Password 2 Enter a password of up to 10 characters You can use the following characters space The character string you enter is displayed as a string of asterisks For example if you enter a password consisting of four characters the display is shown as Enter Password If you click the OK button before entering the password Not registered will...

Страница 99: ... You must repeat step 1 Incorrect Password If you enter the password incorrectly three times the screen will display Sorry access denied Powering off your machine then powering it back on again are required to regain access You will not be able to access the password option in the HW Setup In this case you must turn the power off and back on to retry the procedure 4 Follow the same procedures desc...

Страница 100: ...l LCD Default LCD Analog RGB Selects both the internal LCD and external monitor for simultaneous display CPU Dynamic CPU Frequency Mode This option lets you choose from the following settings Dynamically Switchable CPU power consumption and clock speed automatic switching function is enabled When the computer is in use CPU operation is automatically switched when necessary Default Always High CPU ...

Страница 101: ...nd HDD CD ROM LAN HDD FDD The computer looks for bootable files in the following order CD ROM LAN HDD diskette drive CD ROM LAN FDD HDD The computer looks for bootable files in the following order CD ROM LAN diskette drive and HDD You can override the settings and manually select a boot device by pressing one of the following keys while the computer is booting U Selects the USB diskette drive N Se...

Страница 102: ...oot priority settings in HW Setup 4 If you press a key other than one of those above or if the selected device is not installed the system will boot according to the current setting in HW Setup HDD Priority Options If more than one HDD is installed in the computer this option lets you set the priority for HDD detection If the first detected HDD has a boot command the system will boot from the HDD ...

Страница 103: ...ake up on Keyboard Disabled Disables the Wake up on Keyboard USB USB KB Mouse Legacy Emulation Use this option to enable or disable USB KB Mouse Legacy Emulation If your operating system does not support USB you can still use a USB mouse and keyboard by setting the USB KB Mouse Legacy Emulation item to Enabled Enabled Enables the USB KB Mouse Legacy Emulation Default Disabled Disables the USB KB M...

Страница 104: ...n Setting Power Button Lamp This drop down menu enables you to specify how the Power button lamp glows depending on the status of your computer Off Always off Mode 1 Sets Mode1 Glows blue Power on Glows yellow Standby Glows orange Power off Hibernation Default Mode 2 Sets Mode2 Glows blue Power on Alternately flashes green and orange Standby Alternately flashes green and blue Power off Hibernation...

Страница 105: ... Password Utility for instructions on setting the Supervisor Password The path to the readme file is C Program Files TOSHIBA Windows Utilities SVPWTool In the SVPWTool directory open the readme htm file To set a supervisor password follow the steps below 1 Click Start 2 Click Run 3 Enter the following C Program Files Toshiba Windows Utilities SVPWTool SVPW32 EXE If you set a supervisor password so...

Страница 106: ...its versatility The following optional devices are available from your TOSHIBA dealer Cards memory PC cards SD cards Memory expansion Power devices Battery pack Universal AC adaptor Battery charger Peripheral devices USB diskette drive External monitor TV i LINK IEEE1394 Other Security lock Portégé A100 User s Manual 8 1 ...

Страница 107: ...e left side of the computer Both connectors are accessed from the same slot You can install two Type II cards one in each connector or one Type III card in the bottom connector Windows hot install feature lets you install PC cards while the computer s power is on 1 Do not install a PC card while the computer is in standby or hibernation mode Some cards might not work properly 2 An HDD or CD ROM co...

Страница 108: ...D cards let you easily transfer data from devices such as digital cameras and Personal Digital Assistants that use SD card flash memory The cards have a high level of security and copy protection features The slot cannot accommodate Multi Media cards Keep foreign objects out of the SD card slot A pin or similar object can damage the computer s circuitry SD memory cards comply with SDMI Secure Digi...

Страница 109: ...on Inserting an SD card Make sure the SD card is oriented properly before you insert it Removing an SD card To remove an SD card follow the steps below 1 Open the Safely Remove Hardware icon on the system tray and disable the SD card 2 Push in the card and release it to pop the card out slightly 3 Grasp the card and remove it Removing an SD card SD CARD SD CARD ...

Страница 110: ...d so that it can be inserted only one way Do not try to force the card into the slot 4 Do not leave an SD card partially inserted in the slot Press the SD card until you hear it click into place 5 Do not twist or bend SD cards 6 Do not expose SD cards to liquids or store in humid areas or lay media close to containers of liquid 7 After using an SD card return it to its case 8 Do not touch the meta...

Страница 111: ...Installing memory module To install a memory module make sure the computer is in boot mode then 1 Set the computer to boot mode and turn the computer s power off Refer to the Turning off the power section in Chapter 3 2 Remove all cables connected to the computer 3 Turn the computer upside down and remove the Battery pack refer to Chapter 6 Power and Power Up Modes 4 Push the display latch on the ...

Страница 112: ... you lift up the keyboard Do not try to disconnect this cable 8 Raise the insulation sheet covering the memory module to appear the module And keep the insulation sheet raised using adhesive tape Raising the insulation sheet 9 Insert a new module to the socket and push it downward to lie flat Latches on eitherside will click into place to secure the module Do not touch the connectors on the memory...

Страница 113: ...rn the computer on and check the memory Open the System Properties icon in the Windows Control Panel and click the General tab Removing memory module To remove the memory module make sure the computer is in boot mode then 1 Be sure the power is off and all cables are disconnected from the computer 2 Turn the computer upside down and remove the Battery pack refer to Chapter 6 Power and Power Up Mod...

Страница 114: ...ing the memory module 6 Rotate the keyboard back into place and secure the keyboard brace as described in the previous section 7 Turn the computer upside down and replace the Battery pack Battery pack You can increase the portability of the computer with Battery packs If you re away from an AC power source you can replace a low battery with a fully charged one See Chapter 6 Power and Power Up Mode...

Страница 115: ... the monitor s power on 4 Turn the computer on Windows Logo is displayed on the display device which is set Power on Display in HW Setup Refer to Chapter 7 Power On Display HW Setup Passwords for more information But Windows Desktop is displayed on the display device which was used the last time when you shut down PC if the display device exists To change the display settings press Fn F5 If you di...

Страница 116: ...on to open the Display Properties window c Click the Settings tab and click the Advanced button d Click Intel Extreme Graphics tab click Graphics Properties button and click Devices tab e Select Television icon f Select the Video Standard list box and select the format that your TV supports Please select one of them NTSC M NTSC J or PAL B from the Video Standard list box though there are lots of s...

Страница 117: ...ed below to do the setting You cannot move from the Settings tab of Display Properties to the multi monitor when you are using the display of the computer and an external CRT display or a TV at the same time 1 The Settings tab is displayed in the following steps Classic View a Click start and click Control Panel b Double click the Display icon to open the Display Properties window c Click the Sett...

Страница 118: ...en select Apply button because the Primary Device is fixed into Notebook the display of the computer Intel R 82852 82855 GM GME Graphics Controller Prope 1 3 The following 10 kinds of mode are displayed in Video Standard setting Use PAL B only in UK Kinds of mode displayed in the menu bar of Video Standard setting NTSC M NTSC J PAL B PAL D PAL H PAL I PAL M PAL N NTSC 433 PAL G The Video Standardi...

Страница 119: ...ice 5 The reproduced picture may be up and down slightly in some DVD titles when reproduced by WinDVD The swing can be suppressed by the following procedure a Boot up WinDVD and click the circled part shown in figure below then select Display out of the list WIN DVD b The following sub panel is displayed then click the circled part shown in figure below WIN DVD Sub Panel c The following Set up scr...

Страница 120: ...D VIDEO Resolution dot CRT refresh rate Hz 1280x1024 16bpp 100 Hz 1600x1200 16 32bpp 75 85 Hz 1600x1200 16bpp 100 Hz 1920x1440 16bpp 60 75 85 Hz 2048x1536 16bpp 60 75 Hz 7 When Simultaneous Display or Multiple Monitors is selected in the Intel R 82852 82855 GM GME Graphics Controller Property dialog do not use the following combinations for the display settings of the CRT monitor These settings ar...

Страница 121: ... you want to change the resolution into 640x480 because it is difficulty to read character on TV follow the steps below 1 Open Display properties and select the Settings tab 2 Select Advanced Display properties 3 Select the Adapter tab then select List all modes The Adapter window ...

Страница 122: ...ames will be deleted in the case of digital video transfer TOSHIBA assumes no liability for such loss of data Do not transfer data in areas where static electricity is easily generated or in areas subjected to electronic noise Data can be destroyed If you are transferring data through an IEEE1394 hub do not connect or disconnect other devices from the hub during data transfer There is a likelihood...

Страница 123: ...eed to install drivers for your i LINK devices Not all i LINK devices have been tested therefore compatibility with all i LINK devices cannot be guaranteed Use S100 S200 or S400 cables no longer than three meters Some devices might not support standby or automatic off functions Do not connect or disconnect an i LINK device while it is using an application or when the computer is automatically shut...

Страница 124: ...ty lock enables you to anchor your computer to a desk or other heavy object to help prevent unauthorized removal of the computer Attach one end of a cable to the desk and the other end to the security lock slot on the Right side of the computer Security lock ...

Страница 125: ...rther action may result in data loss or damage You may destroy valuable problem related information that can help solve the problem Observe what is happening Write down what the system is doing and what actions you performed immediately before the problem occurred If you have a printer attached print a copy of the screen using PrtSc The questions and procedures offered in this chapter are meant as...

Страница 126: ...s to your dealer If a problem recurs the log will help you identify the problem faster Analyzing the problem Sometimes the system gives clues that can help you identify why it is malfunctioning Keep the following questions in mind Which part of the system is not operating properly keyboard diskette drives hard disk drive printer display Each device produces different symptoms Is the operating syst...

Страница 127: ...ough the items in the preliminary checklist above If you still cannot correct the problem try to identify the source The next section provides checklists for individual components and peripherals Hardware and system checklist This section discusses problems caused by your computer s hardware or attached peripherals Basic problems may occur in the following areas System start up Self test Power Pas...

Страница 128: ...m characters appear on the screen and the system does not function normally The screen displays an error message Turn off the computer and check all cable connections as well as PC card and memory module connections If the test fails again contact your dealer Power When the computer is not plugged into an AC outlet the Battery pack is the primary power source However your computer has a number of ...

Страница 129: ...down quickly contact your dealer Computer shuts down and its DC IN 15V indicator is flashing green Indicates a problem with the heat dispersal system Please contact your dealer AC power If you have trouble turning on the computer with the AC adaptor connected check the DC IN 15V indicator Refer to Chapter 6 Power and Power Up Modes for more information Problem Procedure Check the connections Make ...

Страница 130: ...r does not glow orange Unplug the AC adaptor and remove the battery to make sure the terminals are clean If necessary wipe them with a soft dry cloth dipped in alcohol Connect the AC adaptor and replace the battery Make sure it is securely seated Check the Main Battery indicator If it does not glow let the computer charge the battery for at least 20 minutes If the Main Battery indicator glows afte...

Страница 131: ...software you are using is not remapping the keyboard Remapping involves reassigning the meaning of each key See your software s documentation If you are still unable to use the keyboard consult your dealer LCD panel Apparent LCD problems may be related to the computer s setup Refer to Chapter 7 HW Setup and Passwords for more information Problem Procedure No display Press hotkeys Fn F5 to change t...

Страница 132: ...es If problems persist contact your dealer CD RW DVD ROM drive For more information refer to Chapter 4 Operating Basics Problem Procedure Make sure the drive s drawer is securely closed Press gently until it clicks into place Open the drawer and make sure the CD DVD is properly seated It should lie flat with the label facing up A foreign object in the drawer could block laser light from reading th...

Страница 133: ...ecautions Use only media recommended by TOSHIBA Do not use the mouse or keyboard during writing Use only the software supplied with the computer for recording Do not run or start other software during writing Do not jar the computer during writing Do not connect disconnect external devices or install remove internal cards during writing If problems persist contact your dealer Diskette drive For mo...

Страница 134: ...system might be busy If the pointer is shaped as an hourglass wait for it to standby its normal shape and try again to move it Double tapping does not work Try changing the double click speed setting in the mouse control utility 1 Open the Control Panel select the Mouse icon and press Enter 2 Click the Buttons tab 3 Set the double click speed as instructed and click OK The mouse pointer moves too ...

Страница 135: ...ck Touch Sensitivity 8 Move the slide bar for Touch Sensitivity to make an adjustment Click the OK button 9 Click the OK button on the Device Setting tab PC card Refer also to Chapter 8 Optional Devices Problem Procedure Reseat the PC card to make sure it is firmly connected Make sure the connection between the external device and the card is firm PC card error occurs Check the card s documentatio...

Страница 136: ...ty and make sure it is not set for the internal display Display error occurs Check that the cable connecting the external monitor to the computer is attached firmly If problems persist contact your dealer Sound system Problem Procedure Adjust the volume control dial Check the software volume settings Make sure the headphone connection is secure No sound is heard Check Windows Device Manager Make s...

Страница 137: ...munication software can t initialize modem Make sure the computer s internal modem settings are correct Refer to Modem Properties in the Control Panel You can hear a dial tone but can t make a call If the call is going through a PBX machine make sure the communication application s tone dial detection feature is disabled You can also use the ATX command You place a call but a connection can t be m...

Страница 138: ...control and communication protocol You cannot receive an incoming call Check the rings before auto answer setting in your communications application You can also use the ATS0 command If problems persist contact your dealer Standby Hibernation Problem Procedure The system will not enter Standby Hibernation Is Windows Media Player open The system might not enter Standby Hibernation if Windows Media ...

Страница 139: ...nect the AC adaptor and all peripheral devices 2 Remove the battery 3 Remove the memory module 4 Replace the battery and or connect the AC adaptor 5 Turn on the power If problems persist contact your dealer LAN Problem Procedure Cannot access LAN Check for a firm cable connection between the LAN jack and the LAN HUB If problems persist consult your LAN administrator Wireless LAN If the following p...

Страница 140: ...unction Restart Windows If problems persist contact your dealer Real Time Clock Problem Procedure The following message is displayed on the LCD RTC battery is low or CMOS checksum is inconsistent Press F1 key to set Date Time The battery for RTC is wearing Set the date and time in BIOS setup with the following steps 1 Press F1 key BIOS setup will boot up 2 Set the date in System Date 3 Set the tim...

Страница 141: ...eview troubleshooting sections in the documentation for software and peripheral devices If a problem occurs when you are running software applications consult the software documentation for troubleshooting suggestions Call the software company s technical support for assistance Consult the dealer you purchased your computer and or software from They are your best sources for current information an...

Страница 142: ...ti drive Wireless LAN Weight will vary depending on whether or not and what kind of options are adopted Environmental Requirements Conditions Ambient temperature Relative humidity Operating 5 C 41 F to 35 C 95 F 20 to 80 Non operating 20 C 4 F to 65 C 149 F 10 to 95 Thermal Gradient 20 C per hour maximum Wet bulb temperature 26 C maximum Conditions Altitude from sea level Operating 60 to 3 000 met...

Страница 143: ...tions Communication system Data Full duplex Fax Half duplex Communication protocol Data ITU T Rec Former CCITT V 21 V 22 V 22bis V 32 V 32bis V 34 V 90 V 92 Bell 103 212A Fax ITU T Rec Former CCITT V 17 V 29 V 27ter V 21 ch2 Communication speed Data transmission and reception speed 300 1200 2400 4800 7200 9600 12000 14400 16800 19200 21600 24000 26400 28800 31200 33600 bps Data reception only with...

Страница 144: ...00 A 3 Transmitting level 10 dBm Receiving level 10 to 40 dBm Input output impedance 600 ohms 30 Error correcting MNP class 4 and ITU T V 42 Data compression MNP class 5 and ITU T V 42bis Power supply 3 3V supplied by computer ...

Страница 145: ...sed All cords must meet the following specifications Length Minimum 2 metres Wire size Minimum 0 75 mm Current rating Minimum 2 5 Amperes Voltage rating 125 or 250 VAC depending on country region s power standards Certification agencies U S and Canada UL listed and CSA certified No 18 AWG Type SVT or SPT 2 two conductor Australia AS Japan DENANHO Europe Austria OVE Belgium CEBEC Denmark DEMKO Finl...

Страница 146: ...d States and Canada plug configuration must be a 2 15P 250 V or 1 15P 125 V as designated in the U S National Electrical code handbook and the Canadian Electrical Code Part II The following illustrations show the plug shapes for the U S A and Canada the United Kingdom Australia and Europe USA and Canada United Kingdom UL approved CSA approved BS approved Australia Europe AS approved Approved by th...

Страница 147: ...ontroller also controls the video mode which uses industry standard rules to govern the screen resolution and the maximum number of colors that can be displayed on screen Software written for a given video mode will run on any computer that supports the mode The computer s display controller supports all VGA and SVGA modes the most widely used industry standards Video modes The computer supports v...

Страница 148: ...of 256K 70 2 3 VGA Text 80 x 25 Characters 9 x 16 16 of 256K 16 of 256K 70 4 5 VGA Grph 320 x 200 Pels 8 x 8 4 of 256K 4 of 256K 70 6 VGA Grph 640 x 200 Pels 8 x 8 2 of 256K 2 of 256K 70 7 VGA Text 80 x 25 Characters 9 x 14 Mono Mono 70 7 VGA Text 80 x 25 Characters 9 x 16 Mono Mono 70 D VGA Grph 320 x 200 Pels 8 x 8 16 of 256K 16 of 256K 70 E VGA Grph 640 x 200 Pels 8 x 8 16 of 256K 16 of 256K 70...

Страница 149: ...K 256 256K 60 75 85 100 1280 x 1024 256 256K Virtual 256 256K 60 75 85 100 1400 x 1050 256 256K Virtual 256 256K 60 75 85 1600 x 1200 256 256K Virtual 256 256K 60 75 85 100 1920 x 1440 256 256K Virtual 256 256K 60 75 85 2048 x 1536 256 256K Virtual 256 256K 60 75 640 x 480 64K 64K 64K 64K 60 75 85 100 800 x 600 64K 64K 64K 64K 60 75 85 100 1024 x 768 64K 64K 64K 64K 60 75 85 100 1280 x 1024 64K 64...

Страница 150: ...Virtual 64K 64K 60 75 640 x 480 16M 16M 16M 16M 60 75 85 100 800 x 600 16M 16M 16M 16M 60 75 85 100 1024 x 768 16M 16M 16M 16M 60 75 85 100 1280 x 1024 16M 16M Virtual 16M 16M 60 75 85 100 1400 x 1050 16M 16M Virtual 16M 16M 60 75 85 1600 x 1200 16M 16M Virtual 16M 16M 60 75 85 100 1920 x 1440 16M 16M Virtual 16M 16M 60 75 85 2048 x 1536 16M 16M Virtual 16M 16M 60 75 Some SVGA modes are not suppor...

Страница 151: ...hould your computer be stolen however we ll help you try to find it Before contacting TOSHIBA please prepare the following information which is necessary to uniquely identify your computer In which country was your computer stolen What type of machine do you have What was the model number PA number What was the serial number 8 digits When was it stolen i e date What was the warranty seal number if...

Страница 152: ...cal Service and Support Leibnizstr 2 93055 Regensburg Germany Fax number 49 0 941 7807 925 Country stolen Machine type e g Portégé A100 Model number e g PSM30 YXT Serial number e g 70123456E Date stolen Warranty seal e g 9813 123456 049 Owner s details Name Company Street Postal Code City Country Phone Fax ...

Страница 153: ...e following pages The characters in the IBM char column appear on your display when you type the corresponding ASCII code as described in Chapter 5 Keyboard The characters that are printed however depend on the software you are using For most software the printed output for decimal codes 32 to 128 will match your screen display Portégé A100 User s Manual E 1 ...

Страница 154: ... 05 5 ENQ 006 06 6 ACK 007 07 7 BEL 008 08 8 BS 009 09 9 HT 010 0A 10 LF 011 0B 11 VT 012 0C 12 FF 013 0D 13 CR 014 0E 14 SO 015 0F 15 SI 016 10 16 DLE 017 11 17 DC1 018 12 18 DC2 019 13 19 DC3 020 14 20 DC4 021 15 21 NAK 022 16 22 SYN 023 17 23 ETB 024 18 24 CAN 025 19 25 EM 026 1A 26 SUB 027 1B 27 ESC 028 1C 28 FS 029 1D 29 GS 030 1E 30 RS 031 1F 31 US ...

Страница 155: ...54 36 6 54 055 37 7 55 056 38 8 56 057 39 9 57 058 3A 58 059 3B 59 060 3C 60 061 3D 61 062 3E 62 063 3F 63 Dec code Hex code IBM char Sort seq 064 40 64 065 41 A 65 066 42 B 66 067 43 C 67 068 44 D 68 069 45 E 69 070 46 F 70 071 47 G 71 072 48 H 72 073 49 I 73 074 4A J 74 075 4B K 75 076 4C L 76 077 4D M 77 078 4E N 78 079 4F O 79 080 50 P 80 081 51 Q 81 082 52 R 82 083 53 S 83 084 54 T 84 085 55 ...

Страница 156: ...7 75 u 117 118 76 v 118 119 77 w 119 120 78 x 120 121 79 y 121 122 7A z 122 123 7B 123 124 7C 124 125 7D 125 126 7E 126 127 7F 127 Dec code Hex code IBM char Sort seq 128 80 Ç 67 129 81 ü 85 130 82 é 69 131 83 â 65 132 84 ä 65 133 85 à 65 134 86 å 65 135 87 ç 67 136 88 ê 69 137 89 ë 69 138 8A è 69 139 8B ï 73 140 8C î 73 141 8D ì 73 142 8E Ä 65 143 8F Å 65 144 90 É 69 145 91 æ 65 146 92 Æ 65 147 9...

Страница 157: ...72 AC 172 173 AD 33 174 AE 34 175 AF 34 176 B0 177 B1 178 B2 179 B3 180 B4 181 B5 182 B6 183 B7 184 B8 185 B9 186 BA 187 BB 188 BC 189 BD 190 BE 191 BF Dec code Hex code IBM char Sort seq 192 C0 193 C1 194 C2 195 C3 196 C4 197 C5 198 C6 199 C7 200 C8 201 C9 202 CA 203 CB 204 CC 205 CD 206 CE 207 CF 208 D0 209 D1 210 D2 211 D3 212 D4 213 D5 214 D6 215 D7 216 D8 217 D9 218 DA 219 DB 220 DC 221 DD 22...

Страница 158: ...Sort seq 224 E0 α 225 E1 ß 83 226 E2 Γ 227 E3 Π 228 E4 229 E5 σ 230 E6 µ 231 E7 ϒ 232 E8 Φ 233 E9 Θ 234 EA Ω 235 EB δ 236 EC ϕ 237 ED φ 238 EE Ε 239 EF Λ 240 F0 Ξ 241 F1 242 F2 243 F3 244 F4 245 F5 246 F6 247 F7 248 F8 249 F9 250 FA 251 FB 252 FC η 253 FD 2 254 FE 255 FF ...

Страница 159: ...unning with a minimum of parameters Card specifications Form Factor Mini PCI Type III Compability IEEE 802 11 Standard for Wireless LANS Network Operating System Microsoft Windows Networking Media Access Protocol CSMA CA Collision Avoidance with Acknowledgment ACK Data Rate 11 5 5 2 1 Mb s Revision B Portégé A100 User s Manual F 1 ...

Страница 160: ...3 5 MHz Revision B Modulation Technique DSSS CCK DSSS DQPSK DSSSDBPSK Revision B The range of the wireless signal is related to the transmit rate of the wireless communication Communications at lower transmit range may travel larger distances The range of your wireless devices can be affected when the antennas are placed near metal surfaces and solid high density materials Range is also affected b...

Страница 161: ...follows For wireless clients that operate in a Wireless LAN Infrastructure the Wireless LAN card will automatically start operation at the channel identified by the Wireless LAN Access Point When roaming between different access points the station can dynamically switch to another channel if required For Wireless LAN cards installed in wireless clients operating in a peer to peer mode the card wil...

Страница 162: ... Ch1 Ch11 Australia Austria Belgium Canada Denmark Finland Germany Iceland Ireland Japan Luxembourg Netherlands New Zealand Norway Sweden Switzerland UK USA Greece Italy France Portugal Spain Liechtenstein Singapore China Korea Hong Kong Malaysia Philippines Thailand Indonesia Bahrain Czech Republic Jordan Lithuania Malta Monaco Romania Poland Saudi Arabia Estonia Slovakia Oman Turkey Egypt Bulgar...

Страница 163: ...dem or to check the PTT label 2 Do not disassemble the computer beyond the steps described in this instruction or touch any components not specifically described 3 Always remove the Battery Pack and disconnect the AC Adaptor before removing the base cover 4 Be careful not to drop any screws or other foreign matter into the computer Metal or other foreign matter can damage the computer Portégé A100...

Страница 164: ...tch at the end of the keyboard brace and remove the keyboard brace Slip your finger under a notch at the end of the both sides of keyboard brace slowly pull carefully and raise from right hand side 6 Remove two screws of the keyboard upper part and shift a keyboard to a display side 7 Remove three screws securing the palm rest 8 Lift off the palm rest 9 Connect the modem board cable to the modem b...

Страница 165: ...eyboard brace slowly pull carefully and raise from right hand side 6 Remove two screws of the keyboard upper part and shift a keyboard to a display side 7 Remove three screws securing the palm rest 8 Lift off the palm rest A standard label PTT label can be checked 9 Remove two screws securing the modem board 10 Disconnect the modem cable 11 Seat the palm rest removed in step 7 and 8 secure it with...

Страница 166: ...of flow at regular intervals analog signal A signal whose characteristics such as amplitude and frequency vary in proportion to are an analog of the value to be transmitted Voice communications are analog signals ANSI American National Standards Institute An organisation established to adopt and define standards for a variety of technical disciplines For example ANSI defined the ASCII standard and...

Страница 167: ...that controls data flow within the computer See also firmware bit Derived from binary digit the basic unit of information used by the computer It is either zero or one Eight bits is one byte See also byte board A circuit board An internal card containing electronic components called chips which perform a specific function or increase the capabilities of the system boot Short for bootstrap A progra...

Страница 168: ...synonymous with byte chassis The frame containing the computer chip A small semiconductor containing computer logic and circuitry for processing memory input output functions and controlling other chips CMOS Complementary Metal Oxide Semiconductor An electronic circuit fabricated on a silicon wafer that requires very little power Integrated circuits implemented in CMOS technology can be tightly pa...

Страница 169: ...ision set cursor A small blinking rectangle or line that indicates the current position on the display screen D data Information that is factual measurable or statistical that a computer can process store or retrieve data bits A data communications parameter controlling the number of bits binary digits used to make up a byte If data bits 7 the computer can generate 128 unique characters If data bi...

Страница 170: ... ROM A Digital Versatile Disc Read Only Memory is a high capacity high performance disc suitable for play back of video and other high density files The DVD drive uses a laser to read data from the disc DVD RW A Compact Disc Read Write disc can be rewritten many times E echo To send back a reflection of the transmitted data to the sending device You can display the information on the screen or out...

Страница 171: ...r to perform certain functions G gigabyte GB A unit of data storage equal to 1024 megabytes See also megabyte graphics The use of drawings pictures or other images such as charts or graphs to present information H hard disk A non removable disk usually referred to as drive C The factory installs this disk and only a trained engineer can remove it for servicing Also called fixed disk hard disk driv...

Страница 172: ...y how to perform a particular task interface 1 Hardware and or software components of a system used specifically to connect one system or device to another 2 To physically connect one system or device to another to exchange information 3 The point of contact between user the computer and the program for example the keyboard or a menu interrupt request A signal that gives a component access to the ...

Страница 173: ...e that displays a list of options on the screen Also called a screen microprocessor A hardware component contained in a single integrated circuit that carries out instructions Also called the central processing unit CPU one of the main parts of the computer mode A method of operation for example the boot mode standby mode or the hibernation mode modem Derived from modulator demodulator a device th...

Страница 174: ...ata files and controlling the transmission and receipt input output of data to and from memory and peripheral devices output The results of a computer operation Output commonly indicates data 1 printed on paper 2 displayed at a terminal 3 sent through the serial port of internal modem or 4 stored on some magnetic media P parallel interface Refers to a type of information exchange that transmits in...

Страница 175: ...it is ready for or requires information or an action from you R Radio frequency interference RFI shield A metal shield enclosing the printed circuit boards of the printer or computer to prevent radio and TV interference All computer equipment generates radio frequency signals The FCC regulates the amount of signals a computing device can allow past its shielding A Class A device is sufficient for ...

Страница 176: ...one red one green and blue RGB that make up a pixel on the colour LCD The computer sets subpixels independently each may emit a different degree of brightness See also pixel S video This connection provides separate lines for contrast and colour which produces a video image superior to that produced by a composite connection synchronous Having a constant time interval between successive bits chara...

Страница 177: ...a power source W warm start Restarting or resetting a computer without turning it off window A portion of the screen that can display its own application or document Often used to mean a Microsoft Windows window Wireless LAN Local Area Network LAN through wireless communication A short range radio technology designed to simplify wireless communication with other LAN systems based on Direct Sequenc...

Страница 178: ...or rewriting 4 6 When writing or rewriting 4 7 CD RW DVD ROM drive 2 13 Writing CDs 4 6 Certification agencies B 1 Charging the batteries 6 7 Cleaning the computer 4 18 Communications 1 6 Connecting the AC adaptor 3 5 Cooling 1 9 D DC IN 15V indicator 6 3 Diskette care 4 11 Diskettes 4 10 Disks 1 4 Display 1 4 controller 1 4 Display Driver for Windows 1 9 Display controller C 1 DVD drives and medi...

Страница 179: ...3 M Main battery 6 4 Maximizing battery operating time 6 10 Memory 1 3 expansion 1 11 Memory expansion 8 5 Microphone 4 15 Modem 1 6 built in A 2 Connecting 4 17 Disconnecting 4 17 Properties menu 4 16 Monitoring battery capacity 6 9 Moving the computer 4 18 Multimedia 1 6 O Opening the display 3 6 Operating Basics 4 1 Operating System 1 7 Optical media drives 4 3 Optional Devices 8 1 Options 1 11...

Страница 180: ... 8 4 Problems 9 11 Removing 8 4 SD cards 8 3 Seating and posture 3 3 Security 1 6 Security lock 1 11 8 19 Self test 9 4 Setting up your work space 3 2 Shut Down mode Boot mode 3 8 Slots 1 5 Soft keys Fn key combinations 5 2 Software 1 2 1 7 Sound system Sound drivers 1 10 volume control 2 3 Special features 1 7 Specifications A 1 Standby 1 8 Standby mode 3 10 Starting the computer by password 6 14...

Страница 181: ... A100 4 W Where to write 9 17 Windows special keys 5 6 Windows utilities 6 15 Wireless communication Indicator 4 12 Wireless communication switch 4 12 wireless LAN F 1 Wireless LAN 4 12 Problems 9 15 Work habits 3 4 ...

Отзывы: