e-STUDIO167/207/237
© February 2007 TOSHIBA TEC CORPORATION All rights reserved
DRUM RELATED SECTION
11 - 10
[B] Drum cleaner unit
(1)
Take out the process unit.
"
P.11-9 "[A] Process unit"
(2)
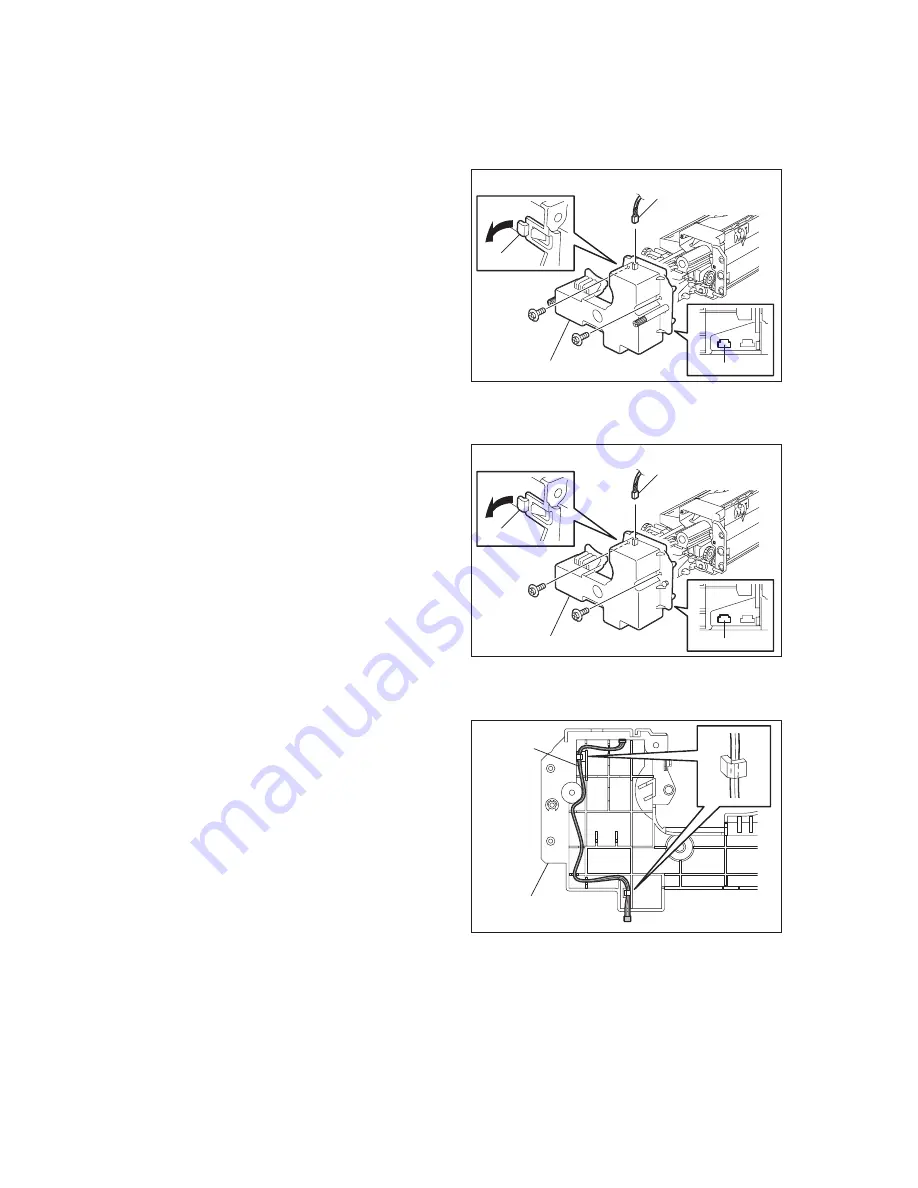
Disconnect 2 connectors and remove 2
screws.
(3)
Release 1 latch. Then pull out the process
unit front cover and take it off.
Note:
When installing the process unit front cover,
wire the harness correctly in order not to con-
tact the gears and harness of the process
unit front cover each other.
Fig. 11-8
Fig. 11-9
Fig. 11-10
Process unit front cover
Connector
Connector
Latch
for MJD
Process unit front cover
Connector
Connector
Latch
except for MJD
Process unit
front cover
Harness
07/03
Содержание E-Studio167
Страница 8: ...e STUDIO167 207 237 February 2007 TOSHIBA TEC CORPORATION All rights reserved CONTENTS 4 ...
Страница 54: ...e STUDIO167 207 237 February 2007 TOSHIBA TEC CORPORATION All rights reserved OUTLINE OF THE MACHINE 2 38 ...
Страница 68: ...e STUDIO167 207 237 February 2007 TOSHIBA TEC CORPORATION All rights reserved COPY PROCESS 3 14 ...
Страница 92: ...e STUDIO167 207 237 February 2007 TOSHIBA TEC CORPORATION All rights reserved CONTROL PANEL 5 10 ...
Страница 132: ...e STUDIO167 207 237 February 2007 TOSHIBA TEC CORPORATION All rights reserved LASER OPTICAL UNIT 8 8 ...
Страница 142: ...e STUDIO167 207 237 February 2007 TOSHIBA TEC CORPORATION All rights reserved DRIVE UNIT 9 10 ...
Страница 192: ...e STUDIO167 207 237 February 2007 TOSHIBA TEC CORPORATION All rights reserved DRUM RELATED SECTION 11 22 ...
Страница 214: ...e STUDIO167 207 237 February 2007 TOSHIBA TEC CORPORATION All rights reserved DEVELOPMENT SYSTEM 12 22 ...
Страница 260: ...e STUDIO167 207 237 February 2007 TOSHIBA TEC CORPORATION All rights reserved POWER SUPPLY UNIT 15 8 ...
Страница 264: ...e STUDIO167 207 237 February 2007 TOSHIBA TEC CORPORATION All rights reserved PC BOARDS 16 4 8 PWA F ADU Fig 16 8 ...
Страница 265: ......
Страница 266: ......


