background image

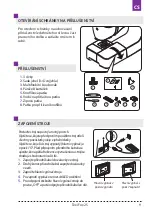
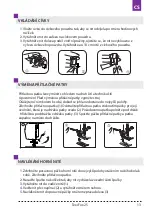
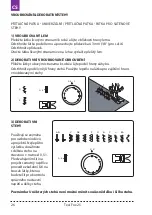
ŠITÍ VE ZPĚTNÉM CHODU

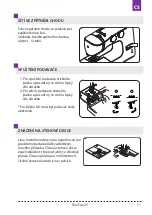
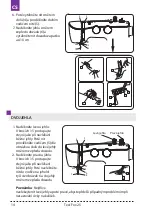
SPUŠTĚNÍ PODAVAČE

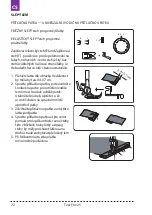
ZNAČENÍ NA STEHOVÉ DESCE

Šití ve zpětném chodu se používá pro 

zajištění konců švů.

Stiskněte tlačítko zpětného chodu a 

ušijte 4 - 5 stehů.

Linie na stehové desce jsou nápomocné pro

pravidelné podávání látky a dodržení 

švového přídavku. Čísla na stehové desce 

značí vzdálenost linee od jehly ve středové 

poloze. Čísla vepředu jsou v milimetrech, 

číselná označení vzadu jsou v palcích.

1. 

Pro spuštění podavače stiskněte 

páčku a posuňte ji ve směru šipky 

dle obrázku.

2. 

Pro zdvih podavače stiskněte 

páčku a posuňte ji ve směru šipky 

dle obrázku.

* Pro běžné šití musí být podavač vždy 

aktivován.

4

2

1

3

KNOWING


YOUR


SEWING


MACHINE

Converting


to


free

-

arm


sewing

Your machine can be used either as a flat-bed or as a 
free-arm model.
With the extension table in position, it provides a 
large working surface as a standard flat-bed model.
To remove the extension table, hold it firmly with both 

hands and pull it off to the left as shown. To replace, 
slide the extension table back into place until it 
clicks.
With the extension table removed the machine 
converts into a slim free-arm model for sewing 

children’s clothes, cuffs, trouser legs, and other 
hard-to-reach places.

Presser foot lifter

There are three positions for your presser foot.
1. Lower the presser foot to sew.
2. Raise the lifter to the middle position to insert or remove 

fabric.

3. Lift it to its highest position to change the presser foot or to 

remove thick fabric.

Reverse sewing lever

As long as you are pressing down this 
button while sewing, the machine will feed 
the fabric backwards.

Dropping the feed dogs

1. For dropping the feed dogs, press down 

lever and move it to the direction of arrow 
as illustrated.

2. To raise the feed dogs, press down the 

lever and move it to the direction or arrow 
as illustrated.

* Feed dogs must always be up for normal 

sewing.

5

1

2

3

KNOWING


YOUR


SEWING


MACHINE

KNOWING


YOUR


SEWING


MACHINE

Seam guide line

The numbers on the needle plate indicate 
the distance between the center needle 
position and the indicating line.
The numbers in the front indicate in 
Millimeters.
The numbers in the back indicate in inches.

Setting spool pins

The spool pins are used for holding the spool of thread in order 
to feed thread to the machine.
To use, pull up the spool pin. Push down for storage.

Winding the bobbin

1. Place a spool of thread on the left spool pin. Pull 

the thread out from the spool and place it through 
thread guide as shown in illustration. Put end of 
thread through the hole in bobbin as shown.

2. Push the bobbin wider shaft to far left position, if 

it is not already there. Place bobbin onto the 
bobbin wider shaft with end of thread coming 
from top of bobbin. Push bobbin winder shaft to 
the right until it clicks. Hold onto end of thread.

3. Start machine. Bobbin will automatically stop 

turning when completely filled. Push shaft to the 
left to remove bobbin and cut thread.

Texi Fox 25

11

CS

Содержание Fox 25

Страница 1: ...MULTIFUNCTIONAL SEWING MACHINE 2 A L K J I H G F E D C B 3...

Страница 2: ......

Страница 3: ...CS U ivatelsk manu l 4 Benutzerhandbuch 32 DE User manual 60 EN Manual de usuario 88 ES Manuel d utilisation 116 FR Instrukcja obs ugi 144 PL 172 RU...

Страница 4: ...kud je n kter z ventila n ch otvor blokov n Udr ujte ventila n otvory stroje i ped l ist 5 Nikdy nevkl dejte dn p edm ty do otvor stroje 6 Nepou vejte venku 7 Nepou vejte v m stnostech kde se pou vaj...

Страница 5: ...Texi Fox 25 5 CS...

Страница 6: ...JEN C VEK 12 ODSTRAN N I VLO EN C VKOV HO POUZDRA 12 VKL D N C VKY 13 V M NA P TLA N PATKY 13 NAVL K N HORN NIT 13 DVOJJEHLA 14 NAVL KA JEHLY 15 VTA EN SPODN NIT 16 TABULKA MATERI L NIT A JEHELT 16 NA...

Страница 7: ...OV D RKY 25 LASTUROV STEH 25 VROUBKOV N DEKORATIVN STEHY 26 VROUBKOVAN LEM 26 DEKORATIVN VROUBKOVAN OBROUBEN 26 DEKORATIVNI STEHY 26 ASEN 27 DR BA 27 I T N PODAVA E 28 MAZ N JEHELN TY E 29 PROBL MY P...

Страница 8: ...oubek jeheln svorky 33 P ka pro zdvih p tla n patky HLAVN STI 3 NAZWY CZ CI 1 Pokr t o regulacji d ugo ci ciegu 2 Pokr t o wyboru ciegu 3 Regulator napr enia nici 4 Pokrywa boczna 5 Pokrywa g rna prze...

Страница 9: ...om power supply by removing the plug from the wall outlet Sewing speed can be varied the foot control The harder you press on the control the faster machine runs Accessories 1 Bobbins 3pcs 2 Needle 3...

Страница 10: ...runs Power light switch OFF Power light switch ON 2 1 3 KNOWING YOUR SEWING MACHINE Converting to free arm sewing Your machine can be used either as a flat bed or as a free arm model With the extensio...

Страница 11: ...d 2 To raise the feed dogs press down the lever and move it to the direction or arrow as illustrated Feed dogs must always be up for normal sewing 4 2 1 3 Presser foot lifter There are three positions...

Страница 12: ...wad przez prowadnik na pokrywie g r nej 1 2 Przeci gnij nitk przez otw r w szpulce od wewn trz na zewn trz i za szpulk b benka na trzpie szpulownika 3 Przesu trzpie ze szpulk w prawo 2 5 Przytrzymaj z...

Страница 13: ...bobbin should spin clockwise Changing the presser foot 1 Turn the hand wheel toward you to raise the needle to its highest position Raise the presser foot 2 Press the lever on the back of the presser...

Страница 14: ...n and slip it into needle bar thread guide 6 Finally thread into the left needle eye from front to back 2 Thread the right needle according to the way of threading single needle from step one to step...

Страница 15: ...utomatick navl ka Navl ka nelze pou t pro navle en dvojjehly NAVL KA JEHLY 8 1 2 3 4 5 6 KNOWING YOUR SEWING MACHINE Using automatic needle threader Raise the needle to its highest position by rotatin...

Страница 16: ...e fabric n thread t and hold the needle thread lightly lowly towards you with your right goes down and continue turning the ake up lever is at its highest edle thread forming a loop of the of both thr...

Страница 17: ...d owym ciegu ni g rna i ni b benka wci gane s w r wnym stopniu do ma tworzy si po rodku zszywanych warstw tkaniny 11 WYMIANA IG Y Dobierz odpowiedni system ig y i jej grubo w zale no ci od rodzaju szy...

Страница 18: ...hen forward and reverse feeds become unbalanced depending upon the type of fabric correct the hand as follows When patterns are compressed correct it by turning the dial toward When patterns are drawn...

Страница 19: ...es Raise the presser foot and remove the fabric drawing the threads to back The threads are cut the proper length for starting the next seam KNOWING YOUR SEWING MACHINE Useful sewing tips Various ways...

Страница 20: ...trol Gently guide the fabric along the guide line letting the fabric feed by itself For fastening the ends of seams press the reverse stitch button and sew several reverse stitches Raise the presser f...

Страница 21: ...sewing on buttons etc Overlock stitch This type of stitch is used on the seam allowance to prevent fabrics from fraying at raw edges Overedge stitch Overedge stitch will be done most successfuly when...

Страница 22: ...screw and the shank of foot holder Tighten the screw making sure the wall of hem guide is placed in the middle of the toes of the presser foot Raise the presser foot and place the fabric under the fo...

Страница 23: ...the gimp cord straightly 7 Cut the gimp cord Attach the zipper foot When sewing the right side of the zipper attach the zipper foot as the illustration in right When sewing the left side of the zippe...

Страница 24: ...guzik na pr bce tkaniny i oznacz szczyt i ko niec by okre li d ugo dziurki 2 Za stopk do obszywania dziurek stron z podzia k do przodu Przenie oznaczenia d ugo ci dziurki z mate ria u na podzia k na s...

Страница 25: ...po adovanou knofl kovou d rku 5 Po do it uvoln te kord z patky a odst ihn te p esahuj c st 6 Pro zn te knofl kovou d rku postupujte opatrn a nedojde k po kozen steh LASTUROV STEH P ilo te p elo enou...

Страница 26: ...i stranama k sob a ijte pod l hrany z hybu Odst ihn te pod l vn j hrany steh Pou ijte lepidlo na l tku pro zaji t n hran s vroubkovan mi stehy 3 DEKORATIVNI STEHY Pou vaj se zejm na pro ozdoben od v a...

Страница 27: ...xagonov m stehem mezi adami rovn ch steh Pozn mka Pro snadn j nab r n uvoln te nap t horn nit I T N CHAPA E Upozorn n P ed samotn ch i t n m i odstra ov n m kryt stroje nejd ve vypn te hlavn vyp na st...

Страница 28: ...Odstra te jehlu a p tla nou patku Odstra te roubky jeheln desky a odstra te jeheln desku Kart kem o ist te zoubky podava e a znovu nasa te jeheln desku 5 Vy ist te dr hu chapa e pomoc kart ku a such h...

Страница 29: ...st l bez pou it kapn te n kolik kapek oleje do mazac ch bod a spus te stroj po dobu cca 1 minuty napr zdno na vysokourychlost P ed maz n m je t ot ete v echny mazac body 2 Doporu uje se olejovat ozna...

Страница 30: ...e c vkov pouzdro za nov Jehla se l me Jehla nen spr vn nasazena Zkontrolujte a nasa te jehlu spr vn Jehla je tup nebo ohnut Vym te jehlu za novou roub jeheln svorky nen spr vn dota en Ut hn te roub je...

Страница 31: ...n te knofl kovou p ku Knofl kov p ka je zdvi ena v pr b hu it knofl kov d rky Spus te knofl kovou p ku Nit se zamotala v c vce Zkontrolujte a vlo te novou c vku Stroj je p li hlu n nebo pomal Nit se z...

Страница 32: ...Freien benutzt werden Achten Sie darauf dass die Maschine in einem trockenen Raum benutzt wird 7 Benutzen Sie die Maschine in solchen Bereichen nicht in denen Aerosol Spray Produkte verwendet werden o...

Страница 33: ...chalter auf 0 immer wenn Sie etwas neben der Nadel machen Einf deln Spulenkapselwechsel N hfu wechsel usw 18 Trennen Sie die Maschine vor der Stromversorgung immer wenn Sie die Wartungsarbeiten durchf...

Страница 34: ...SPULE IN DIE SPULENKAPSEL 41 WECHSELN DES N HFUSSES MATIC SYSTEM 41 EINF DELN DES OBERFADENS 41 DOPPELNADEL 42 NADELEINF DLER 43 UNTERFADEN NACH OBEN BRINGEN 44 TABELLE MIT AUSWAHL VON N HGUTABH NGIGE...

Страница 35: ...SCHELSTICH UND DEKORATIVE MUSTER 54 MUSCHELSAUM 54 DEKORATIVE MUSCHELSTICH KANTE 54 ZIERSTICHE 54 FALTEN 55 REINIGUNG UND WARTUNG DER MASCHINE 55 REINIGEN VON GREIFER 55 REINIGEN VON TRANSPORTEUR 56 L...

Страница 36: ...estigungsschraube 33 Hebel zur Fu l ftung TEILE DER N HMASCHINE 3 NAZWY CZ CI 1 Pokr t o regulacji d ugo ci ciegu 2 Pokr t o wyboru ciegu 3 Regulator napr enia nici 4 Pokrywa boczna 5 Pokrywa g rna pr...

Страница 37: ...nect the machine from power supply by removing the plug from the wall outlet Sewing speed can be varied the foot control The harder you press on the control the faster machine runs Accessories 1 Bobbi...

Страница 38: ...ewing speed can be varied the foot control The harder you press on the control the faster machine runs Power light switch OFF Power light switch ON 2 1 3 KNOWING YOUR SEWING MACHINE Converting to free...

Страница 39: ...s highest position to change the presser foot or to remove thick fabric Reverse sewing lever As long as you are pressing down this button while sewing the machine will feed the fabric backwards Droppi...

Страница 40: ...po krowca nale y wciska stojaki w d w obudow STOJAKI NA NICI NAWIJANIE NICI NA SZPULK 1 Na szpul z nici na jeden ze stojak w Poci gnij nitk ze szpulki i przeprowad przez prowadnik na pokrywie g r nej...

Страница 41: ...bobbin case When you pull the thread the bobbin should spin clockwise Changing the presser foot 1 Turn the hand wheel toward you to raise the needle to its highest position Raise the presser foot 2 P...

Страница 42: ...ead the left needle according to the way of threading single needle from step one to step five then fix the thread into the double needle spring as point 5 in the right picture Draw thread down and sl...

Страница 43: ...oblemlos durchf hren zu k nnen stellen Sie den Geradstich ein Der Nadeleinf dler darf w hrend des Einf delns der Doppelnadel nicht benutzt werden NADELEINF DLER 8 1 2 3 4 5 6 KNOWING YOUR SEWING MACHI...

Страница 44: ...thread lightly lowly towards you with your right goes down and continue turning the ake up lever is at its highest edle thread forming a loop of the of both thread back and under the 9 KNOWING YOUR SE...

Страница 45: ...wiednie napr enie za pomoc pokr t a regulacji napr enia nitki w zale no ci od grubo ci i ilo ci war materia u oraz rodzaju nici W prawid owym ciegu ni g rna i ni b benka wci gane s w r wnym stopniu do...

Страница 46: ...al The higher the number the longer the stitch length You can select the suitable stitch length for most fabric Raise the needle above the fabric and select the desired pattern at the setting mark by...

Страница 47: ...ing the fabric feed by itself For fastening the ends of seams press the reverse stitch button and sew several reverse stitches Raise the presser foot and remove the fabric drawing the threads to back...

Страница 48: ...he fabric Lower the presser foot and smooth the thread towards the back Depress the foot control Gently guide the fabric along the guide line letting the fabric feed by itself For fastening the ends o...

Страница 49: ...ie die Stoffresten ab Benutzen Sie dazu den Standardfu UTILITY STITCHES Zigzag stitch Simple zigzag stitching is widely used for overcastting sewing on buttons etc Overlock stitch This type of stitch...

Страница 50: ...ric as illustrated Lower the presser foot then loosen the foot holder screw to place the hem guide between the screw and the shank of foot holder Tighten the screw making sure the wall of hem guide is...

Страница 51: ...ttonhole according to page 17 6 Pull the gimp cord straightly 7 Cut the gimp cord Attach the zipper foot When sewing the right side of the zipper attach the zipper foot as the illustration in right Wh...

Страница 52: ...tebefindenwird 4 StellenSiedasStichauswahl EinstellradaufdiePosition OBSZYWANIE DZIUREK 1 Umie guzik na pr bce tkaniny i oznacz szczyt i ko niec by okre li d ugo dziurki 2 Za stopk do obszywania dziur...

Страница 53: ...gung des N hens schneiden Sie das restliche Band ab achten Sie darauf dass die N hte nicht besch digt werden 6 Mittels eines Messers schneiden Sie das Loch in der Mitte vorsichtig durch MUSCHELSAUM MU...

Страница 54: ...der Naht achten Sie darauf die N hte nicht zu durchschneiden 3 Verwenden Sie Nahtabdichtung oder Textilkleber um die R nder der Muschel N hten zu sichern 3 ZIERSTICHE Dienen vor allem dazu die Ziern...

Страница 55: ...e F den der Geradstiche heraus REINIGEN VON GREIFER Damit die Maschine lange betriebsf hig bleibt ist es notwendig die wichtigsten Teile zu reinigen Achtung bei Reinigung und Wartung muss die Maschine...

Страница 56: ...schmieren 5 MitdemReinigungspinsel denGreiferundden Greiferbereichreinigen 6 Ein Mal pro Woche den Greifer mit einem Tropfen Vaselin l schmieren LEN DER MASCHINE Achtung bei Reinigung und Wartung mus...

Страница 57: ...htige Stelle ACHTUNG Nach dem len legen Sie einige Stoffresten unter den N hfu und schalten Sie die Maschine ein ohne sie einzuf deln Die Maschine soll einige Minuten lang so arbeiten um das berfl ssi...

Страница 58: ...el und den Greifer Defekte Trommel Verwenden Sie eine neue Trommel Die Nadel bricht Fehlerhaft eingesetzte Nadel Setzen Sie erneut die Nadel gem Bedienungsanleitung ein Krumme oder stumpfe Nadel Verwe...

Страница 59: ...Lochn hversuchs Senken Sie den Lochn hhebel zur seiner unteren Stellung Der Faden bleibt am Trommelbolzen h ngen Positionieren Sie die Spule und die Trommel fehlerfrei Die N hmaschine arbeitet zu laut...

Страница 60: ...electrical or mechanical adjustment 4 Never operate the appliance with any air opening blocked Keep ventilation openings of this sewing machine and foot controller free from accumulation of lint dust...

Страница 61: ...EN SAVE THESE INSTRUCTIONS This sewing machine is designed and manufactured for household use only Texi Fox 25 61...

Страница 62: ...BOBBIN CASE 68 INSERTING THE BOBBIN 69 CHANGING THE PRESSER FOOT 69 THREADING THE UPPER THREAD 69 TWEEN NEEDLE 70 NEEDLE THREADER 71 DRAWING UP THE BOBBIN THREAD 72 FABRIC THREAD AND NEEDLE TABLE 72 I...

Страница 63: ...80 CORDED BUTTONHOLES 81 SHELL TUCK 81 SCALLOP STITCHES DECORATIVE STITCHES 82 SHIRRING 83 MAINTANANCE 83 CLEANING AND REMOVING THE HOOK 83 CLEANING THE FEED DOG 84 OILING THE MACHINE 85 HELPFUL HINT...

Страница 64: ...rew 33 Presser foot lifter MAIN PARTS 3 NAZWY CZ CI 1 Pokr t o regulacji d ugo ci ciegu 2 Pokr t o wyboru ciegu 3 Regulator napr enia nici 4 Pokrywa boczna 5 Pokrywa g rna przednia 6 Podci gacz nitki...

Страница 65: ...l is disconnected the machine will not operate Always disconnect the machine from power supply by removing the plug from the wall outlet Sewing speed can be varied the foot control The harder you pres...

Страница 66: ...The harder you press on the control the faster machine runs Power light switch OFF Power light switch ON 2 1 3 KNOWING YOUR SEWING MACHINE Converting to free arm sewing Your machine can be used eithe...

Страница 67: ...Reverse sewing lever As long as you are pressing down this button while sewing the machine will feed the fabric backwards Dropping the feed dogs 1 For dropping the feed dogs press down lever and move...

Страница 68: ...szpulki i przeprowad przez prowadnik na pokrywie g r nej 1 2 Przeci gnij nitk przez otw r w szpulce od wewn trz na zewn trz i za szpulk b benka na trzpie szpulownika 3 Przesu trzpie ze szpulk w prawo...

Страница 69: ...he bobbin should spin clockwise Changing the presser foot 1 Turn the hand wheel toward you to raise the needle to its highest position Raise the presser foot 2 Press the lever on the back of the press...

Страница 70: ...t 5 in the right picture Draw thread down and slip it into needle bar thread guide 6 Finally thread into the left needle eye from front to back 2 Thread the right needle according to the way of thread...

Страница 71: ...ching when using the needle threader Automatic needle threader cannot be used for double needle NEEDLE THREADER 8 1 2 3 4 5 6 KNOWING YOUR SEWING MACHINE Using automatic needle threader Raise the need...

Страница 72: ...n thread on the top side of the fabric n thread t and hold the needle thread lightly lowly towards you with your right goes down and continue turning the ake up lever is at its highest edle thread for...

Страница 73: ...rna i ni b benka wci gane s w r wnym stopniu do ma tworzy si po rodku zszywanych warstw tkaniny 11 WYMIANA IG Y Dobierz odpowiedni system ig y i jej grubo w zale no ci od rodzaju szytego materia u UW...

Страница 74: ...ting stretch stitch patterns When sewing stretch set the stitch length dial at SS When forward and reverse feeds become unbalanced depending upon the type of fabric correct the hand as follows When pa...

Страница 75: ...the reverse stitch button and sew several reverse stitches Raise the presser foot and remove the fabric drawing the threads to back The threads are cut the proper length for starting the next seam KNO...

Страница 76: ...e Lower the needle into the fabric Lower the presser foot and smooth the thread towards the back Depress the foot control Gently guide the fabric along the guide line letting the fabric feed by itself...

Страница 77: ...astting sewing on buttons etc Overlock stitch This type of stitch is used on the seam allowance to prevent fabrics from fraying at raw edges Overedge stitch Overedge stitch will be done most successfu...

Страница 78: ...sser foot then loosen the foot holder screw to place the hem guide between the screw and the shank of foot holder Tighten the screw making sure the wall of hem guide is placed in the middle of the toe...

Страница 79: ...gimp cord Attach the zipper foot When sewing the right side of the zipper attach the zipper foot as the illustration in right When sewing the left side of the zipper attach the zipper foot as the ill...

Страница 80: ...itshighestpositionby turningthehandwheel 5 Choose 18 1 Umie guzik na pr bce tkaniny i oznacz szczyt i ko niec by okre li d ugo dziurki 2 Za stopk do obszywania dziurek stron z podzia k do przodu Przen...

Страница 81: ...buttonhole pattern and start to sew 4 When completed release the cord from foot and snip off extra length 5 Cut center of buttonhole being careful not to cut stitches on either side SHELL TUCK Used m...

Страница 82: ...ft sides together and stitch near the edge 2 Trim along the outside edge of the stitching 3 Use seam sealant or fabric glue to secure edges of the scallop stitching 3 DECORATIVE STITCHES Used mainly f...

Страница 83: ...omb stitch between the gathering stitches Pull out the gathering stitches CLEANING AND REMOVING THE HOOK CAUTION Unplug the power supply before making below acitivies 1 Raise the needle to its highest...

Страница 84: ...needle and the presserfoot Remove the needle plate set screws and remove the needle plate With a brush clean out dust from the feed dog teeth Insert the needle plate 5 Clean the shuttle race with a br...

Страница 85: ...In case the machine does not work smoothly due to standing idle for some time apply a few drops of kerosene at the oiling point and turn the machine rapidly for a minute Before oiling wipe off oiling...

Страница 86: ...Needle inserted incorrectly Reinsert needle Needle bent or blunt Replace needle for new one Needle incorrectly screwed Tighten the screw Upper thread tension too tight Readjust thread tension Machine...

Страница 87: ...ring buttonhole sewing Lower buttonhole lever Machine works too laud or too slow The thread tangled up in bobbin Reinsert bobbin and thread Dirt in the bobbin and hook area blocked feed dog Clean feed...

Страница 88: ...a ha sido golpeada o da ada o si ha estado en contacto con el agua En caso de presentarse algunas de las situaciones citadas acuda al servicio t cnico autorizado m s pr ximo para revisarla repararla o...

Страница 89: ...pre la aguja en la posici n m s alta para evitar que se rompa la aguja o se produzca cualquier otro tipo de da o en la m quina 20 Al realizar cualquier tipo de actividad cerca de la aguja como enhebra...

Страница 90: ...CANILLA EN EL CARRETE 97 CAMBIO DEL PIE SISTEMA MATIC 97 ENHEBRADO DE HILO SUPERIOR 97 AGUJA DOBLE 98 ENHEBRADO DE LA AGUJA 99 EXTRACCI N DEL HILO DE LA BOBINA 100 TABLA DE COMBINACIONES ENTRE TEJIDOS...

Страница 91: ...DECORATIVAS 110 FEST N ENROLLADO 110 FEST N DECORATIVO JUNTO AL BORDE 110 PUNTADAS DE RASO DECORATIVAS 110 FRUNCIDO 111 LIMPIEZA Y MANTENIMIENTO DE LA M QUINA 111 LIMPIEZA DE LA LANZADERA 111 LIMPIEZ...

Страница 92: ...rensatelas 32 Tornillo de montaje de aguja 33 Palanca de elevaci n del pie prensatelas NOMBRES DE LAS PARTES 3 NAZWY CZ CI 1 Pokr t o regulacji d ugo ci ciegu 2 Pokr t o wyboru ciegu 3 Regulator napr...

Страница 93: ...upply by removing the plug from the wall outlet Sewing speed can be varied the foot control The harder you press on the control the faster machine runs Accessories 1 Bobbins 3pcs 2 Needle 3 pcs and tw...

Страница 94: ...et Sewing speed can be varied the foot control The harder you press on the control the faster machine runs Power light switch OFF Power light switch ON 2 1 3 KNOWING YOUR SEWING MACHINE Converting to...

Страница 95: ...ositions for your presser foot 1 Lower the presser foot to sew 2 Raise the lifter to the middle position to insert or remove fabric 3 Lift it to its highest position to change the presser foot or to r...

Страница 96: ...y wciska stojaki w d w obudow STOJAKI NA NICI NAWIJANIE NICI NA SZPULK 1 Na szpul z nici na jeden ze stojak w Poci gnij nitk ze szpulki i przeprowad przez prowadnik na pokrywie g r nej 1 2 Przeci gni...

Страница 97: ...out 10cm 4 inches of the thread hanging out of the bobbin case When you pull the thread the bobbin should spin clockwise Changing the presser foot 1 Turn the hand wheel toward you to raise the needle...

Страница 98: ...thread the double needle 1 Thread the left needle according to the way of threading single needle from step one to step five then fix the thread into the double needle spring as point 5 in the right...

Страница 99: ...ado se produzca sin problemas seleccione la puntada recta El enhebrador no puede utilizarse para enhebrar agujas dobles ENHEBRADO DE LA AGUJA 8 1 2 3 4 5 6 KNOWING YOUR SEWING MACHINE Using automatic...

Страница 100: ...de of the fabric n thread t and hold the needle thread lightly lowly towards you with your right goes down and continue turning the ake up lever is at its highest edle thread forming a loop of the of...

Страница 101: ...podniej stronie materia u REGULACJA NAPR ENIA NICI G RNEJ Ustawiaj odpowiednie napr enie za pomoc pokr t a regulacji napr enia nitki w zale no ci od grubo ci i ilo ci w materia u oraz rodzaju nici W p...

Страница 102: ...h length You can select the suitable stitch length for most fabric Raise the needle above the fabric and select the desired pattern at the setting mark by turning the pattern selector dial Selecting s...

Страница 103: ...se stitch button and sew several reverse stitches Raise the presser foot and remove the fabric drawing the threads to back The threads are cut the proper length for starting the next seam KNOWING YOUR...

Страница 104: ...e Lower the needle into the fabric Lower the presser foot and smooth the thread towards the back Depress the foot control Gently guide the fabric along the guide line letting the fabric feed by itself...

Страница 105: ...las universal o un pie especial para zigzag UTILITY STITCHES Zigzag stitch Simple zigzag stitching is widely used for overcastting sewing on buttons etc Overlock stitch This type of stitch is used on...

Страница 106: ...ng up 1 4 0 5 1 E F Machine Setting 19 0 4 0 7cm UTILITY STITCHES Blind stitch Fold up the fabric as illustrated Lower the presser foot then loosen the foot holder screw to place the hem guide between...

Страница 107: ...the zipper foot as the illustration in right When sewing the left side of the zipper attach the zipper foot as the illustration in right Sew the right side of the zipper Sew the left side of the zipp...

Страница 108: ...aalpuntoA principiodelagujero Detengala m quinaylevantelaagujahastasuposici nm salta cuandoseencuentreenelladoizquierdodelapuntada 4 Ajusteelselectordepatr nenlaposici n OBSZYWANIE DZIUREK 1 Umie guzi...

Страница 109: ...e teniendo cuidado de no da ar las costuras 5 Corte la abertura del ojal con el abreojales UNTADADECONCHA UNTADA DE CONCHA se usa principalmente en costura de decoraci n a menudo en tejido con corte i...

Страница 110: ...BORDE 1 Coloque las telas una encima de otra por el lado izquierdo y cosa cerca del borde 2 Corte la tela a lo largo de la puntada teniendo cuidado de no cortar la puntada 3 Utilice el sellador de co...

Страница 111: ...A DE LA LANZADERA Para asegurar un funcionamiento prolongado y sin aver as de la m quina debe mantener limpias todas las partes esenciales ATENCI N para realizar la siguiente limpieza desconecte la al...

Страница 112: ...a m quina se usa de forma intensiva hay que limpiar regularmente los dientes del transportador ATENCI N desconecte la alimentaci n de la m quina y desenganche la m quina de la corriente PRECAUCI N Par...

Страница 113: ...de lubricar la m quina coloque un pedazo de tela bajo el prensatelas y ponga la m quina en funcionamiento sin hilos presione el pedal durante varios minutos para eliminar el exceso de aceite 2 Se rec...

Страница 114: ...vo la m quina seg n las instrucciones Los restos de hilo y hebras bloquean el balanceo de la lanzadera Limpie el carrete y la lanzadera Carrete da ado Sustituya el carrete La aguja se rompe Aguja colo...

Страница 115: ...o ruido o es demasiado lenta Hilo enganchado en el mbolo del canillero Coloque correctamente la canilla en el carrete Los restos de hilo y hebras bloquean los dientes del transportador Limpie los dien...

Страница 116: ...cteur et indiqu es dans la pr sente notice 6 Il est interdit d utiliser la machine quand le c ble ou la fiche sont endommag s ou quand il y a des perturbations dans le fonctionnement quand la machine...

Страница 117: ...est interdit d utiliser des aiguilles tordues 18 Il ne faut pas tirer le tissu ni le pousser pendant la couture Cela pourrait endommager l aiguille 19 Il faut toujours laisser l aiguille en position l...

Страница 118: ...25 CHANGEMENT DU PIED SYSTEME MATIC 125 ENFILAGE DU FIL SUPERIEUR 125 DOUBLE AIGUILLE 126 ENHEBRADO DE LA AGUJA 127 REMONTER LE FIL DE CANETTE 128 TABLEAU DES TISSUS FILS ET AIGUILLES 128 MISE EN PLAC...

Страница 119: ...IFS SATINES 138 COQUILLE ROULANTE 138 COQUILLE DECORATIVE PRES DU BORD 138 LES POINTS DECORATIFS SATINES 138 PLISSAGE 139 NETTOYAGE ET ENTRETIEN DE LA MACHINE 139 NETTOYAGE DE LA GRIFFE 139 NETTOYAGE...

Страница 120: ...33 D wignia podnoszenia stopki 1 Touche du choix du point 2 Touche de r gulation de la longueur du point 3 R gulateur de la tension du fil 4 Plaque frontale 5 Haut de la page couverture 6 Levier de r...

Страница 121: ...ot control The harder you press on the control the faster machine runs Accessories 1 Bobbins 3pcs 2 Needle 3 pcs and twin needle 1 pc 3 Multi function screwdriver 4 Seam guide optional 5 Ripper Brush...

Страница 122: ...ct the machine from power supply by removing the plug from the wall outlet Sewing speed can be varied the foot control The harder you press on the control the faster machine runs Power light switch OF...

Страница 123: ...our abaisser les 4 2 1 There are three positions for your presser foot 1 Lower the presser foot to sew 2 Raise the lifter to the middle position to insert or remove fabric 3 Lift it to its highest pos...

Страница 124: ...NICI NA SZPULK 1 Na szpul z nici na jeden ze stojak w Poci gnij nitk ze szpulki i przeprowad przez prowadnik na pokrywie g r nej 1 2 Przeci gnij nitk przez otw r w szpulce od wewn trz na zewn trz i za...

Страница 125: ...OTE Leave about 10cm 4 inches of the thread hanging out of the bobbin case When you pull the thread the bobbin should spin clockwise Changing the presser foot 1 Turn the hand wheel toward you to raise...

Страница 126: ...YOUR SEWING MACHINE Twin needle How to thread the double needle 1 Thread the left needle according to the way of threading single needle from step one to step five then fix the thread into the double...

Страница 127: ...la machine fonctionne Pour garantir un enfilage sans probl me r gler le point droit L enfileur ne peut pas tre utilis lors de l enfilage d une aiguille jumel e ENHEBRADO DE LA AGUJA 8 1 2 3 4 5 6 KNOW...

Страница 128: ...ic but the bobbin thread on the top side of the fabric n thread t and hold the needle thread lightly lowly towards you with your right goes down and continue turning the ake up lever is at its highest...

Страница 129: ...ie materia u REGULACJA NAPR ENIA NICI G RNEJ Ustawiaj odpowiednie napr enie za pomoc pokr t a regulacji napr enia nitki w zale no ci od grubo ci i ilo ci w materia u oraz rodzaju nici W prawid owym ci...

Страница 130: ...length You can select the suitable stitch length for most fabric Raise the needle above the fabric and select the desired pattern at the setting mark by turning the pattern selector dial Selecting str...

Страница 131: ...the fabric feed by itself For fastening the ends of seams press the reverse stitch button and sew several reverse stitches Raise the presser foot and remove the fabric drawing the threads to back The...

Страница 132: ...the needle plate Lower the needle into the fabric Lower the presser foot and smooth the thread towards the back Depress the foot control Gently guide the fabric along the guide line letting the fabric...

Страница 133: ...morceau inutile du tissu Utilisez un pied presseur universel ou un pied sp cial pour le zigzag UTILITY STITCHES Zigzag stitch Simple zigzag stitching is widely used for overcastting sewing on buttons...

Страница 134: ...the right side facing up 1 4 0 5 1 E F Machine Setting 19 0 4 0 7cm UTILITY STITCHES Blind stitch Fold up the fabric as illustrated Lower the presser foot then loosen the foot holder screw to place t...

Страница 135: ...sewing the right side of the zipper attach the zipper foot as the illustration in right When sewing the left side of the zipper attach the zipper foot as the illustration in right Sew the right side o...

Страница 136: ...ou Arr tezlamachine soulevez l aiguillejusqu laplushautepositionquandellese trouveraduc t gauchedupoint 4 R glezlamoletteduchoixdupointenposition OBSZYWANIE DZIUREK 1 Umie guzik na pr bce tkaniny i oz...

Страница 137: ...Apr s avoir termin la couture couper le reste de la ficelle en prenant soin de ne pas endommager les points 6 Couper soigneusement le centre du trou l aide d un d coud vite LEPOINTCOQUILLE Le POINT CO...

Страница 138: ...la couture en faisant attention de ne pas couper le point 3 Utilisez le calfat des coutures ou une colle pour tissus afin de prot ger le point coquille 3 LES POINTS DECORATIFS SATINES Comme le nom l i...

Страница 139: ...GRIFFE Afin d assurer un fonctionnement long et sans pannes de la machine il faut maintenir en propret toutes les pi ces cl s ATTENTION couper l alimentation de la machine et d brancher la machine du...

Страница 140: ...transporteur si la machine est intensivement utilis e ATTENTION couper l alimentation de la machine et d brancher la machine du courant lors de la r alisations des actions ci dessous ATTENTION Utilise...

Страница 141: ...pr s la fin de la lubrification mettez un morceau de tissu sous le pied presseur et mettez en marche la machine sans fil appuyez sur le d marreur quelques minutes afin d liminer le surplus du lubrifia...

Страница 142: ...se Aiguille incorrectement plac e Remettez l aiguille nouveau conform ment la notice Aiguille tordue ou mouss e Changez l aiguille L aiguille est mal viss e Serrez la vis dans le support de l aiguille...

Страница 143: ...ur Nettoyez les dents du transporteur Machine insuffisamment lubrifi e Lire le chapitre concernant l entretien de la machine L ampoule ne s allume pas L interrupteursetrouveenposition 0 Mettre l inter...

Страница 144: ...a gdy przew d lub wtyczka s uszkodzone gdy wyst puj zak cenia w funkcjonowaniu gdy maszyna zosta a uderzona lub uszkodzona lub te gdy pozostawa a w kontakcie z wod W takich przypadkach nale y zwr ci s...

Страница 145: ...nale y ci gn tkaniny ani jej popycha Mog oby to spowodowa uszkodzenie ig y 16 Po zako czeniu szycia zawsze pozostawia ig w najwy szym po o eniu aby zapobiec z amaniu ig y czy innemu uszkodzeniu maszy...

Страница 146: ...W B BENKU 153 WYMIANA STOPKI SYSTEM MATIC 153 NAWLEKANIE NITKI G RNEJ 153 PODW JNA IG A 154 NAWLEKANIE IG Y 155 WYCI GANIE NICI ZE SZPULKI 156 TABELA DOBORU NICI I IGIE DO SZYTEGO MATERIA U 156 WYMIA...

Страница 147: ...MUSZELKOWY 165 CIEG MUSZELKOWY SATYNOWY I CIEGI DEKORACYJNE SATYNOWE 166 MARSZCZENIE 167 CZYSZCZENIE I KONSERWACJA MASZYNY 167 CZYSZCZENIE OKOLICY CHWYTACZA 167 CZYSZCZENIE Z BK W TRANSPORTERA I OLIW...

Страница 148: ...31 Przycisk zwalniaj cy stopk 32 ruba mocuj ca ig 33 D wignia podnoszenia stopki NAZWY CZ CI 3 NAZWY CZ CI 1 Pokr t o regulacji d ugo ci ciegu 2 Pokr t o wyboru ciegu 3 Regulator napr enia nici 4 Pokr...

Страница 149: ...sconnect the machine from power supply by removing the plug from the wall outlet Sewing speed can be varied the foot control The harder you press on the control the faster machine runs Accessories 1 B...

Страница 150: ...d can be varied the foot control The harder you press on the control the faster machine runs Power light switch OFF Power light switch ON 2 1 3 KNOWING YOUR SEWING MACHINE Converting to free arm sewin...

Страница 151: ...insert or remove fabric 3 Lift it to its highest position to change the presser foot or to remove thick fabric Reverse sewing lever As long as you are pressing down this button while sewing the machi...

Страница 152: ...z otw r w szpulce od wewn trz na zewn trz i za szpulk b benka na trzpie szpulownika 3 Przesu trzpie ze szpulk w prawo 2 5 Przytrzymaj za koniec nitki i naci nij rozrusznik rozpo czynaj c nawijanie Zat...

Страница 153: ...ou pull the thread the bobbin should spin clockwise Changing the presser foot 1 Turn the hand wheel toward you to raise the needle to its highest position Raise the presser foot 2 Press the lever on t...

Страница 154: ...rom step one to step five then fix the thread into the double needle spring as point 5 in the right picture Draw thread down and slip it into needle bar thread guide 6 Finally thread into the left nee...

Страница 155: ...prosty Nawlekacz nie mo e by u ywany podczas nawlekania podw jnej ig y NAWLEKANIE IG Y 8 1 2 3 4 5 6 KNOWING YOUR SEWING MACHINE Using automatic needle threader Raise the needle to its highest positio...

Страница 156: ...ight goes down and continue turning the ake up lever is at its highest edle thread forming a loop of the of both thread back and under the 9 Balancing top thread tension The top thread and the bobbin...

Страница 157: ...nie za pomoc pokr t a regulacji napr enia nitki w zale no ci od grubo ci i ilo ci w materia u oraz rodzaju nici W prawid owym ciegu ni g rna i ni b benka wci gane s w r wnym stopniu do ma tworzy si po...

Страница 158: ...Raise the needle above the fabric and select the desired pattern at the setting mark by turning the pattern selector dial Selecting stretch stitch patterns When sewing stretch set the stitch length di...

Страница 159: ...tches Raise the presser foot and remove the fabric drawing the threads to back The threads are cut the proper length for starting the next seam KNOWING YOUR SEWING MACHINE Useful sewing tips Various w...

Страница 160: ...smooth the thread towards the back Depress the foot control Gently guide the fabric along the guide line letting the fabric feed by itself For fastening the ends of seams press the reverse stitch but...

Страница 161: ...j zbyteczny skrawek tkaniny Stosuj stopk uniwersaln lub stopk specjaln do zygzaka UTILITY STITCHES Zigzag stitch Simple zigzag stitching is widely used for overcastting sewing on buttons etc Overlock...

Страница 162: ...ric as illustrated Lower the presser foot then loosen the foot holder screw to place the hem guide between the screw and the shank of foot holder Tighten the screw making sure the wall of hem guide is...

Страница 163: ...the starting position on fabric put down the presser foot 5 Sew the buttonhole according to page 17 6 Pull the gimp cord straightly 7 Cut the gimp cord Attach the zipper foot When sewing the right sid...

Страница 164: ...odnie zwymiaremdziurki a sankiprzesun si dopunktuA szczytudziurki Zatrzymajmaszyn podnie ig do najwy szejpozycji gdyb dziesi onaznajdowa apolewej stronie ciegu 4 Ustawpokr t owyborud ugo ci cieguwpozy...

Страница 165: ...tnij pozosta y sznurek uwa aj c by nie uszkodzi szw w 5 Przy pomocy rozcinacza ostro nie przetnij rodek dziurki CIEGMUSZELKOWY Stosowany si g wnie w szyciu dekoracyjnym cz sto przy tkaninach krojonych...

Страница 166: ...nie przeci ciegu 3 U yj uszczelniacza szw w lub kleju do tkanin by zabezpieczy brzegi ciegu muszelkowego 3 CIEGI DEKORACYJNE Jak sama nazwa wskazuje znajduj g wnie zastosowanie w szyciu dekoracyjnym...

Страница 167: ...g w prostych CZYSZCZENIE OKOLICY CHWYTACZA By zapewni d ugie i bezawaryjne dzia anie maszyny nale y utrzymywa w czysto ci wszystkie kluczowe cz ci UWAGA Przy jakichkolwiek czynno ci konserwacyjnych wy...

Страница 168: ...e u ywana nale y cz sto oczyszcza z bki transportera UWAGA Przy jakichkolwiek czynno ci konserwacyjnych wy cz zasilanie maszyny i od cz maszyn z pr du UWAGA Do oliwienia maszyny u ywaj wy cznie oleju...

Страница 169: ...bki za za lepk UWAGA Po zako czeniu oliwienia pod kawa ek tkaniny pod stopk i uruchom maszyn bez nitki wci nij rozrusznik na kilka minut aby usun nadmiar oleju 2 Zaleca si oliwienie wskazanych punkt w...

Страница 170: ...Nawlecz maszyn ponownie zgodnie z instrukcj Resztki nici i meszek z tkanin blokuj ruch wahad owy chwytacza Oczy b benek i chwytacz Uszkodzony b benek Wymie b benek Ig a si amie Nieprawid owo za o ona...

Страница 171: ...o bolec b benka Za prawid owo szpulk i b benek Resztki nici i meszek z tkanin blokuj z bki transportera Oczy z bki transportera Maszyna niewystarczaj co naoliwiona Sprawd rozdzia dotycz cy konserwacji...

Страница 172: ...RU 1 2 3 1 2 3 4 5 6 7 8 9 Texi Fox 25 172...

Страница 173: ...RU 10 11 12 13 14 15 16 17 Texi Fox 25 173...

Страница 174: ...RU 172 176 177 E 177 177 178 178 178 179 179 179 180 180 180 181 MATIC 181 181 182 183 184 184 185 185 186 186 187 187 188 188 188 189 190 191 191 Texi Fox 25 174...

Страница 175: ...RU 192 193 193 194 194 194 194 195 195 195 196 196 198 Texi Fox 25 175...

Страница 176: ...cz 15 Pokrywa 16 Pojemnik na akcesoria stolik 17 Hamulec szpulownika 18 Trzpie szpulownika 19 Prowadnik nitki 20 Obcinacz nitki 21 Obudowa pojemnika na akcesoria 22 Pokrywa tylna 23 D wignia nawlekacz...

Страница 177: ...switch OFF Power light switch ON 3 2 1 3 5 4 7 6 8 9 KNOWING YOUR SEWING MACHINE Power line cord foot control Make sure that the sewing machine is turned off the power switch is set to O and then con...

Страница 178: ...til it clicks With the extension table removed the machine converts into a slim free arm model for sewing children s clothes cuffs trouser legs and other hard to reach places Presser foot lifter There...

Страница 179: ...the middle position to insert or remove fabric 3 Lift it to its highest position to change the presser foot or to remove thick fabric Reverse sewing lever As long as you are pressing down this button...

Страница 180: ...sh down for storage Winding the bobbin 1 Place a spool of thread on the left spool pin Pull the thread out from the spool and place it through thread guide as shown in illustration Put end of thread t...

Страница 181: ...you then open the shuttle cover 2 Take out bobbin case holding the latch 3 When installing the bobbin case the pin on the case should fit into the gap of the shuttle race Threading the bobbin case 1 I...

Страница 182: ...t needle thread Put the thread spool on the spool pin make sure that the left thread will run anti clockwise the right thread will run clockwise Threading the machine Raise take up lever to its highes...

Страница 183: ...Rotate the lever to the rear of the machine 4 Guide thread into hooked end and pull the thread upward 5 Return the lever and needle will be threaded automatically 6 Release the lever and pull thread...

Страница 184: ...lever is at its highest edle thread forming a loop of the of both thread back and under the 9 Balancing top thread tension The top thread and the bobbin thread should interlock in the center of two la...

Страница 185: ...r rub mocuj c ig UWAGA Nie wolno u ywa wykrzywionych t pych lub wygi tych igie Aby sprawdzi ig po j na p askiej powierzchni np p ytce ciegowej szkle Odst p pomi dzy ig a p ask powierzchni powinien by...

Страница 186: ...ngth dial The higher the number the longer the stitch length You can select the suitable stitch leng for most fabric Raise the needle above the fabric and select the desired pattern at the setting mar...

Страница 187: ...h and length for correct sewing For the trial sewing use a piece of fabric and thread that are the same as those used for your project and check the thread tension and stitch length and width Since th...

Страница 188: ...resser foot so hat the edge will be slightly inside the right and side of the presser foot uide the work so the right hand stitches fall t the edge of the fabric riple strength stitch he stitch is sew...

Страница 189: ...of the fabric C 1 4 1 2 Machine Setting E 1 4 Machine Setting S S C 2 5 Machine Setting 0 5 4 UTILITY STITCHES Zigzag stitch Simple zigzag stitching is widely used for overcastting sewing on buttons e...

Страница 190: ...sure the soft fold runs along the wall of hem guide Spread the fabric flat with the right side facing up 1 4 0 5 1 E F Machine Setting 19 0 4 0 7cm Fold up the fabric as illustrated Lower the presser...

Страница 191: ...penings of button Adjust width if required Sew 10 stitches across When attaching four hole buttons first sew the two holes closest to you Then slide the button so that the needle goes into the two hol...

Страница 192: ...ko ca lewej Wypro wad ig z materia u pozostawiaj c j po prawej stronie ciegu 7 Ustaw pokr t o wyboru d ugo ci ciegu w pozycji Aby zrobi rygiel przeszyj 4 6 szw w pozostaw ig w pozycji g rnej po lewej...

Страница 193: ...RU 1 A 2 3 4 5 6 H 3 9 2 3 Machine Setting Texi Fox 25 193...

Страница 194: ...RU 1 1 2 3 1 8 3 2 1 2 3 3 0 5 1 1 4 S S AB C DE F G H J KL I Machine Setting K 1 4 0 5 1 L Machine Settin g Texi Fox 25 194...

Страница 195: ...RU 4 10 1 2 2 3 D 1 4 S S Machine Setting 10mm 3 8 Wrong side of fabric Texi Fox 25 195...

Страница 196: ...RU 4 1 2 3 4 1 2 5 6 Texi Fox 25 196...

Страница 197: ...RU 1 3 4 1 2 2 4 6 Texi Fox 25 197...

Страница 198: ...RU Texi Fox 25 198...

Страница 199: ...RU 0 0 I 0 I 2014 30 EU Texi Fox 25 199...

Страница 200: ...owing product Household sewing machine model Texi Fox 25 990 With this declaration relates complies with following directives Electromagnetic compatibility 2014 30 EU EN 55014 1 2006 A1 A2 EN 55014 2...

Отзывы: