FR
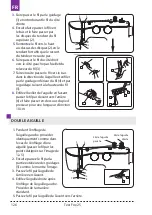
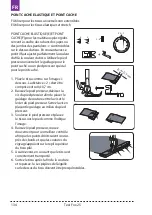
POINT CACHE ELASTIQUE ET POINT CACHE
F Utiliser pour les tissus universels non extensibles
E Utiliser pour les tissus élastiques et stretch
POINT CACHE ELASTIQUE (E) ET POINT
CACHE (F) pour les matériaux plus rigides
servent à coudre des rubans des jupes ou
des jambes des pantalons -v sont invisibles
sur le dessus du tissu. En cousant avec se
point il faut ajuster parfaitement la couleur
du fil à la couleur du tissu. Utilisez le pied
presseur universel et le guidage pour le
point caché ou un pied presseur spécial
pour le point caché.
1.
Pliez le tissu comme sur l’image ci-
dessous. La distance « 2 » doit être
comprise entre 0,4-0,7 cm.
2.
Baissez le pied presseur, dévisser la
vis du pied presseur afin de placer le
guidage de couture entre la vis et le
levier du pied presseur. Serrez la vis en
plaçant le guidage au milieu du pied
presseur.
3.
Soulevez le pied presseur et placez
le tissu sous le pied comme l’indique
l’image.
4.
Baissez le pied presseur, cousez
doucement pour un meilleur contrôle
afin que les points droits soient cousus
près des bords et que les coutures du
zigzag s’appuient sur le repli supérieur
du tissu plié.
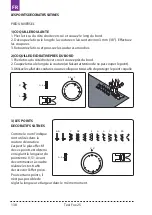
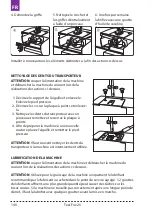
5.
Assurez-vous en cousant que le tissu est
correctement transporté.
6.
Sortez le tissu après la fin de la couture
et repassez-le. Les piqûres de l’aiguille
sur le dessus du tissu doivent être presqu’invisibles.
19
0.4~
0.7c
m
UTILITY STITCHES
Blind
stitch
Fold up the fabric as illustrated.
Lower the presser foot, then loosen the foot holder
screw to place the hem guide between the screw
and the shank of foot holder. Tighten the screw
making sure the wall of hem guide is placed in the
middle of the toes of the presser foot.
Raise the presser foot and place the fabric under the
foot so that the soft fold rests against the wall of hem
guide.
Lower the foot, then stitch slowly for better for better
control so that the zigzag stitches fall on the hen
allowance and pierce the soft fold. While sewing,
make sure the soft fold runs along the wall of hem
guide.
Spread the fabric flat with the right side facing up.
+
1~4
0.5~1
E
F
Machine
Setting
Texi Fox 25
134
Содержание Fox 25
Страница 1: ...MULTIFUNCTIONAL SEWING MACHINE 2 A L K J I H G F E D C B 3...
Страница 2: ......
Страница 5: ...Texi Fox 25 5 CS...
Страница 172: ...RU 1 2 3 1 2 3 4 5 6 7 8 9 Texi Fox 25 172...
Страница 173: ...RU 10 11 12 13 14 15 16 17 Texi Fox 25 173...
Страница 175: ...RU 192 193 193 194 194 194 194 195 195 195 196 196 198 Texi Fox 25 175...
Страница 193: ...RU 1 A 2 3 4 5 6 H 3 9 2 3 Machine Setting Texi Fox 25 193...
Страница 195: ...RU 4 10 1 2 2 3 D 1 4 S S Machine Setting 10mm 3 8 Wrong side of fabric Texi Fox 25 195...
Страница 196: ...RU 4 1 2 3 4 1 2 5 6 Texi Fox 25 196...
Страница 197: ...RU 1 3 4 1 2 2 4 6 Texi Fox 25 197...
Страница 198: ...RU Texi Fox 25 198...
Страница 199: ...RU 0 0 I 0 I 2014 30 EU Texi Fox 25 199...

