ES
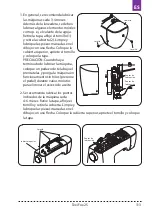
INICIO Y TERMINACIÓN DE LA COSTURA
CAMBIO DE DIRECCIÓN DE LA COSTURA
ATENCIÓN: Cuando usted cose, debe prestar
especial cuidado en el espacio alrededor de la
aguja. La máquina automácamente transportará
el material, no re ni empuje el material.
1.
Levante la aguja girando el volante.
2.
Eleve el pie prensatela y coloque el material
debajo de éste.
3.
Libere el pie prensatela .
4.
Tire del hilo de la aguja y del hilo de la bobina de
la parte trasera. Cose algunas puntadas .
5.
Aplique velócidad al coser.
6.
Detenga la máquina cuando termine de coser.
7.
Eleve la palanca elevadora del pie prensatela
8.
Levante la aguja girando el volante. Retire el
material cosido del pie prensatela. Utilizando el
cortador del lado de la máquina, corte los hilos.
1.
Pare la máquina antes de cambiar la
dirección de la costura.
2.
Ponga la aguja en la posición inferior.
3.
Levante el pie prensatelas.
4.
Para cambiar la dirección, gire la tela
“en la aguja”.
5.
Baje el pie y continúe el trabajo.
13
UTILITY STITCHES
Straight stitch
Raise the presser foot and position the fabric next to a
stitching guide line on the needle plate.
Lower the needle into the fabric.
Lower the presser foot and smooth the thread towards the
back. Depress the foot control.
Gently guide the fabric along the guide line letting the
fabric feed by itself.
For fastening the ends of seams, press the reverse stitch
button and sew several reverse stitches.
Raise the presser foot and remove the fabric, drawing the
threads to back.
The threads are cut the proper length for starting the next
seam.
A
B
2~6
1.5~4
Machine
Setting
12
KNOWING
YOUR
SEWING
MACHINE
Useful sewing tips
Various ways to achieve better sewing results are described below.
Refer to these tips when sewing.
1. Trial sewing
Use different stitch width and length for trial sewing. When you have finished, select the
best looking stitch width and length for correct sewing.
For the trial sewing, use a piece of fabric and thread that are the same as those used for
your project, and check the thread tension and stitch length and width. Since the results
differ depending on the type of stitching and the number of fabric layers sewn, perform the
trial sewing under the same conditions that will be used with your project.
3. Sewing curves
1).Stop sewing, and then slightly change the sewing direction to sew around the curve.
2).When sewing along a curve while using a zigzag stitch, select a shorter length in order to
obtain a finer stitch.
4. Sewing thick fabrics
If the fabric does not fit under the presser foot
Raise the presser foot even higher to bring the presser foot to its highest position. Then feed
the fabric under the presser foot. (See page 4 to Raise the presser foot.)
5. Sewing elastic fabric or the fabric that is easy to cause skipping stitches
Use round head needle and bigger stitch length. If necessary, add one layer of lining cloth
under the fabric for better sewing.
6. Sewing thin fabric or silk
When sewing thin fabric or silk, the stitch may depart from correct direction or cannot feed the
fabric correctly. If so, add one layer of lining cloth under the fabric for better sewing.
7. Sewing stretch fabrics
First, baste the piece of fabric together, and then sew without stretching the fabric.
8. Free arm sewing
When sewing tube fabric or the part cannot reach, use the free arm sewing function (For
detail, refer to page 4).
2. Changing the sewing direction
Stop the machine and turn the hand wheel
toward you to bring the needle down into the
fabric. Raise the presser foot.
Pivot the fabric around the needle to change
sewing direction as desired. Lower the
presser foot and continue sewing.
Texi Fox 25
103
Содержание Fox 25
Страница 1: ...MULTIFUNCTIONAL SEWING MACHINE 2 A L K J I H G F E D C B 3...
Страница 2: ......
Страница 5: ...Texi Fox 25 5 CS...
Страница 172: ...RU 1 2 3 1 2 3 4 5 6 7 8 9 Texi Fox 25 172...
Страница 173: ...RU 10 11 12 13 14 15 16 17 Texi Fox 25 173...
Страница 175: ...RU 192 193 193 194 194 194 194 195 195 195 196 196 198 Texi Fox 25 175...
Страница 193: ...RU 1 A 2 3 4 5 6 H 3 9 2 3 Machine Setting Texi Fox 25 193...
Страница 195: ...RU 4 10 1 2 2 3 D 1 4 S S Machine Setting 10mm 3 8 Wrong side of fabric Texi Fox 25 195...
Страница 196: ...RU 4 1 2 3 4 1 2 5 6 Texi Fox 25 196...
Страница 197: ...RU 1 3 4 1 2 2 4 6 Texi Fox 25 197...
Страница 198: ...RU Texi Fox 25 198...
Страница 199: ...RU 0 0 I 0 I 2014 30 EU Texi Fox 25 199...


