FR
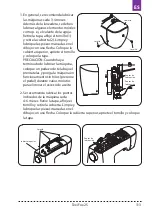
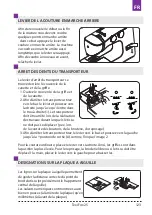
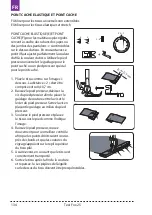
LEVIER DE LA COUTURE EN MARCHE ARRIERE
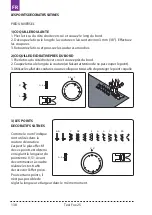
ARRET DES DENTS DU TRANSPORTEUR
DESIGNATIONS SUR LA PLAQUE A AIGUILLE
Afin de renouveler le début ou la fin
de la couture nous devons coudre
quelques points en marche arrière
- dans ce but appuyez le levier de
couture en marche arrière. La machine
va coudre en marche arrière aussi
longtemps que le levier sera appuyé.
Afin de coudre à nouveau en avant,
relâcher le levier.
Les lignes sur la plaque à aiguille permettent
de garder la distance correcte du point du
bord du tissu (et précisément le frappement
central de l’aiguille).
Les valeurs numériques sont montrées aussi
bien en pouces (à l’arrière de la plaque) qu’en
millimètres (à l’avant de la plaque).
Le levier d’arrêt du transporteur se
trouve derrière le couvercle de la
canette et de la griffe.
1.
Ouvrez le couvercle de la griffe et
de la canette.
2.
Afin d’arrêter le transporteur tirez
vers le bas le levier et poussez vers
la droite jusqu’à ce qu’il entre dans
le trou à droite (1). Le transporteur
doit être arrêté lors de la réalisation
des travaux durant lesquels le tissu
ne doit pas se déplacer (p.ex. lors
de la couture des boutons, de la broderie, du reprisage).
3.
Afin d’arrêter le transporteur tirez le levier vers le bas et poussez vers la gauche
jusqu’à la ^position de sortie (A) comme l’inique l’image 2.
Pour la couture ordinaire, placez le levier vers la droite. Ainsi, les griffes sont dans
la position la plus élevée. Pour le reprisage, la broderie libre ou si le tissu doit être
déplacé ŕ la main, placez le levier vers la gauche pour abaisser les.
4
2
1
3
KNOWING
YOUR
SEWING
MACHINE
Converting
to
free
-
arm
sewing
Your machine can be used either as a flat-bed or as a
free-arm model.
With the extension table in position, it provides a
large working surface as a standard flat-bed model.
To remove the extension table, hold it firmly with both
hands and pull it off to the left as shown. To replace,
slide the extension table back into place until it
clicks.
With the extension table removed the machine
converts into a slim free-arm model for sewing
children’s clothes, cuffs, trouser legs, and other
hard-to-reach places.
Presser foot lifter
There are three positions for your presser foot.
1. Lower the presser foot to sew.
2. Raise the lifter to the middle position to insert or remove
fabric.
3. Lift it to its highest position to change the presser foot or to
remove thick fabric.
Reverse sewing lever
As long as you are pressing down this
button while sewing, the machine will feed
the fabric backwards.
Dropping the feed dogs
1. For dropping the feed dogs, press down
lever and move it to the direction of arrow
as illustrated.
2. To raise the feed dogs, press down the
lever and move it to the direction or arrow
as illustrated.
* Feed dogs must always be up for normal
sewing.
5
1
2
3
KNOWING
YOUR
SEWING
MACHINE
KNOWING
YOUR
SEWING
MACHINE
Seam guide line
The numbers on the needle plate indicate
the distance between the center needle
position and the indicating line.
The numbers in the front indicate in
Millimeters.
The numbers in the back indicate in inches.
Setting spool pins
The spool pins are used for holding the spool of thread in order
to feed thread to the machine.
To use, pull up the spool pin. Push down for storage.
Winding the bobbin
1. Place a spool of thread on the left spool pin. Pull
the thread out from the spool and place it through
thread guide as shown in illustration. Put end of
thread through the hole in bobbin as shown.
2. Push the bobbin wider shaft to far left position, if
it is not already there. Place bobbin onto the
bobbin wider shaft with end of thread coming
from top of bobbin. Push bobbin winder shaft to
the right until it clicks. Hold onto end of thread.
3. Start machine. Bobbin will automatically stop
turning when completely filled. Push shaft to the
left to remove bobbin and cut thread.
Texi Fox 25
123
Содержание Fox 25
Страница 1: ...MULTIFUNCTIONAL SEWING MACHINE 2 A L K J I H G F E D C B 3...
Страница 2: ......
Страница 5: ...Texi Fox 25 5 CS...
Страница 172: ...RU 1 2 3 1 2 3 4 5 6 7 8 9 Texi Fox 25 172...
Страница 173: ...RU 10 11 12 13 14 15 16 17 Texi Fox 25 173...
Страница 175: ...RU 192 193 193 194 194 194 194 195 195 195 196 196 198 Texi Fox 25 175...
Страница 193: ...RU 1 A 2 3 4 5 6 H 3 9 2 3 Machine Setting Texi Fox 25 193...
Страница 195: ...RU 4 10 1 2 2 3 D 1 4 S S Machine Setting 10mm 3 8 Wrong side of fabric Texi Fox 25 195...
Страница 196: ...RU 4 1 2 3 4 1 2 5 6 Texi Fox 25 196...
Страница 197: ...RU 1 3 4 1 2 2 4 6 Texi Fox 25 197...
Страница 198: ...RU Texi Fox 25 198...
Страница 199: ...RU 0 0 I 0 I 2014 30 EU Texi Fox 25 199...


