22
MAINTENANCE, REPLACEMENT, OR REPAIR
OF THE EMISSION CONTROL DEVICES AND
SYSTEMS MAY BE PERFORMED BY ANY
NONROAD ENGINE REPAIR ESTABLISHMENT
OR INDIVIDUAL.
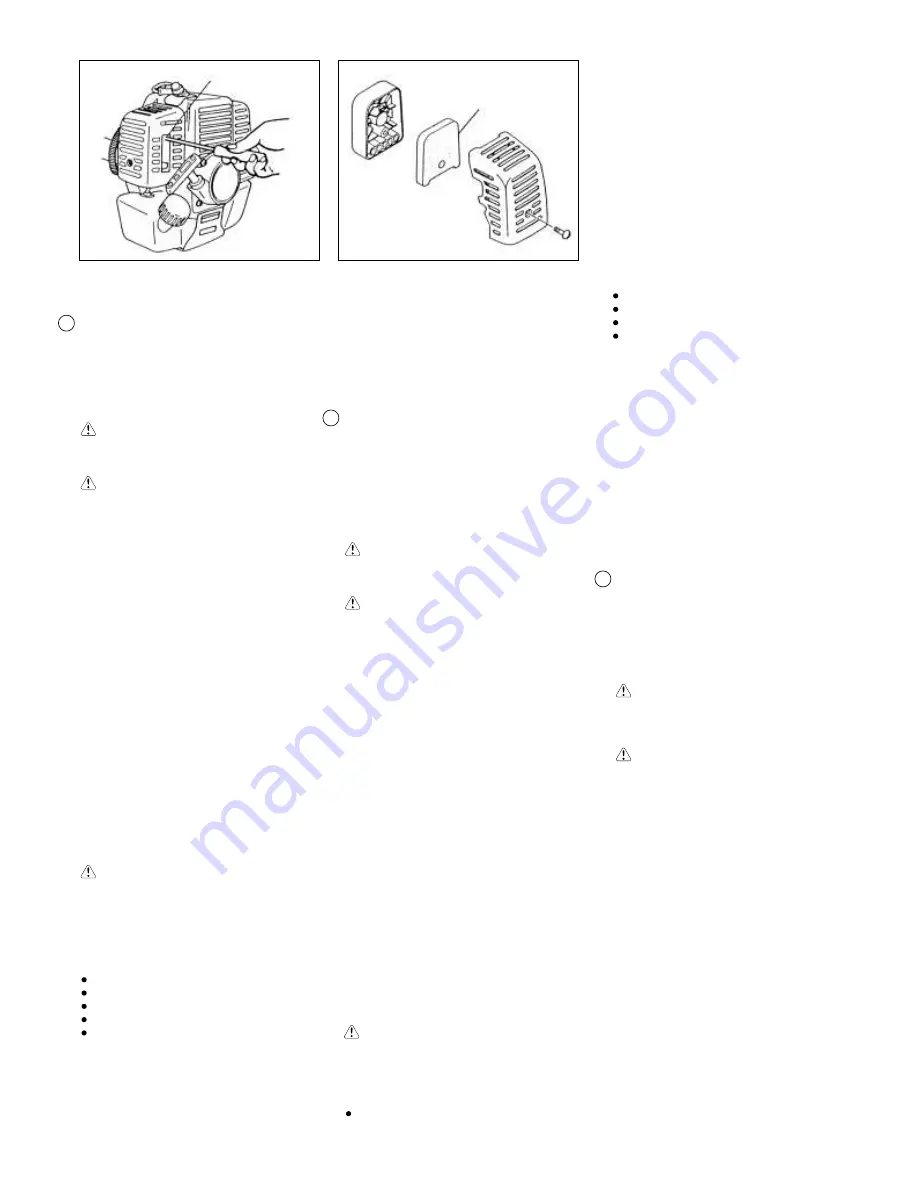
Carburetor adjustment (Fig. 3-1)
WARNING!
The cutting attachment may be spinning during
carburetor adjustments.
WARNING!
Never start the engine without the complete clutch
cover and tube assembled! Otherwise the clutch
can come loose and cause personal injuries.
In the carburetor, fuel is mixed with air. When
the engine is test run at the factory, the
carburetor is basically adjusted. A further
adjustment may be required, according to climate
and altitude. The carburetor has one adjustment
possibility:
T = Idle speed adjustment screw.
Idle speed adjustment (T)
Check that the air filter is clean. When the idle
speed is correct, the cutting attachment will not
rotate. If adjustment is required, close (clockwise)
the T-screw, with the engine running, until the
cutting attachment starts to rotate. Open
(counter-clockwise) the screw until the cutting
attachment stops. You have reached the correct
idle speed when the engine runs smoothly in all
positions well below the rpm when the cutting
attachment starts to rotate.
If the cutting attachment still rotates after idle
speed adjustment, contact your service workshop.
NOTE!
Standard Idle rpm is 2500~3000 rpm.
WARNING!
When the engine is idling the cutting
attachment must under no circumstances
rotate.
Air filter (Fig. 3-2)
The air filter must be cleaned from dust and dirt
in order to avoid:
Carburetor malfunctions.
Starting problems.
Engine power reduction.
Unnecessary wear on the engine parts.
Abnormal fuel consumption.
Clean the air filter daily or more often if working
in exceptionally dusty areas.
Cleaning the air filter
Remove the air filter cover and the filter (1).
Rinse it in warm soap suds. Check that the filter
Les problèmes de démarrage.
Les pertes de puissance.
L'usure prématurée des organes du moteur.
Une consommation anormalement élevée.
Nettoyer le filtre à air tour les jours, plus
fréquemment en milieu à forte teneur en
poussières.
Nettoyage du filtre
Démonter le carter de filtre et sortir l'élément de
filtre (1). Le laver dans de l'eau savonneuse
chaude. Veiller ensuite à ce qu'il soit bien sec
avant de le remonter. Un élément de filtre à air
ayant servi longtemps ne peut être
complètement nettoyé. Pour cette raison,
l'élément de filtre doit être remplacé
régulièrement par un élément neuf. Toujours
remplacer un filtre endommagé.
I t
5. Manutenzione
LA MAUTENZIONE, SOSTITUZIONE O
RIPARAZIONE DEI DISPOSITIVI E SISTEMI
DI COTROLLO DELLE EMISSIONI POSSONO
ESSERE ESEGUITE DA QUALSIASI
OFFICINA O TECNICO DI RIPARAZIONE
MOTORI NON VEICOLARI.
Regolazione del carburatore (Fig. 3-1)
ATTENZIONE!
Puó darsi che l'accessorio di taglio giri
vorticosamente durante gli aggiustamenti
della carburazione.
ATTENZIONE!
Prima di mettere in moto, assicurarsi che il
carter della frizione e il tubo siano montati
correttamente, per evitare che la frizione si
stacchi e causi gravi incidenti.
Nel carburatore, il carburante viene mescolato
con l'aria. Quando il motore viene collaudato in
fabbrica, il carburatore viene tarato. Può essere
necessario ricontrollare la taratura a seconda
del clima e dell'altitudine della zona di impiego.
La regolazione del minimo del carburatore può
essere effettuata con:
T = Vite di regolazione del minimo.
Regolazione del minimo (T)
Controllare che il filtro dell'aria sia pulito. Se il
minimo é corretto, il dispositivo di taglio non gira.
Se é necessario regolare il minimo, chiudere la
vite a T (in senso orario) con il motore in moto,
fino a quando il dispositivo di taglio comincia a
girare. Riaprire poi la vite (in senso antiorario)
fino a quando il dispositivo di taglio si ferma. II
minimo é corretto quando il motore gira
regolarmente in ogni posizione, al di sotto del
regime di giri necessario al dispositivo di taglio
per iniziare a girare.
Se il dispositivo di taglio continua a girare dopo
la regolazione del minimo, contattare un centro
di assistenza.
5. Maintenance
En
Fr
5. Entretien
L'ENTRETIEN, LE REMPLACEMENT OU LA
REPARATION DES DISPOSITIFS ET
SYSTEMES DE CONTRÔLE DE
L'ECHAPPEMENT PEUVENT ETRE
EFFECTUES PAR N'IMPORTE QUEL ATELIER
DE RÉPARATION OU MÉCANICIEN DE
MOTEUR NON AUTOMOBILE.
Réglage du carburateur (Fig. 3-1)
ATTENTION!
II se peut que l'outil de coupe tourne pendant le
réglage du carburateur.
ATTENTION!
Le carter et le tube doivent être en place avant
la mise en marche. Sinon, l'embrayage risquerait
de se détacher et d'entraîner un accident corporel.
Dans la carburateur, l'air est mélangé à l'essence.
Le carburateur est préréglé pendant les essais
en usine. Ce réglage peut nécessiter des
modifications selon les conditions climatiques et
d'altitude. Le carburateur ne propose qu'une
seule possibilité de réglage.
T = Vis de réglage du ralenti.
Réglage du ralenti (T)
Vérifier que le filtre à air est propre. Quand le
ralenti est correct, l'outil de coupe ne doit pas
tourner. Si un réglage est nécessaire, visser
(dans les sens des aiguilles d'une montre) la vis
T, moteur en marche, jusqu'à ce que la lame
commence à tourner. Ouvrir alors (sens contraire
des aiguilles d'une montre) jusqu'à ce que l'outil
de coupe s'immobilise. Le ralenti correct permet
au moteur de fonctionner dans toutes les positions
tout en disposant d'une marge avant la mise en
rotation de l'outil d'une marge avant la mise en
rotation de l'outil de coupe. Si le ralenti ne peut
être réglé de manière à obtenir un arrêt de
l'outil de coupe, contacter le réparateur.
REMARQUE!
Le nombre normal de tours par minute au
ralenti est de 2500 - 3000 tours/minuts.
ATTENTION!
L'outil doit être absolument immobile lorsque
le moteur tourne au ralenti.
Filtre à air (Fig. 3-2)
Nettoyer le filtre à air régulièrement pour éviter:
Les troubles de fonctionnement du carburateur.
is dry before re-assembly. An air filter that has
been used for some time cannot be cleaned
completely. Therefore, it must regularly be
replaced with a new one. A damaged filter must
always be replaced.
Fig.3-1
Fig.3-2
T
1


