


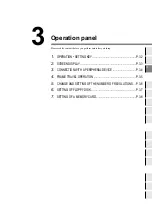


Operation panel
3-7
1
2
3
4
5
6
7
8
9
10
11
12
13
14
15
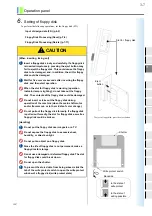
6.
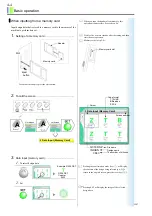
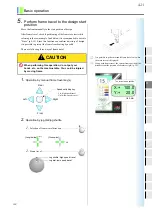
Setting of floppy disk
To perform the following operations, set the floppy disk (FD).
Input of design data (FD) (p.4-2)
Floppy Disk Processing (Save) (p.7-9)
Floppy Disk Processing (Delete) (p.7-11)
CAUTION
[When inserting, taking out]
Insert a floppy disk slowly and carefully. If a floppy disk
is inserted impetuously, pressing the eject button may
fail to eject the floppy disk. This could cause the floppy
disk to be damaged, and, in addition, the slit for floppy
disk could be damaged.
Wait for five or more seconds after inserting the floppy
disk, and then start operation.
When the slot for floppy disk is working (operation
indicator lamp is lighting), do not take out the floppy
disk. The contents of the floppy disk could be damaged.
Do not insert or take out the floppy disk during
operation of the machine (when the main shaft motor
and/or frame move, or in the middle of color change).
Do not pull out the floppy disk forcedly. If a floppy disk
is pulled out forcedly, the slot for floppy disk as well as
floppy disk could be broken.
[Handling]
Do not put the floppy disk near magnets or a TV.
Do not expose the floppy disk to excessive heat,
humidity, or direct sunlight.
Do not put an object on a floppy disk.
Since the life of floppy disk is not permanent, make a
floppy disk for storage.
Do not use a damaged or deformed floppy disk. The slot
for floppy disk could break down.
Do not open the shutter.
To prevent the stored data from being erased, slide the
tab of the write protect switch to open the write protect
window of a floppy disk (write protect state).
Shutter
Write protect switch
To eject a floppy disk, press the eject button.
In the state of
In the state of
Backside
Eject
button
Slot for floppy disk
write protect
writing possible
!
!
!
!
!
!
JZ07
Содержание TCMX 601
Страница 1: ...USER S MANUAL TCMX 601 M XL01 E 2006 07 TCMX 601 ...
Страница 18: ...Name of each part and function 2 7 1 2 3 4 5 6 7 8 9 10 11 12 13 14 15 ...
Страница 19: ...2 8 Name of each part and function ...
Страница 41: ...4 14 Basic operation ...
Страница 65: ...6 8 Convenient functions ...
Страница 105: ...11 12 Software installation and necessary ...
Страница 119: ...14 6 Maintenance ...
Страница 129: ...15 10 Supplemental documentation ...