background image

PR13 - 2


WBPEEUI220772A0

Procedure


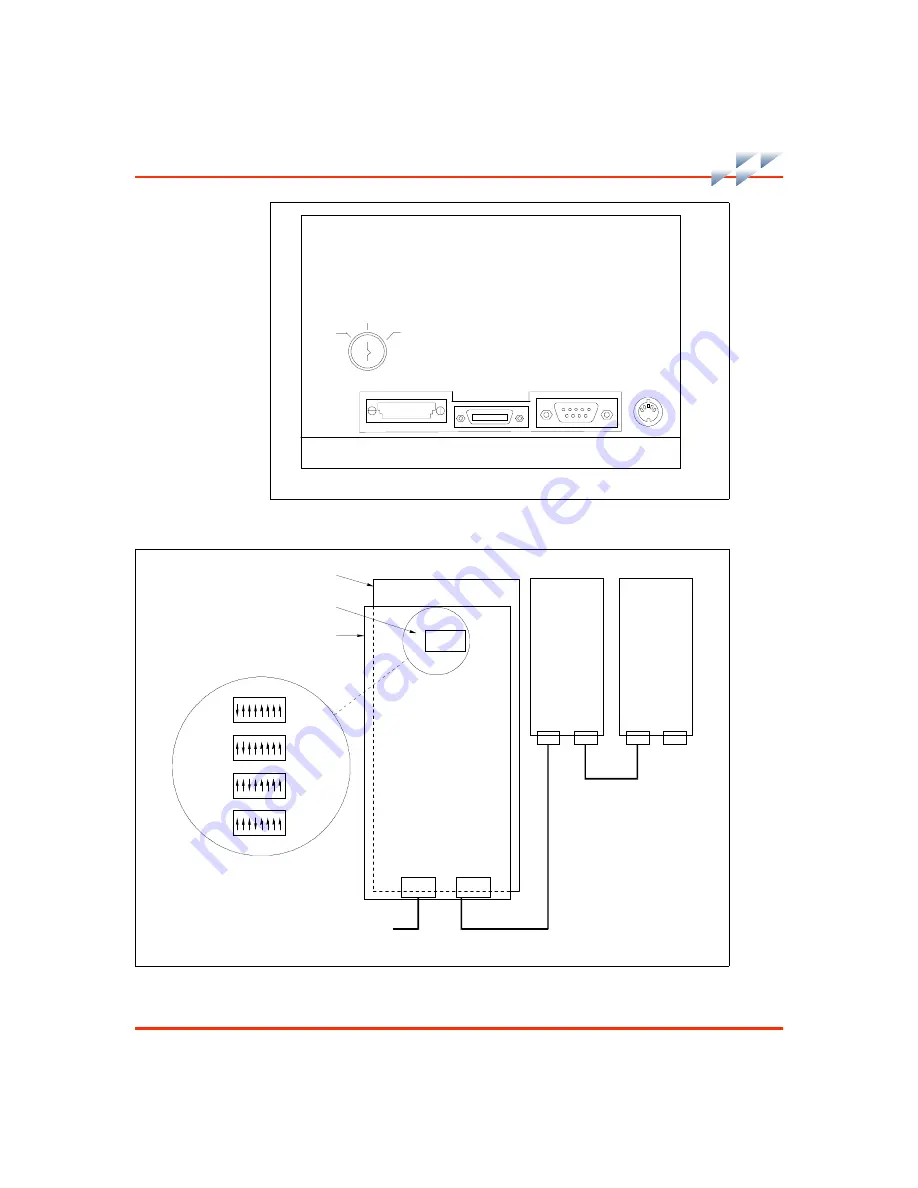
Figure PR13-1.  Keyboard Interface Assembly

T01447A

OFF

TUNE

CONFIG

KEYBOARD

AUX 1 

PORT

MOUSE/

TRACKBALL

AUX
KBD

Figure PR13-2.  IIADP01 Installation

T01302A

TO AUX 1 PORT ON 

KEYBOARD 

INTERFACE BOARD

P1

BACK OF 

ADP PANEL

ADDRESS 

SWITCH

PC BOARD

ADDRESS SWITCH 

SETTINGS

SW1

1  2  3  4  5  6  7  8

1  2  3  4  5  6  7  8

1  2  3  4  5  6  7  8

1  2  3  4  5  6  7  8

OPEN

OPEN

OPEN

OPEN

SW1

SW1

SW1

ADP 1

ADP 2

ADP 3

ADP 4

P1

SW1

P1

P2

P2

P2

ADP 

2

ADP 

3

ADP 

4

1   2    3   4   5   6  7   8

OP EN

Содержание C-I-CV43C

Страница 1: ...Bailey Hartmann Braun TM Instruction Conductor Conductor VMS Series 43 Auxiliary Terminal...

Страница 2: ...he section and any nonprocedural informa tion This flowchart directs personnel to the appropriate proce dure located in the back of this instruction By treating each task as a separate entity the proc...

Страница 3: ...ginal PR7 1 through PR7 2 Original PR8 1 through PR8 3 Original PR9 1 through PR9 2 Original PR10 1 through PR10 2 Original PR11 1 through PR11 2 Original PR12 1 through PR12 3 Original PR13 1 through...

Страница 4: ...s 1 9 Section 2 Description and Operation 2 1 Introduction 2 1 Functional Operation 2 1 Section 3 Installation 3 1 Introduction 3 1 Special Handling 3 1 Unpacking and Inspection 3 2 Safety Considerati...

Страница 5: ...mension Drawings A 1 Introduction A 1 Appendix B Factory Cabling B 1 Introduction B 1 Appendix C Quick Reference C 1 Introduction C 1 List of Procedures No Title PR1 Cover Removal PR2 Anchoring PR3 Wo...

Страница 6: ...PR30 Hard Drive Settings PR31 CD ROM Drive Settings PR32 Keyboard Interface Device Removal PR33 IIADP02 Replacement PR34 Keyboard Interface Assembly Replacement PR35 Upper Monitor Removal PR36 Lower...

Страница 7: ...2 C 2 Auxiliary Terminal Components Rear View C 3 C 3 IIMKM02A Module C 4 C 4 Touchscreen Controller Card C 5 C 5 Multibus Card Cage Backplane C 5 C 6 CPU Halt Switch Settings C 6 C 7 Graphics Card S...

Страница 8: ...PR31 1 CD ROM Drive Settings PR31 2 PR32 1 Keyboard Interface Assembly PR32 1 PR33 1 IIADP02 Replacement PR33 2 PR33 2 IIADP02 Bezel Removal PR33 3 PR39 1 Touchscreen Controller Card Installation PR39...

Страница 9: ...t in severe or fatal shock or equipment damage p PR18 1 PR20 1 PR22 1 PR23 1 PR25 1 Disconnect the AC line cord or power lines from the operating branch circuit coming from the source before attemptin...

Страница 10: ...settings on the peripheral devices power supply and power entry panel show the correct operating voltage Equipment damage may result if the incorrect voltage is connected Make sure the console main po...

Страница 11: ...ptions from equipment manuals Parts without a description must be ordered from the nearest sales or service office Recommended spare parts lists including prices are available though the nearest sales...

Страница 12: ...mark of Eberhard Faber Incorporated Elsag Bailey Registered trademark of Elsag Bailey Process Automation Ethernet Trademark of Xerox Corporation HP Registered trademark of Hewlett Packard Company INFI...

Страница 13: ...WBPEEUI220772A0...

Страница 14: ...User This instruction is intended for use by technical personnel responsible for the installation maintenance and repair of the auxiliary terminal System engineers and technicians with a background i...

Страница 15: ...n Figures 1 1 and 1 2 show the main com ponents of the auxiliary terminal Both figures show the unit with doors open Figure 1 1 Auxiliary Terminal Components Front View T01441A FRONT VIEW MULTIBUS CAR...

Страница 16: ...haSta tion 255 Model 233 Specifications for the CPU are listed in the DEC User Information manual shipped with the auxiliary terminal Figure 1 2 Auxiliary Terminal Components Rear View T01442A REAR VI...

Страница 17: ...s instruction contains information on C I CV43C auxiliary terminals It is organized into seven sections three appendices and a set of procedures After becoming completely familiar with it and the auxi...

Страница 18: ...tempting to install maintain or repair the auxiliary terminal After gaining a complete understanding of this instruction and the auxiliary terminal it can be used as a reference Some sections of this...

Страница 19: ...text within the brackets follows the previously described conventions Examples ei 108 87 key1 key2 x coord y coord ELE volume filename exe Reference Documents Table 1 1 lists Elsag Bailey instructions...

Страница 20: ...ifications Property Characteristic Value Power Line voltage Line frequency Circuit breaker size 240 VAC nominal 180 VAC to 264 VAC RMS 120 VAC nominal 90 VAC to 132 VAC RMS Overvoltage category III 47...

Страница 21: ...1 103 BTU hr nominal 1 467 BTU hr maximum Dimensions 568 3 cm high x 711 2 cm wide x 1096 1 cm deep 61 74 in high x 28 00 in wide x 42 92 in deep Weight 240 kg 525 lbs Electrical noise Keep cabinet d...

Страница 22: ...work surface 40790021 Lexmark Color JetPrinter 4079 PLUS 11 in by 17 in color printer C3540A1 HP 1600C 8 5 in by 11 0 in color printer IICPI01 15 wedge IICPI02 45 wedge IICUC01 Utility console IICWS0...

Страница 23: ...WBPEEUI220772A0...

Страница 24: ...cs faceplates trends and alarm summaries For operating procedures refer to Table 1 1 Functional Operation The auxiliary terminal controls and monitors the process through the main workstation The auxi...

Страница 25: ...peration Figure 2 1 Block Diagram ENGINEERING KEYBOARD TOUCHSCREEN MOUSE TRACKBALL ADP PANEL OPERATOR KEYBOARD IIMKM02A MODULE VGA T01452A KEYBOARD INTERFACE ASSEMBLY CPU ETHERNET NETWORK TO MAIN WORK...

Страница 26: ...fer to Table 1 4 is available for personnel working on components containing semiconductor devices It contains two wrist straps a ground cord assembly an alligator clip and a static dissipating work s...

Страница 27: ...ve sys tem it should be done quickly Do not cut leads or lift circuit paths when troubleshooting 7 Be sure to ground any test equipment 8 Avoid static charges during removal and replacement Make sure...

Страница 28: ...the components when removing any fasteners that secure them to their ship ping pallets Never sit or stand on work surfaces or any other part of the auxiliary terminal Do not remove or install printed...

Страница 29: ...s from 120 240 VAC 50 60 hertz The PEP provides line filtering transient suppression and a 20 amp circuit breaker In addition to AC input terminals the PEP has alarm relay out puts located on a termin...

Страница 30: ...ge than the power wiring and must be bare green colored or green yellow colored if insulated The grounding conductor must be terminated at the system safety ground connection on the front of the PEP O...

Страница 31: ...perly grounded electrical system is vital for personnel safety equipment protections and normal process system operation Digital process control sys tems require a single point grounding system that h...

Страница 32: ...Some blocks contain alphanumeric codes These codes identify the procedure that describes the steps to complete an indi cated task Complete all of the steps given in a procedure before continuing to th...

Страница 33: ...ODULE INSTALLATION PR9 CPU INSTALLATION PR12 KEYBOARD INTERFACE DEVICE INSTALLATION PR13 IIMKM02A MODULE SETTINGS REMOVE CPU COVER PER MANUFACTURER S INSTRUCTIONS INSTALL CPU COVER PER MANUFACTURER S...

Страница 34: ...t that directs troubleshoot ing personnel to the appropriate procedures NOTE Put circuit boards containing MOS devices into antistatic bags when stored or shipped back to the factory Do not repair cir...

Страница 35: ...Complete all of the steps given in a procedure before continuing to the next procedure The procedures have check boxes in the margin by each proce dural step When performing a procedure check each box...

Страница 36: ...roubleshooting Sequence TR1434A START AC POWER PROBLEMS AC POWER TEST PR16 DC POWER PROBLEMS DC POWER TEST PR17 COVER INSTALLATION PR42 COVER INSTALLATION PR42 CONTACT LOCAL EBPA SERVICE OFFICE STILL...

Страница 37: ...WBPEEUI220772A0...

Страница 38: ...ability of that product Elsag Bailey recommends that all equipment users practice a preventive maintenance program that will keep the equipment operating at an optimum level The procedures referred to...

Страница 39: ...blades N A 1 month Check cabinet and modules for dust Clean as necessary using an anti static vacuum N A 3 months Check power supply outputs Adjust power supplies if needed PR17 Clean CD ROM drive1 N...

Страница 40: ...g with the sequence In some cases more than one path can be taken during repair and replace ment procedures For paths that are in parallel either com plete all of the tasks in all of the paths before...

Страница 41: ...epair and Replacement Sequence Figure 6 1 Repair and Replacement Sequence Flowchart TR1345A START WHAT AREA OF WORKSTATION MULTIBUS CARD CAGE POWER SUPPLY AND PEP CPU OPERATOR INTERFACE MONITORS AND T...

Страница 42: ...OFF POWER AT PEP MODULE REMOVAL PR7 MODULE INSTALLATION PR9 MULTIBUS CARD CAGE INSTALLATION PR25 SWITCH ON POWER AT PEP COVER INSTALLATION PR42 REPLACING MODULE OR MULTIBUS CARD CAGE COMPONENTS REPLA...

Страница 43: ...nd PEP SWITCH OFF POWER AT OPERATING BRANCH CIRCUIT SWITCH OFF POWER AT PEP B COVER REMOVAL PR1 POWER SUPPLY REMOVAL POWER SUPPLY INSTALLATION PR26 PR27 PEP REPLACEMENT PR28 TR1436A DONE SWITCH ON POW...

Страница 44: ...PEP C COVER REMOVAL PR1 REMOVE CPU COVER PER MANUFACTURER S INSTRUCTIONS INSTALL CPU COVER PER MANUFACTURER S INSTRUCTIONS GRAPHICS CARD SETTINGS HARD DRIVE SETTINGS CD ROM DRIVE SETTINGS PR29 PR30 P...

Страница 45: ...R AT OPERATING BRANCH CIRCUIT SWITCH OFF POWER AT PEP KEYBOARD INTERFACE DEVICE REMOVAL KEYBOARD INTERFACE DEVICE INSTALLATION D COVER REMOVAL COVER REMOVAL IIADP02 REPLACEMENT KEYBOARD INTERFACE ASSE...

Страница 46: ...ER CARD REPLACEMENT PR39 COVER INSTALLATION PR42 LOWER MONITOR REMOVAL LOWER MONITOR INSTALLATION UPPER MONITOR INSTALLATION TOUCHSCREEN REMOVAL TOUCHSCREEN REMOVAL TOUCHSCREEN INSTALLATION TOUCHSCREE...

Страница 47: ...WBPEEUI220772A0...

Страница 48: ...eyboard module 1947419 7 Fan 11 43 cm 4 1 2 in 1948623 9 Monitor 19 inch 1949009 1 50 thinwire terminator 1949207 5 SCSI cable 2 5 ft 1949514 2 Hard disk drive 1 08 Gbytes 1949514 3 5 25 in 600 MB CD...

Страница 49: ...WBPEEUI220772A0...

Страница 50: ...ure numbers and descriptions of the drawings Table A 1 Installation and Dimension Drawings Figure Number Description A 1 Auxiliary terminal installation drawing A 2 Anchoring dimensions A 3 Anchoring...

Страница 51: ...42 75 1568 3 61 74 724 6 28 53 471 8 18 58 830 4 32 69 1090 1 42 92 DIMENSIONS MILLIMETERS INCHES STUD CENTER 482 6 19 00 66 0 2 60 281 8 11 09 TO REAR DOOR STUD CENTER 493 8 19 44 108 7 4 28 108 7 4...

Страница 52: ...DIA ANCHOR BOLT FLOOR OPENING FLOOR OPENING STANDARD FLOOR MOUNTING OPTIONAL WELD MOUNTING 101 6 4 00 38 1 1 50 DIMENSIONS MILLIMETERS INCHES Figure A 4 Cable Entry Cutouts 197 1 7 76 129 5 5 10 REAR...

Страница 53: ...tallation Drawing Typical 1000 0 39 40 711 2 28 00 15 REF 1054 1 41 50 482 6 19 00 52 8 2 08 69 2 2 73 1089 4 42 89 1270 0 50 00 215 7 8 49 T01418A 529 1 20 83 404 2 15 91 493 8 19 44 217 4 8 56 RECOM...

Страница 54: ...Drawing T01295A IICPI01 482 6 19 00 52 8 2 08 69 3 2 73 50 8 2 00 404 1 15 91 493 8 19 44 335 3 13 20 DIMENSIONS MILLIMETERS INCHES 493 8 19 44 T01296A IICPI02 DIMENSIONS MILLIMETERS INCHES 395 7 15...

Страница 55: ...MENDED CLEARANCE FROM WALL FOR SERVICING AND AISLEWAY CABLE ACCESS COVER PLATE BOTTOM CABLE ENTRY AREA REAR CABLE ENTRY 1000 0 39 40 1090 1 42 92 433 7 17 08 1523 9 60 00 711 2 28 00 465 1 18 31 614 7...

Страница 56: ...A0 A 7 Figure A 9 IICUC01 Utility Console Installation Drawing 1090 1 42 92 711 2 28 00 1000 0 39 40 1732 51 68 21 1085 7 42 75 687 5 27 07 T01493A SIDE FRONT REAR RECOMMENDED CLEARANCE FROM WALL FOR...

Страница 57: ...WBPEEUI220772A0...

Страница 58: ...AC power connector on monitor 1 4 6639637 4 P9 on IIMKM02A module RS 232 C port Port 2 on CPU 5 6642339 1 P8 on IIMKM02A module Keyboard port on CPU 6 1949207 5 SCSI port on CPU SCSI cable 7 7 6641230...

Страница 59: ...tion board 23 6640371 1 J1 on PEP P1 on power supply 24 6640640 1 P7 on DC distribution board Cable P2 to fan on multibus card cage Cable P3 to fan on back door 26 6640640 4 P8 on DC distribution boa...

Страница 60: ...OPERATOR KEYBOARD DEGAUSS L DEGAUSS U CPU KEYBOARD INTERFACE ASSEMBLY IIMKM02A MODULE J3 J2 POWER SUPPLY MOUSE ETHERNET KEYBOARD SCSI RS 232 C PORT 2 RS 232 C PORT 1 VGA P1 P2 ADP FAN P6 CONTRAST BRI...

Страница 61: ...WBPEEUI220772A0...

Страница 62: ...ion Table C 1 lists the figure numbers and descriptions of the figures Table C 1 Quick Reference Figures Figure Number Description C 1 Auxiliary terminal components front view C 2 Auxiliary terminal c...

Страница 63: ...772A0 Introduction Figure C 1 Auxiliary Terminal Components Front View T01441A FRONT VIEW MULTIBUS CARD CAGE PEP IIMKM02A MODULE CD ROM DRIVE KEYBOARD INTERFACE ASSEMBLY LOWER MONITOR UPPER MONITOR AD...

Страница 64: ...duction WBPEEUI220772A0 C 3 Figure C 2 Auxiliary Terminal Components Rear View T01442A REAR VIEW POWER SUPPLY PEP DC DISTRIBUTION BOARD KEYBOARD INTERFACE ASSEMBLY ADP MULTIBUS CARD CAGE UPPER MONITOR...

Страница 65: ...OARDS 1 2 3 TWO TOUCHSCREEN BOARDS 1 2 3 CUSTOMER SETTINGS J2 FACTORY SETTINGS CUSTOMER SETTINGS J4 J9 J8 J2 J1 J3 J6 J7 J5 1 2 3 1 2 3 1 2 3 1 2 3 1 2 3 1 2 3 3 2 1 J1 FACTORY SETTINGS CUSTOMER SETTI...

Страница 66: ...P14 W3 W4 W2 W1 P15 P18 P14 P17 P15 CONNECTOR PINS PLUG INTO MKM BOARD FACTORY SET DO NOT CHANGE NOT USED TOUCH SCREEN CABLE MOUNTING HOLES 4 W1 INSTALLED W2 NOT INSTALLED R3 1 5 S1 S2 S1 8 7 6 5 4 3...

Страница 67: ...Switch Settings Figure C 7 Graphics Card Settings 1 2 3 4 5 6 7 8 ON OFF T00189A CPU MOTHERBOARD SW 4 OFF FOR HALT OPERATION SW 8 ON FOR 233 MHZ TP80627A ALIAS OFF OFF VGA ALIAS OFF OFF VGA FREQUENCY...

Страница 68: ...Drive Settings BACK OF DRIVE FRONT OF DRIVE OPERATING DISK DKA0 A2 A1 A0 TE PK APPLICATION DISK DKA100 A2 A1 A0 TE PK TP80642A T01399A MODE SELECT HEADERS ID1 TERM ID2 ID4 PRTY PRV ALW TEST JUMPER PLU...

Страница 69: ...BLU RED YEL 5V GND 12V 12V SW1 F2 F1 F3 J1 P3 KEYBOARD AUX 1 PORT AUX KBD MOUSE TRACKBALL P4 P5 P6 P2 P8 ASSY 6638238 1 SW1 SWITCHES 5 6 AND 7 ARE CLOSED ON TP P3 ON DC DISTRIBUTION BOARD F1 F2 AND F3...

Страница 70: ...ON KEYBOARD INTERFACE BOARD P1 BACK OF ADP PANEL ADDRESS SWITCH PC BOARD ADDRESS SWITCH SETTINGS SW1 1 2 3 4 5 6 7 8 1 2 3 4 5 6 7 8 1 2 3 4 5 6 7 8 1 2 3 4 5 6 7 8 OPEN OPEN OPEN OPEN SW1 SW1 SW1 AD...

Страница 71: ...C 10 WBPEEUI220772A0 Introduction Figure C 12 IIADP02 Panel T01303A BACK OF ADP PANEL BEZEL SCREWS 2 ADDRESS SWITCH PC BOARD SW1 TO MKM BOARD 26 PIN P2 P4 P1 POWER IN CABLE 8 7 6 5 OPEN 4 3 2 1...

Страница 72: ...ER CRT POWER SUPPLY LOWER CRT BLOWER AUX N OTICE CO NN ECT PER IPHER AL R IB BON CABLE BEF ORE PLU GGIN G AND POW ERING U NIT E1 ON ON W RISTS TRA P 1 NO 4 NO 3 NO 6 NO 5 NO 2 NC 1 NC 4 NC 3 NC 6 NC 5...

Страница 73: ...COMPOSITE SYNCH RESISTOR POSITION RESISTOR SWITCHES FOR 75 TERMINATION NO RESISTOR POSITION SCREEN ADJUSTMENTS HEIGHT WIDTH BRIGHTNESS CONTRAST MONITOR DEGAUSS POWER R REMOTE AUX 1 VGA VGA SYNC GRN C...

Страница 74: ...n wrench Procedure There are two doors and a top cover on the auxiliary terminal Front and Rear Doors 1 Insert the key into the lock and turn it turn counter clockwise 2 Pull down and out on the doors...

Страница 75: ...WBPEEUI220772A0...

Страница 76: ...ways to secure the auxiliary terminal at the installation site If supplied with stabilizers no further secur ing methods are required If there are not stabilizers the auxil iary terminal must be secu...

Страница 77: ...482 6 19 00 12 7 MM 0 50 IN CUSTOMER MOUNTING HOLES 493 8 19 44 66 0 2 60 108 7 4 28 Figure PR2 2 Anchoring Scheme Typical T01277A 12 7 0 50 0 64 0 25 50 8 2 00 DIA ANCHOR BOLT FLOOR OPENING FLOOR OP...

Страница 78: ...even The leveling screws adjust 26 7 millimeters 1 05 inches 2 Once a unit is secure insert the table support brackets into the cabinet Fig PR3 1 10 min Number Qty Description 6638625 1 1 Work surface...

Страница 79: ...PR3 2 WBPEEUI220772A0 Procedure 3 Lock the work surfaces into place by pushing the red han dle above the front door to the right until it stops at the bottom of the slot...

Страница 80: ...Procedure 1 The work surface is bolted to the table support brackets through oversized holes Use the inch open end wrench to loosen the six bolts three per table support bracket as shown in Fig PR4 1...

Страница 81: ...the cabinet to line up the work surfaces 3 Two steel alignment pins are shipped inside the brass bushings located on each side of each work surface When two work surfaces are lined up push the pins ou...

Страница 82: ...inch long hex head cap screws 4 Use the inch open end wrench to fasten the brackets to the wedge table using the assemblies from Step 3 5 Position the wedge table between two components in the array...

Страница 83: ...ay using the assemblies from Step 6 8 Install the retaining pins from underneath the component work surface through and into the wedge table Figure PR5 1 Wedge Table Installation T01417A WEDGE TABLE I...

Страница 84: ...ound as the main terminal This reduces the chance of communication problems on the Ethernet network Failure to do so may cause data to be changed or lost 10 min WARNING 1 Disconnect the AC line cord o...

Страница 85: ...AC distribution must be sized to allow for the inrush current required by the auxil iary terminal The typical inrush current is 53 3 amps at 120 VAC and 64 8 amps at 240 VAC For more information on po...

Страница 86: ...NNECTING SIGNAL CABLE 2 NO POWER MA IN POWE R ON OFF WA RNING AV ERTISS EMENT 120 240V PERIP HE RAL POW ER NOTICE C ONN ECT PERIPHER AL RIBBON C ABLE BEF OR E PLU GGIN G AND POW ER IN G U NIT E1 ON ON...

Страница 87: ...PR6 4 WBPEEUI220772A0 Procedure Figure PR6 3 CPU Input Voltage T00440A REAR OF CPU 230 V 115 V...

Страница 88: ...is removed 2 Remove the clear polycarbonate shield from the front of the multibus card cage 3 There is a card retainer on each edge of the multibus card cage Use the bladed screwdriver to loosen the...

Страница 89: ...PR7 2 WBPEEUI220772A0 Procedure 7 Pull out on the two tabs on each side of the module to release it 8 Remove the module Figure PR7 1 Module Location T01446A IIMKM02A...

Страница 90: ...ule If replacing it perform this procedure on the new module 1 Refer to Table PR8 1 and Figure PR8 1 and set the jumpers as desired filling in the customer settings in Table PR8 1 and Figure PR8 1 NOT...

Страница 91: ...l to reset the IIMKM02A module J5 2 3 Do not change 2 3 J62 1 2 One or two touchscreen boards 2 3 Zero touchscreen boards J72 1 2 Two touchscreen boards 2 3 One or zero touchscreen boards J82 1 2 One...

Страница 92: ...BOARDS 1 2 3 TWO TOUCHSCREEN BOARDS 1 2 3 CUSTOMER SETTINGS J2 FACTORY SETTINGS CUSTOMER SETTINGS J4 J9 J8 J2 J1 J3 J6 J7 J5 1 2 3 1 2 3 1 2 3 1 2 3 1 2 3 1 2 3 3 2 1 J1 FACTORY SETTINGS CUSTOMER SETT...

Страница 93: ...WBPEEUI220772A0...

Страница 94: ...sitive devices when performing this procedure 1 Verify that the main power switch on the PEP is in the off position Check the main power indicator to see if power is removed 2 Figure PR9 1 shows the l...

Страница 95: ...on the tabs at the side of the module to secure it in the multibus card cage 6 Connect the appropriate cables to the module 7 Slide the card retainers toward the center of the multibus card cage unti...

Страница 96: ...npowered state Refer to the DEC User Infor mation manual for important and cautionary information on replacing the battery System configuration and setup data must be verified after battery replacemen...

Страница 97: ...4 Remove the two screws that hold the rear of the mounting plate to the support bracket 5 Slide the CPU and mounting plate out of the rear of the auxiliary terminal Figure PR10 1 CPU Removal T01450A R...

Страница 98: ...and the screen displays the prompt This requires typing B and from the engi neering or operator keyboard in order to boot the system into the main window A system boot takes approximately ten minutes...

Страница 99: ...PR11 2 WBPEEUI220772A0 Procedure Figure PR11 1 HALT Switch Setting 1 2 3 4 5 6 7 8 ON OFF T00189A CPU MOTHERBOARD SW 4 OFF FOR HALT OPERATION SW 8 ON FOR 233 MHZ...

Страница 100: ...e the system is in the unpowered state Refer to the DEC User Infor mation manual for important and cautionary information on 10 min Number Qty Description 6642865 3 1 CPU assembly AlphaStation 255 mod...

Страница 101: ...ndicator to see if power is removed 2 Verify that the input voltage switch setting on the rear of the CPU Fig PR12 1 is set to the proper input voltage level 3 Slide the CPU and mounting plate into th...

Страница 102: ...Procedure WBPEEUI220772A0 PR12 3 Figure PR12 2 CPU Installation T01450A REAR VIEW SCREWS 4 CPU FRONT VIEW...

Страница 103: ...WBPEEUI220772A0...

Страница 104: ...rked MOUSE TRACKBALL on the keyboard interface assembly 4 Plug the table top ADP panel into the port marked AUX 1 PORT on the keyboard interface assembly using the ADP cable 5 Refer to Figure PR13 2 a...

Страница 105: ...BD Figure PR13 2 IIADP01 Installation T01302A TO AUX 1 PORT ON KEYBOARD INTERFACE BOARD P1 BACK OF ADP PANEL ADDRESS SWITCH PC BOARD ADDRESS SWITCH SETTINGS SW1 1 2 3 4 5 6 7 8 1 2 3 4 5 6 7 8 1 2 3 4...

Страница 106: ...the network An Ethernet message can pass through up to two repeaters or network bridges before it reaches its destination Ethernet networks require a terminator at each end of the cable NOTES 1 Be ca...

Страница 107: ...PR14 2 WBPEEUI220772A0 Procedure Figure PR14 1 Cable Entry Cutouts 197 1 7 76 129 5 5 10 REAR CABLE ENTRY BOTTOM CABLE ENTRY AREA 68 6 2 70 149 4 5 88 DIMENSIONS MILLIMETERS INCHES 63 5 2 50 T01444A...

Страница 108: ...o the printer port on the rear of the CPU or to a DEC server Refer to the Conductor VMS Series 43 Workstation instruction for detailed installation and setup instructions 20 min Number Qty Description...

Страница 109: ...WBPEEUI220772A0...

Страница 110: ...to measure AC RMS voltage to measure the voltage at each of the AC outlets The line voltage should be 90 to 132 VAC RMS for a 120 VAC input and 180 to 264 VAC RMS for a 240 VAC input 5 Use the DMM to...

Страница 111: ...TING SIGNAL CABLE 2 NO POW ER MAIN P OWER ON OFF WARNING AVE RTISSE MENT 120 240V PERIPHE RA L POWE R UPPER CRT POWER SUPPLY LOWER CRT BLOWER AUX N OTICE CO NN ECT PER IPHER AL R IB BON CABLE BEF ORE...

Страница 112: ...stribution cables from all peripheral devices disconnect the cables at the distri bution end 3 Pull the module from the multibus card cage far enough out to disconnect it from the backplane 4 Insure t...

Страница 113: ...power supply voltages are not within tolerance 8 Switch the on off switch on the PEP to the OFF position 9 Plug the module into the multibus card cage 10 Connect all cables removed in Step 2 11 Switch...

Страница 114: ...ightening action will verify that it is secure There must not be any motion to loosen the connection 1 Disconnect power from the auxiliary terminal 2 Disconnect power from the operating branch circuit...

Страница 115: ...PR18 2 WBPEEUI220772A0 Procedure 4 Check and verify that all other power connections within the auxiliary terminal including connections to the power sup plies are secure...

Страница 116: ...the monitor Parts None Tools Soft lint free cloth Mild all purpose commercial spray cleaner Procedure 1 Spray the mild all purpose commercial spray cleaner on the soft lint free cloth 2 Use the soft l...

Страница 117: ...WBPEEUI220772A0...

Страница 118: ...ral printed circuit board cleaning procedures These procedures cover printed circuit board cleaning and cleaning edge connectors Use the procedures that meet the needs of each printed circuit board Re...

Страница 119: ...service vacuum or 1 Spray or wipe the printed circuit board with isopropyl alco hol 99 5 electronic grade 2 Use a foam tipped swab to wipe the printed circuit board 3 When the printed circuit board i...

Страница 120: ...only enough force to shine the contact surface Inspect the edge connector after cleaning to assure no loss of contact surface Female Edge Connector Cleaning 1 Soak a soft lint free cloth that is wrapp...

Страница 121: ...WBPEEUI220772A0...

Страница 122: ...dures differ depend ing on the keyboard Operator Mylar Keyboard 1 Wipe away dust with the soft lint free cloth 2 Spray the mild all purpose commercial spray cleaner on the soft lint free cloth 3 Clean...

Страница 123: ...WBPEEUI220772A0...

Страница 124: ...l power wiring screws within the workstation 4 If they are loose use the flat blade torque screwdriver to tighten them to 1 6 Newton meters 14 in lbs 5 Inspect and clean all PEP and DC distribution bo...

Страница 125: ...WBPEEUI220772A0...

Страница 126: ...moved 2 Remove the clear polycarbonate shield that covers the mul tibus card cage 3 Disconnect and label all cables from the multibus card cage 4 Support the front and rear of the multibus card cage w...

Страница 127: ...PR23 2 WBPEEUI220772A0 Procedure Figure PR23 1 Multibus Card Cage Removal T01448A FRONT VIEW SCREWS 4...

Страница 128: ...ong screws around the fan 3 Slide the fan out around the multibus card cage 4 Disconnect the fan power cable 5 Connect the fan power cable to the new fan making sure the red striped conductor is conne...

Страница 129: ...WBPEEUI220772A0...

Страница 130: ...3 Support the front and rear of the multibus card cage while using the Phillips head screwdriver to install the four screws Fig PR25 1 to secure it to the auxiliary terminal 4 Install the clear polyca...

Страница 131: ...PR25 2 WBPEEUI220772A0 Procedure Figure PR25 1 Multibus Card Cage T01448A FRONT VIEW SCREWS 4...

Страница 132: ...l wires and cables from the power supply 4 Use the bladed screwdriver to remove the two screws that secure the power supply bracket to the monitor mounting plat form Fig PR26 1 5 There is a metal tab...

Страница 133: ...PR26 2 WBPEEUI220772A0 Procedure Figure PR26 1 Power Supply Removal T01400A MONITOR REAR VIEW POWER SUPPLY BRACKET SCREWS AND WASHERS 2 MONITOR MOUNTING PLATFORM PEP...

Страница 134: ...ved 2 There is a metal tab on the bottom of the power supply that sets into a slot on the monitor mounting platform Install the power supply from the rear of the auxiliary terminal so that the tab fit...

Страница 135: ...at secure the power supply bracket to the monitor mounting plat form Fig PR27 1 5 Install all cables 6 Plug the power supply into its socket on the PEP Figure PR27 1 Power Supply Installation T01400A...

Страница 136: ...DEGAUSS corrects picture distortion due to magnetic fields on the screen of the upper swivel mounted monitor The lower degauss switch L DEGAUSS provides the same function for the lower monitor The RES...

Страница 137: ...y that the main power on the PEP is in the off position Check the power indicator to see if power is removed 2 Verify that the AC line power plant circuit breaker to the auxiliary terminal is shut dow...

Страница 138: ...EFORE CONNECTING SIGNAL CABLE 2 NO POW ER MAIN P OWER ON OFF WARNING AVE RTISSE MENT 120 240V PERIPHE RA L POWE R UPPER CRT POWER SUPPLY LOWER CRT BLOWER AUX N OTICE CO NN ECT PER IPHER AL R IB BON CA...

Страница 139: ...PR28 4 WBPEEUI220772A0 Procedure Figure PR28 2 PEP Replacement T01308A FRONT VIEW SCREWS 5...

Страница 140: ...e CPU Parts Tools As required per documentation supplied with CPU Procedure 1 Refer to the documentation supplied with the CPU to gain access to the installed graphics card and slot for the graphics c...

Страница 141: ...PR29 2 WBPEEUI220772A0 Procedure Figure PR29 1 Graphics Card Settings TP80627A ALIAS OFF OFF VGA ALIAS OFF OFF VGA FREQUENCY SWITCH SETTING 0 GRAPHICS BOARD 1 GRAPHICS BOARD 2...

Страница 142: ...red per documentation supplied with CPU Procedure 1 Refer to the documentation supplied with the CPU to gain access to and remove the hard drive to be replaced 2 Refer to Figure PR30 1 and set the jum...

Страница 143: ...PR30 2 WBPEEUI220772A0 Procedure 3 Refer to the documentation supplied with the CPU and install the hard drive 4 Refer to the documentation supplied with the CPU and close the CPU case...

Страница 144: ...with CPU Procedure 1 Refer to the documentation supplied with the CPU to gain access to and remove the CD ROM drive to be replaced 2 Refer to Figure PR31 1 and set the jumpers as shown 3 Refer to the...

Страница 145: ...20772A0 Procedure Figure PR31 1 CD ROM Drive Settings T01399A MODE SELECT HEADERS ID1 TERM ID2 ID4 PRTY PRV ALW TEST JUMPER PLUG SCSI ID4 TERMINATION POWER SPARE JUMPER PLUG SPARE JUMPER PLUG CD ROM D...

Страница 146: ...keyboard the operator Mylar keyboard the pointing device mouse or trackball and the table top ADP panel IIADP01 Parts None Tools None Procedure 1 Unplug the Mylar operator keyboard from the port mark...

Страница 147: ...oard from the port marked AUX KBD on the keyboard interface assembly 3 Unplug the pointing device from the port marked MOUSE TRACKBALL on the keyboard interface assembly 4 Unplug the table top ADP pan...

Страница 148: ...PR33 1 3 If it is necessary to remove the bezel remove the four screws that secure the bezel to the auxiliary terminal Fig PR33 2 4 Remove the ADP panel from the auxiliary terminal or from the bezel i...

Страница 149: ...bezel 10 If the bezel was removed from the auxiliary terminal install it and use the bladed screwdriver to install the four screws Figure PR33 1 IIADP02 Replacement T01303A BACK OF ADP PANEL BEZEL SC...

Страница 150: ...Procedure WBPEEUI220772A0 PR33 3 Figure PR33 2 IIADP02 Bezel Removal T01401A REAR VIEW SCREWS 4 ADP...

Страница 151: ...WBPEEUI220772A0...

Страница 152: ...se the bladed screwdriver to remove the two screws hold ing the keyboard interface assembly to the auxiliary terminal 4 Slide the keyboard interface assembly out of the auxiliary terminal 5 Install th...

Страница 153: ...WBPEEUI220772A0...

Страница 154: ...ont cover 4 Disconnect the power cord connectors from the fans mounted in the rear cover 5 Remove the rear cover 6 If the monitor has a touchscreen disconnect the touch screen cable at the connector b...

Страница 155: ...old VGA cable and care fully pull the old VGA cable down through the monitor mount ing tube support NOTE It may be necessary to cut several tie wraps that hold the old VGA cable to the auxiliary termi...

Страница 156: ...isconnect the touch screen cable from the IIMKM02A module 4 Use the bladed screwdriver to remove the four screws that secure the fan assembly to the weldment 5 Remove the cables from the rear of the f...

Страница 157: ...lts attach the monitor mounting tray to the auxiliary terminal shelf 8 Slide the monitor out of the rear of the auxiliary terminal 9 Place the monitor and tray onto a solid flat surface 10 Protect the...

Страница 158: ...220772A0 PR37 1 PR37 Touchscreen Removal Purpose Scope This procedure explains how remove the touchscreen Parts None Tools None Procedure 1 Firmly pull on the touchscreen to release it from the monito...

Страница 159: ...WBPEEUI220772A0...

Страница 160: ...ng one end of each against the edge of the long piece and align them with the inner edge of the touch screen border 4 Trim off the excess hook tape 5 Cut the loop tape into three pieces one slightly l...

Страница 161: ...loop tape 9 Apply a strip of vinyl tape or equivalent along the bottom edge of the tube face to dust seal the gap between the touch screen and the tube face 10 Position the touchscreen on the monitor...

Страница 162: ...om the touchscreen controller card Note the orientation of Pin 1 2 Use the small bladed screwdriver to remove the four screws that secure the touchscreen controller card to the IIMKM02A module 3 Verif...

Страница 163: ...the other touchscreen con troller card if required 9 Refer to the Operation Conductor VMS and Configura tion Conductor VMS instructions to perform an on line cali bration of the touchscreen Figure PR...

Страница 164: ...itor to its mounting plate 4 Attach the VGA cable Fig PR40 1 10 min Number Qty Description 1948623 91 1 Monitor 19 in NOTE 1 This part is not needed if this procedure is part of touchscreen replacemen...

Страница 165: ...e front cover using the front cover mounting screws 10 If a touchscreen is installed on the monitor refer to the Operation Conductor VMS and Configuration Conductor VMS instructions to perform an on l...

Страница 166: ...the monitor mounting tray to the monitor 4 Install the fan assembly 5 Install the cables to the rear of the fan assembly 10 min Number Qty Description 1948623 91 1 Monitor 19 in NOTE 1 This part is no...

Страница 167: ...M02A module 10 Install the power cord and VGA cable to the rear of the monitor Fig PR41 1 11 Verify that the SYNC switch on the rear of the monitor is set to the VGA position 12 If a touchscreen is in...

Страница 168: ...erminal Front and Rear Doors 1 Insert the tabs on the door into the holes in the auxiliary panel frame 2 Push up and in on the doors to install them 3 Insert the key into the lock and turn it turn clo...

Страница 169: ...WBPEEUI220772A0...

Страница 170: ...stallation PR12 1 Removal PR10 1 D DC power troubleshooting PR17 1 Description 1 1 Dimension drawings A 1 Dipswitches 3 2 E Ethernet wiring PR14 1 F Factory cabling B 1 Fan replacement PR24 1 Function...

Страница 171: ...rd interface devices Installation PR13 1 Removal PR32 1 L Lower monitor Installation PR41 1 Removal PR36 1 M Maintenance 5 1 Checking connections PR18 1 Keyboard cleaning PR21 1 Monitor cleaning PR19...

Страница 172: ...6 1 PR27 1 Sequence 6 1 Touchscreen PR37 1 PR38 1 Touchscreen controller card PR39 1 Trackball PR32 1 Upper monitor PR35 1 PR40 1 Repair and replacement 6 1 S Safety considerations 3 3 Software instal...

Страница 173: ...WBPEEUI220772A0...

Страница 174: ...r process automation For the location nearest you please contact the appropriate regional office AMERICAS 29801 Euclid Avenue Wickliffe Ohio USA 44092 Telephone 1 216 585 8500 Telefax 1 216 585 8756 A...

Отзывы: