– 30 –
4 7
Resetting FAVORITE CHANNEL
choices
You have the option of returning to the
FAVORITE CHANNEL screen to adjust any
of your favorite channel choices.
Simply proceed as described in “Setting
FAVORITE CHANNEL manually” (skip step
2 if MANUAL is already selected).
When you reach step 3, select the position
you want to change and press
. Press
RESET to clear the channel for that position.
Move the joystick up or down to select a new
channel.
Press MENU when you are done.
Note:
• The FAVORITE CHANNEL feature is not
available for the AUX input.
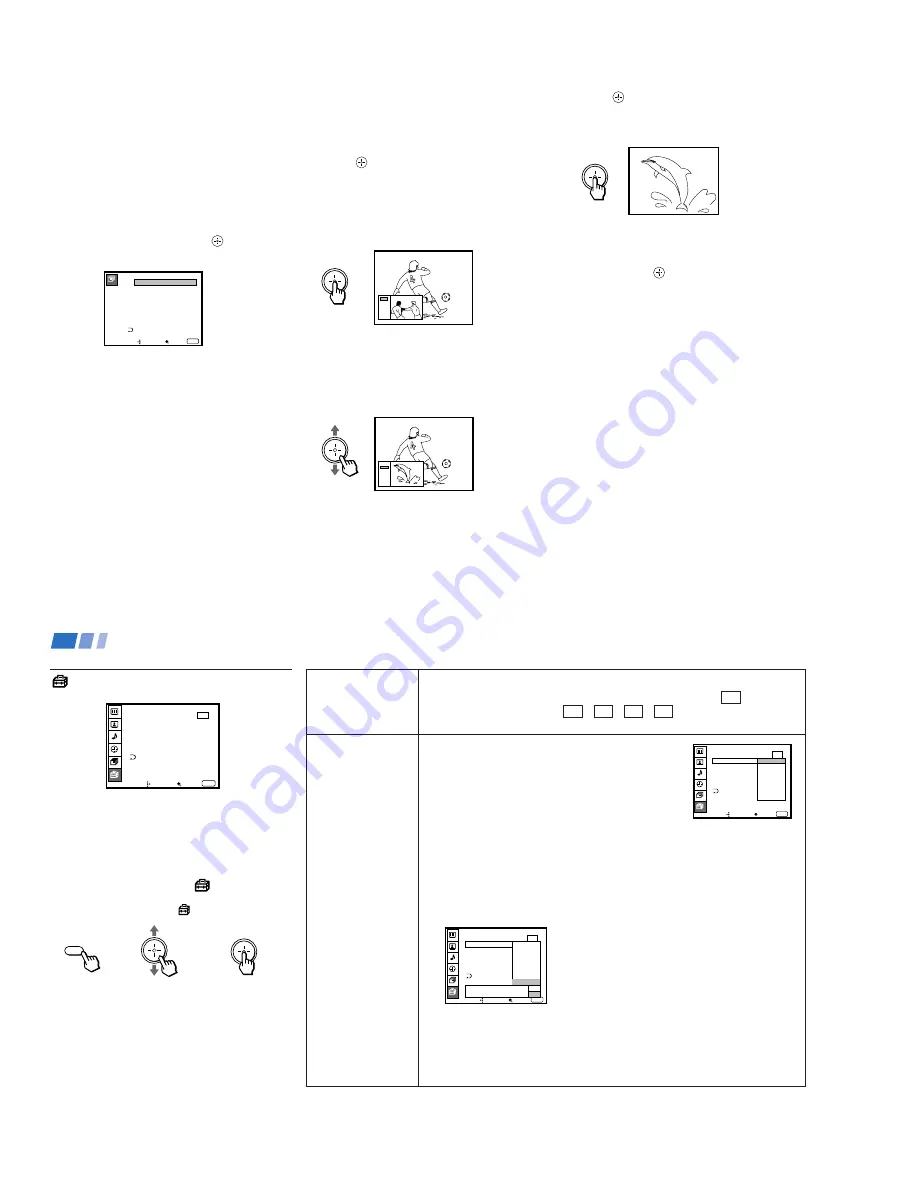
Using FAVORITE CHANNEL
You can use the FAVORITE CHANNEL
feature to display a favorite channel menu
with a window picture for direct selection.
1
Press
once.
The favorite channel menu and a window
picture will be superimposed over the
current channel. The window picture
displays the channel selected from the
menu.
2
Move the joystick up or down to select a
channel that you wish to view from the
menu.
The picture of the selected channel will be
displayed in the window picture.
3
Press
to select the channel.
The selected channel will be displayed for
normal viewing.
To cancel the favorite channel menu before
selecting a channel, move the joystick up or
down to select EXIT at the bottom of the
menu and press
.
FAVORITE CHANNEL
Select a channel
2 .
3 .
4 .
5 .
6 .
7 .
8 .
Move
Select
Exit
MENU
1 .
2
10
22
30
40
52
125
SPTN
_ _ _
FAVORITES
12 CNN
36 ESPN
50
60
70
80
90
120 MTV
EXIT
FAVORITES
12 CNN
36 ESPN
50
60
70
80
90
120 MTV
EXIT
4 8
Using the SET UP Menu
For detailed information on using the remote
control to modify menu settings, refer to
“Learning Menu Selection” on page 34.
To select the SET UP
menu:
Display
/
Highlight
/
Select
Notes:
• When you set SELECT OUT to TV OUT,
you cannot swap the main/right and
window/left pictures.
• The SELECT OUT signal is only available
when the projection TV is on.
CAPTION VISION
Television closed
caption display
SELECT OUT
Output signal
selection from
SELECT OUT
Some programs are broadcast with Caption Vision.
To display Caption Vision, select the desired option and press CC .
CAPTION VISION options: CC 1, CC 2, CC 3, CC 4, TEXT1, TEXT2, TEXT3
or TEXT4. (for details, see “CAPTION VISION” on page 26)
You can select the desired output signal from the
SELECT OUT jacks at the rear of the projection TV.
MONITOR: Select to edit tapes while monitoring.
SELECT OUT outputs the picture displayed on
the projection TV screen.
VIDEO1–VIDEO5: Select to edit tapes while viewing
an input image different from that being recorded.
SELECT OUT outputs the signal input to the projection TV regardless of
the displayed picture on the screen.
TV OUT: Select if you connect an AV receiver to VIDEO 1 IN. SELECT OUT
outputs the signal that the TV is tuned to, regardless of the displayed
picture. (see “Connecting an AV receiver” on page 16 for connection)
If you select TV OUT, a pop-up menu appears.
Select YES only if you connect an AV receiver, with no other equipment, to
your projection TV. You can always select the signal from the receiver by
pressing TV/VIDEO once.
Select NO if you connect multiple components to your projection TV. You
can select an inupt (VIDEO1 – VIDEO5) with the TV/VIDEO button.
MENU
SET UP
CAPTION VISION : CC 1
SELECT OUT : MONITOR
LANGUAGE : ENGLISH
VIDEO LABEL
DIRECT PLAY
FREEZE MODE : NORMAL
Move
Select
Exit
MENU
SET UP
CAPTION VISION : CC 1
LANGUAGE : ENGLISH
VIDEO LABEL
DIRECT PLAY
FREEZE MODE : NORMAL
Move
Select
Exit
MENU
Set up using YES
SELECT OUT : MONITOR
VIDEO1
VIDEO2
VIDEO3
VIDEO4
VIDEO5
TV OUT
only VIDEO1 input? NO
SET UP
CAPTION VISION : CC 1
LANGUAGE : ENGLISH
VIDEO LABEL
DIRECT PLAY
FREEZE MODE : NORMAL
Move
Select
Exit
MENU
VIDEO1
VIDEO2
VIDEO3
VIDEO4
VIDEO5
TV OUT
SELECT OUT : MONITOR
Adjusting Your SET UP (menus) (continued)
Содержание KP-53XBR200 - 53" Projection Tv
Страница 62: ... 62 KP 53XBR200 61XBR200 RM Y902 RM Y902 MEMO ...
Страница 63: ... 64 65 63 SECTION 6 DIAGRAMS 6 1 BLOCK DIAGRAM 1 ...
Страница 64: ... 68 67 66 BLOCK DIAGRAM 2 ...
Страница 65: ... 69 70 71 72 BLOCK DIAGRAM 3 ...
Страница 66: ... 76 75 74 73 BLOCK DIAGRAM 4 ...
Страница 67: ... 78 79 77 BLOCK DIAGRAM 5 ...
Страница 68: ... 82 81 80 BLOCK DIAGRAM 6 ...
Страница 69: ... 84 85 83 BLOCK DIAGRAM 7 ...
Страница 70: ... 88 87 86 BLOCK DIAGRAM 8 ...


