– 18 –
2 4
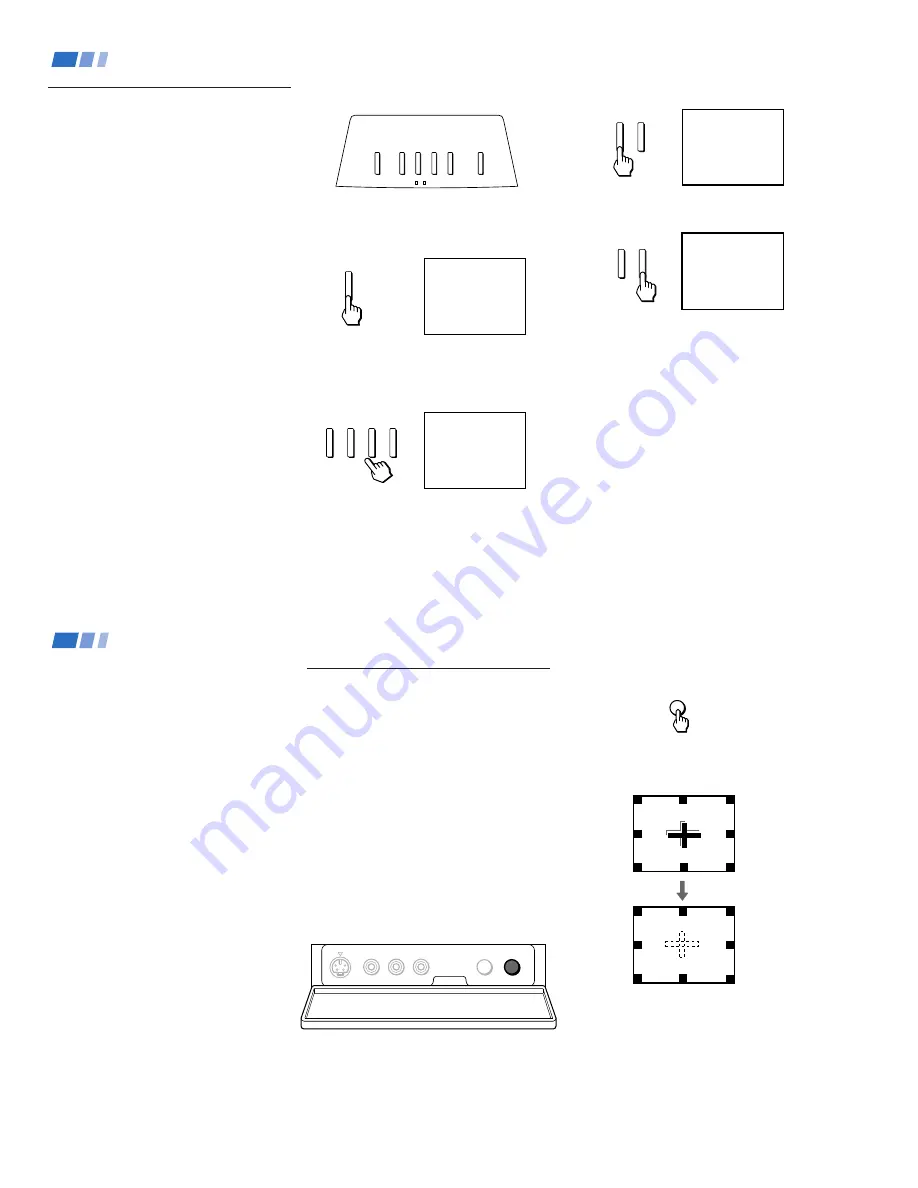
To perform AUTO SET UP again
• Press SET UP inside the drop-down panel
on the projection TV.
• Press C, CHANNEL – or
to select a language.
• Press VOLUME – to restore factory
settings (“CONTINUE TO AUTO
PROGRAM?” will appear on the screen.
Press to execute or
CHANNEL– to exit).
• Press SET UP to exit.
Using Your New Projection TV (continued)
Adjusting the Convergence
Automatically (AUTO FOCUS)
The projection tube image appears on the
screen in three layers (red, green and blue). If
they do not converge, the color is poor and
the picture blurs.
Before you use your projection TV, be sure to
adjust the convergence. The AUTO FOCUS
feature allows you to adjust the convergence
automatically.
Using the AUTO FOCUS button inside the
drop-down panel on the projection TV:
Tip
z
•
It is recommended to perform AUTO FOCUS about
30 minutes after the projection TV is turned on.
Press AUTO FOCUS.
The cross pattern appears and auto
convergence works. It is completed when the
cross pattern becomes white.
Note:
• You will not be able to perform any other
functions until AUTO FOCUS has
completed its cycle.
AUTO FOCUS
VIDEO 2 INPUT
S VIDEO
VIDEO
SET UP
AUTO FOCUS
L(MONO)-AUDIO-R
2 3
Using Your New Projection TV
Setting Up the Projection TV
Automatically
The AUTO SET UP feature will allow you to
set the on-screen language and set all
receivable channels. The AUTO SET UP
screen will appear every time you turn on the
projection TV until you perform AUTO
PROGRAM.
The AUTO SET UP feature does not apply for
installations that use a cable box for all channel
selection.
You can also set up the projection TV manually.
(see “Using the CHANNEL SET UP menu” on
page 43)
Notes:
• Before you perform AUTO SET UP again,
make sure that the input from ANT (not
AUX) is selected by pressing ANT until
“AUX” does not appear next to the
channel number.
• Perform this function during the day, with
the antenna and/or cable properly
connected, to ensure that all available
channels will be broadcasting and
receivable.
• When you perform AUTO PROGRAM,
your CHANNEL FIX, ON/OFF TIMER,
and CHANNEL BLOCK settings will be
erased.
• When you perform AUTO PROGRAM, all
the settings in the VIDEO, ADVANCED
VIDEO and AUDIO menus are reset to the
factory settings.
(continued)
Using the buttons on the front panel of the
projection TV:
1
Press POWER to turn on the projection
TV. Then press SET UP button inside the
drop-down panel on the projection TV.
The AUTO SET UP screen appears.
2
Press C to select English,
CHANNEL – to select Spanish or
to select French.
The screen will change to reflect your
choice.
For a DEMO of functions and menus, press
TV/VIDEO.
3
Press VOLUME – to continue.
4
Press C to preset channels
automatically.
“AUTO PROGRAM” appears and the
projection TV starts scanning and
presetting channels automatically. While
scanning, the received channel will be
displayed on the sub screen. When all the
receivable channels are stored, the lowest
numbered channel is displayed. If the
projection TV receives cable TV channels,
CABLE is set to ON automatically.
POWER
+
VOLUME
–
+
CHANNEL
–
+
CHANNEL
–
+
VOLUME
–
TV/VIDEO
+
VOLUME
–
+
CHANNEL
–
POWER
TIMER/STAND BY
STEREO
Press [ SET UP ] to exit.
First please connect
the antenna.
DEMO :
AUTO SET UP :
ESPAÑOL :
ENGLISH :
FRANÇAIS :
[ TV / VIDEO ]
[ VOL – ]
[ CH – ]
[ CH + ]
[ VOL + ]
Oprima [ SET UP ] para
salir.
Primero conecte la
antena.
DEMO :
AUTO SET UP :
ESPAÑOL :
ENGLISH :
FRANÇAIS :
[ TV / VIDEO ]
[ VOL – ]
[ CH – ]
[ CH + ]
[ VOL + ]
AUTO PROGRAM
NO :
AUTO PROGRAM ?
CONTINUE TO
YES :
[ CH – ]
[ CH + ]
Содержание KP-53XBR200 - 53" Projection Tv
Страница 62: ... 62 KP 53XBR200 61XBR200 RM Y902 RM Y902 MEMO ...
Страница 63: ... 64 65 63 SECTION 6 DIAGRAMS 6 1 BLOCK DIAGRAM 1 ...
Страница 64: ... 68 67 66 BLOCK DIAGRAM 2 ...
Страница 65: ... 69 70 71 72 BLOCK DIAGRAM 3 ...
Страница 66: ... 76 75 74 73 BLOCK DIAGRAM 4 ...
Страница 67: ... 78 79 77 BLOCK DIAGRAM 5 ...
Страница 68: ... 82 81 80 BLOCK DIAGRAM 6 ...
Страница 69: ... 84 85 83 BLOCK DIAGRAM 7 ...
Страница 70: ... 88 87 86 BLOCK DIAGRAM 8 ...


