31
Handling Discs
Cha
p
te
r 2
P
repa
rat
ion
Cleaning
• Clean the disc with a soft cloth, wiping it from the center
out. If the dust is heavy, wipe it with a soft cloth
moistened with water, then wipe off the water with a dry
cloth.
• Do not use solvents such as benzene, thinner,
commercially available record cleaners, or anti-static
spray. Using these products may damage discs.
Inserting and Removing Discs
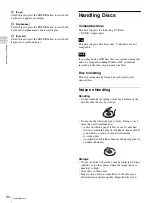
To insert a disc
1
Press the
1
(on/standby) switch to exit standby mode.
“WELCOME” appears on the front panel display.
When the “READY” message appears, proceed to the
following steps.
2
Press the
Z
EJECT button.
The disc tray opens.
3
Insert the disc.
4
Gently push in the disc tray.
The disc tray closes.
When an incompatible disc is inserted
The DVD indicator lights orange, and a message notifying
you of the incompatible media appears on the menu screen.
Remove the disc, and insert a compatible disc.
To remove a disc
1
Press the
Z
EJECT button while the unit is turned on.
The disc tray opens.
2
Remove the disc.
3
Gently push in the disc tray to close it.
The disc tray cannot be opened while recording is in
progress or paused when simultaneously saving to a
DVD.
1
(on/standby) switch
Z
EJECT button
Tip
Data side facing down


