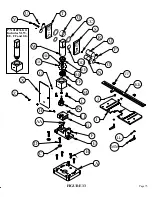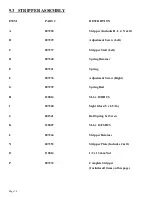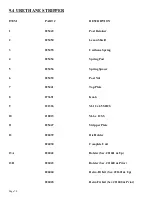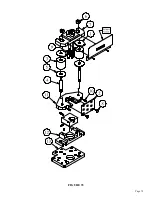
Page 69
TO TEST THE FOOT SWITCH, place the selector switch in the START position and power the
machine. Place the selector switch in the PUNCH or the SHEAR position and test the voltage between
terminal #’s 4, 5, 10 & ground. Test between terminal # 4 & ground to determine that there is voltage
present at the foot switch. The reading should be 110-220 volts. With the pedal up, the voltage should
read 110-120V between # 5 & ground. There should be no voltage reading between # 10 & ground. With
the pedal depressed, the voltage should read 110-120V between # 10 & ground. There should be no
voltage reading between # 5 & ground. If these readings are not correct, continue on with the following
steps:
A.
Turn the machine’s power off at the disconnect switch. Remove the cover on the foot switch and
check for any loose connections.
B.
Make sure that the switches are adjusted properly. You should hear two distinct "clicks"
approximately 1/2 inch (12mm) apart when depressing the pedal. There is a set screw adjustment
on the pedal shaft to adjust the switches.
C.
Check the switches with an Ohm meter.
9.
Damage to the foot pedal cord: Check the continuity of the wire in the cord with an Ohm meter.
Make sure that the power to the machine is off and locked out. The wires must be disconnected
from the pedal and the terminal blocks.
8.2 LIMIT SWITCH INSPECTION PROCEDURE
The limit switches are sealed units and cannot be taken apart. The plunger can be manually checked. It
should move freely in and out. The switches can also be tested with an Ohm meter. The wires must be
disconnected from the terminal blocks and the power to the machine must be turned off. With the
plunger out, the switch should read continuity; with the plunger depressed, it should read open.
8.3 CONTROL VALVE INSPECTION
THE MACHINE WILL TRAVEL IN ONLY ONE DIRECTION.
THIS COULD BE CAUSED BY:
A.
Contamination in the hydraulic oil which causes the spool to stick in one position: With the
machine’s power off, the spool of the valve can be manually shifted. On each end of the control
valve, there is a pin in the center of the knurled nut that holds the coil on. To shift the spool
manually, use a small punch or similar device to push these pins in by hand, first one and then,
the other. Turn the machine on and try it again. If the machine now operates, the hydraulic oil
and the filter should be changed.
B.
A defective coil on the control valve: The coils can be checked by using an Ohm meter. The wires
to the coils must be disconnected. If the ohm reading shows open, the coil is defective and must be
replaced.
Содержание 9012-24M
Страница 10: ...Page 9 FIGURE 1 ...
Страница 12: ...Page 11 FIGURE 2 ...
Страница 16: ...Page 15 FIGURE 4A ...
Страница 17: ...Page 16 FIGURE 4B ...
Страница 18: ...Page 17 FIGURE 4C ...
Страница 22: ...Page 21 FIGURE 6 ...
Страница 24: ...Page 23 FIGURE 7 ...
Страница 35: ...Page 34 THIS PAGE LEFT BLANK INTENTIONALLY ...
Страница 40: ...Page 39 FIGURE 15 ...
Страница 42: ...Page 41 FIGURE 16 ...
Страница 48: ...Page 47 FIGURE 20 ...
Страница 54: ...Page 53 FIGURE 24 ...
Страница 56: ...Page 55 FIGURE 25 ...
Страница 62: ...Page 61 FIGURE 27 ...
Страница 66: ...Page 65 FIGURE 29 ...
Страница 68: ...Page 67 FIGURE 30 ...
Страница 74: ...Page 73 FIGURE 32 ...
Страница 78: ...Page 77 FIGURE 34 ...
Страница 80: ...Page 79 FIGURE 35 ...
Страница 82: ...Page 81 FIGURE 36 ...
Страница 84: ...Page 83 FIGURE 37 ...
Страница 86: ...Page 85 FIGURE 38 ...
Страница 90: ...Page 89 FIGURE 41 ...
Страница 92: ...Page 91 FIGURE 42 ...
Страница 93: ...Page 92 FIGURE 43 ...
Страница 96: ...Page 95 THIS PAGE LEFT BLANK INTENTIONALLY ...
Страница 98: ...Page 97 FIGURE 46 ...
Страница 100: ...Page 99 FIGURE 47 ...

