


Page 64
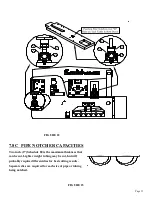
The Weld Coupon Bender Tool is designed to bend welded test coupons into "U" and "V" shapes for the
purpose of testing soundness and ductility of welds. The maximum size of a test clip is 7" long x 2" wide
x 3/8" (178 x 51 x 10mm) thick. Rollers are 4" apart (102mm).
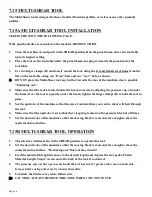
7.14 WELD COUPON BENDER TOOL
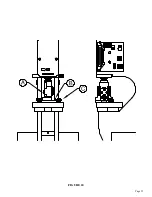
SEE FIGURE 29 ON THE FOLLOWING PAGE.
1.
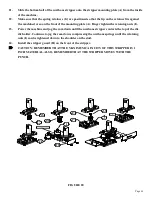
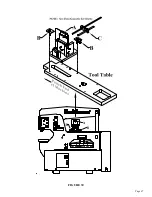
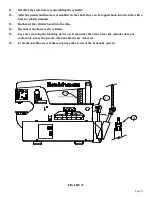
The Weld Coupon Bender Tool mounts on the tool table under the upper arm and is held in place
with two finger clamps (A). Use the 3rd set of holes from the left (punch end) on the tool table and
mount it as shown in the drawing.
2.
Make sure that the rocker cap (B) is squarely under the arm and that the stationary back of the
coupon bender is clear of the moving arm of the ironworker.
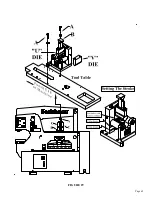
3.
On the left side of the tool, under the roller, there are two lines machined in the tools back support.
The upper line is for when the "V" die is used and the lower line is for when the "U" die is used.
Stroke is to be set by aligning the bottom of the ram with the appropriate line machined in the back
support. Please see the drawing under "Setting the Stroke".
7.14A WELD COUPON BENDER TOOL INSTALLATION
►
NOTE: THE DOWN STROKE MUST BE SET PROPERLY WITH THIS TOOL.
1.
Grease the rocker cap (B) between the upper arm and the tool and again after every two hours of
use. Grease the ram, using the two grease zerks on the side.
2.
Lightly grease the rollers, using the two grease zerks on the front of the weld tester. Make sure that
the rollers still turn easily; too much grease can cause the tool to not work properly.
3.
Lightly lubricate the underside of the die and the outside of the two rollers with a spray lube such
as WD-40 and again, every 10-15 bends, thereafter.
4.
Insert the weld test coupon by sliding it on to the rollers. Using the back of the weld tester, square up
the test piece and then, move it forward enough to center it under the die. Make sure that the weld
test coupon is square and centered under the die.
5.
Make sure that the down stroke of the tool is set so that the bottom of the ram - NOT the die - is
aligned with the correct scribe line.
6.
After bending the weld test coupon, let the tool return to the resting position. Remove the test
coupon and inspect the weld. The tool can be seen in use at www.scotchman.com.
7.14B WELD COUPON BENDER TOOL OPERATION
CAUTION: REMOVE THE WELD COUPON BENDER WHEN IT IS NOT IN USE.
Содержание 9012-24M
Страница 10: ...Page 9 FIGURE 1 ...
Страница 12: ...Page 11 FIGURE 2 ...
Страница 16: ...Page 15 FIGURE 4A ...
Страница 17: ...Page 16 FIGURE 4B ...
Страница 18: ...Page 17 FIGURE 4C ...
Страница 22: ...Page 21 FIGURE 6 ...
Страница 24: ...Page 23 FIGURE 7 ...
Страница 35: ...Page 34 THIS PAGE LEFT BLANK INTENTIONALLY ...
Страница 40: ...Page 39 FIGURE 15 ...
Страница 42: ...Page 41 FIGURE 16 ...
Страница 48: ...Page 47 FIGURE 20 ...
Страница 54: ...Page 53 FIGURE 24 ...
Страница 56: ...Page 55 FIGURE 25 ...
Страница 62: ...Page 61 FIGURE 27 ...
Страница 66: ...Page 65 FIGURE 29 ...
Страница 68: ...Page 67 FIGURE 30 ...
Страница 74: ...Page 73 FIGURE 32 ...
Страница 78: ...Page 77 FIGURE 34 ...
Страница 80: ...Page 79 FIGURE 35 ...
Страница 82: ...Page 81 FIGURE 36 ...
Страница 84: ...Page 83 FIGURE 37 ...
Страница 86: ...Page 85 FIGURE 38 ...
Страница 90: ...Page 89 FIGURE 41 ...
Страница 92: ...Page 91 FIGURE 42 ...
Страница 93: ...Page 92 FIGURE 43 ...
Страница 96: ...Page 95 THIS PAGE LEFT BLANK INTENTIONALLY ...
Страница 98: ...Page 97 FIGURE 46 ...
Страница 100: ...Page 99 FIGURE 47 ...