


78
10.
When the leak test is complete, press the VDB button on the device screen to release the air
from the chamber.
11.
Reconnect the silicone tubing to the biological air filter.
12.
Unlock the door using the lock icon on the device screen.
Method 2: Using the test port
For this test, you will need a test port fitting with Teflon tubing to connect your compressed air
regulator to the test port.
1.
Remove all the panels.
2.
Close and latch the door.
3.
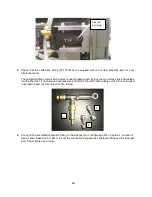
Remove the test port plug from the side port of the unit and connect the adapter fitting with
push-in fitting to that port. Tighten the test port adapter fitting using a ¾” open wrench.
4.
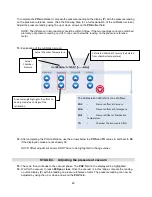
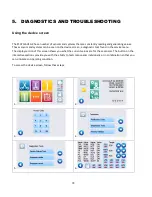
From the home screen, go to the technician menu and select the device screen. Select the lock
icon to lock the door.
5.
From the device screen, select “VDB” to close this normally open valve.
6.
Connect your compressed air tubing to the push in fitting on the test port and pressurize the
chamber to 270 kPa. You can find the chamber pressure reading on the device screen next to
“PC”.
7.
Apply snoop to all the fittings on the chamber and on the valves to find the leak.
8.
When you have found the leak, you may simply need to tighten a connection. If you need to
remove a valve or component, you will need to depressurize the chamber. From the device
screen, select “VDB” to exhaust the air from the chamber.
9.
Once the leak is fixed, repeat the procedure described above to pressurize the system and apply
snoop to the repair to check for leaks.
10.
When the leak is fixed, from the device screen, select “VDB” to exhaust the air from the
chamber.
11.
Plug the test port, using a new Teflon washer on the test port plug.
12.
Run a vacuum leak test.
Method 3: Using a solenoid valve
For this test, you will need a compressed air regulator with a bleed valve and pressure gauge and a short
length of braided hose. You can perform this test from a point on the unit’s right side or left side. To
work from the left side, detach the braided hose from the T-connection below the VEV valve. To work
from the right side, detach the braided hose from the VDB valve. The following instructions are for
working from the right side:
1.
Remove all the panels.
2.
Close and latch the door.
3.
From the right side, remove the braided hose from the VDB valve.
4.
Attach your short length of braided hose to the VDB valve and use a spring clamp to fasten it.
Содержание STATCLAVE G4
Страница 5: ...5 Diagram of key systems and components...
Страница 6: ...6...
Страница 17: ...17 Checking package contents...
Страница 18: ...18 Positioning a unit Unit dimensions and operating environment...
Страница 20: ...20 Direct to drain connection recommended...
Страница 21: ...21 Connecting to a waste bottle...
Страница 22: ...22 Connecting to the Internet Connecting to a wired network Connecting to a wireless network...
Страница 23: ...23...
Страница 25: ...25 Connecting an auxiliary pump...
Страница 28: ...28...
Страница 30: ...30 Starting and stopping a cycle...
Страница 50: ...50 Registering for online access...
Страница 51: ...51 First start up...
Страница 52: ...52...
Страница 58: ...58 Draining the unit for cleaning and shipping...
Страница 61: ...61 Replacing the bacteriological filter Replacing the door seal...
Страница 75: ...75...
Страница 107: ...107 APPENDIX A STATCLAVE G4 plumbing diagram...
Страница 108: ...108 APPENDIX B STATCLAVE G4 electrical schematic...