


69
To complete the
POA
calibration, compare the pressure reading on the display (
P
) with the pressure reading
on the pressure reference meter. (See the following Step for a full explanation of the calibration screen.)
Adjust the pressure reading using the up or down arrows on the
POA
offset field.
NOTE: The difference in two readings should be within 0.5Kpa. If the two readings cannot be matched
precisely, set pressure reading on unit to one count below the reading on the pressure reference
meter.
13.
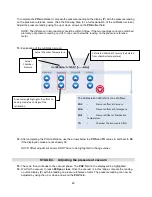
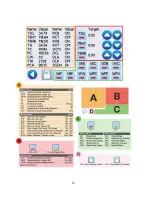
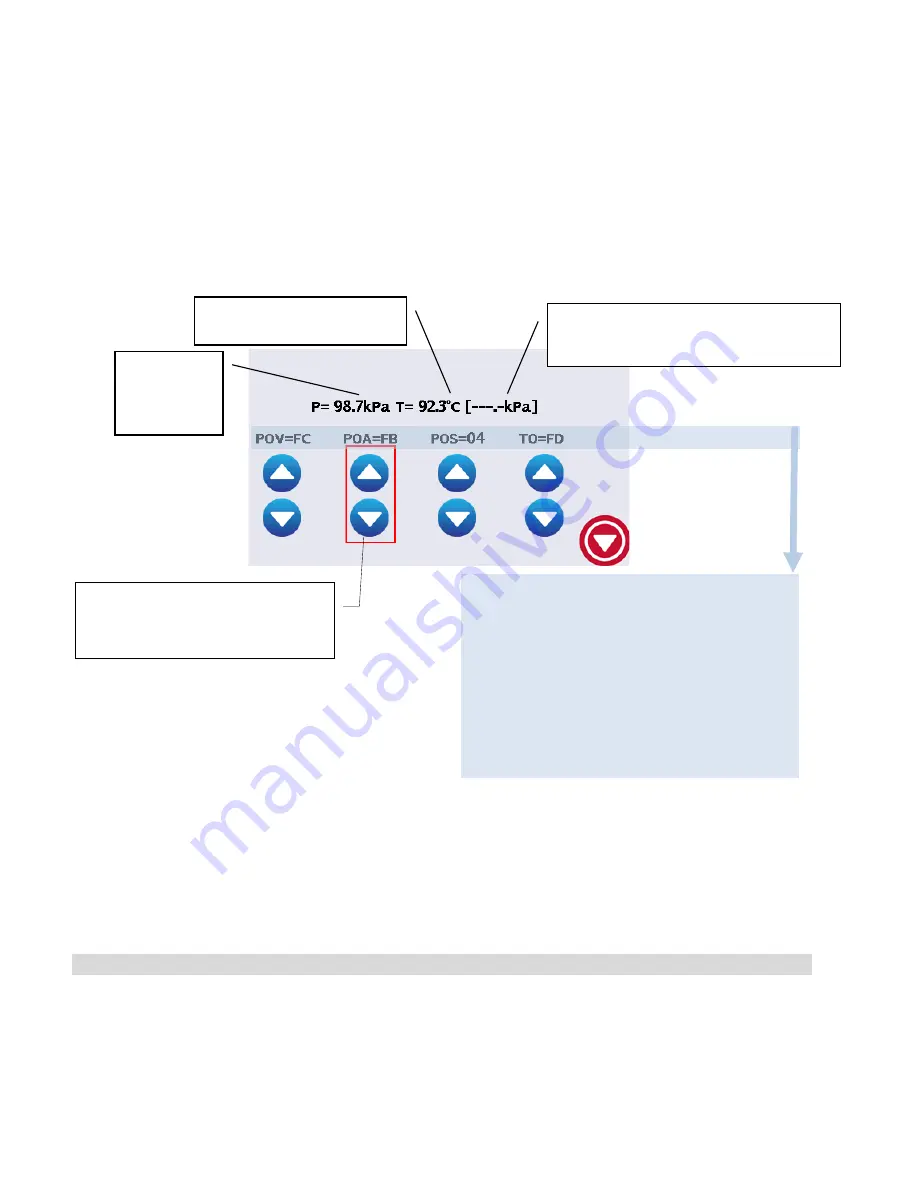
Explanation of the calibration screen:
14.
After completing the POA calibration, use the arrows below the
POS
and
TO
values to set them to
00
,
if the displayed values are not already 00.
NOTE: Offset adjustment arrows DON’T have to be highlighted to change values.
STAGE 4. Adjusting the pressure at vacuum
15.
The cycle then continues to the vacuum phase. The
POV
field on the display will be highlighted.
16.
Wait for the vacuum to reach
60 Kpa or less
. Once the vacuum is in this range, compare the reading
on unit’s display (
P
)
with the reading on pressure reference meter. The pressure reading can now be
adjusted by using the up or down arrows on the
POV
field
.
A red rectangle highlights the offset to
be adjusted at each stage of the
calibration.
Actual
Chamber
Pressure
Actual Chamber Temperature
Calculated Chamber Pressure (Calculated
from chamber temperature)
The abbreviation definitions are as follows:
POV
-
Pressure offset at Vacuum
POA
-
Pressure offset at Atmosphere
POS
-
Pressure Offset at Sterilization
Temperature
TO
-
Chamber Thermocouple Offset
Содержание STATCLAVE G4
Страница 5: ...5 Diagram of key systems and components...
Страница 6: ...6...
Страница 17: ...17 Checking package contents...
Страница 18: ...18 Positioning a unit Unit dimensions and operating environment...
Страница 20: ...20 Direct to drain connection recommended...
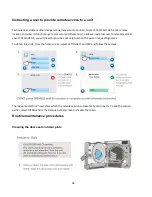
Страница 21: ...21 Connecting to a waste bottle...
Страница 22: ...22 Connecting to the Internet Connecting to a wired network Connecting to a wireless network...
Страница 23: ...23...
Страница 25: ...25 Connecting an auxiliary pump...
Страница 28: ...28...
Страница 30: ...30 Starting and stopping a cycle...
Страница 50: ...50 Registering for online access...
Страница 51: ...51 First start up...
Страница 52: ...52...
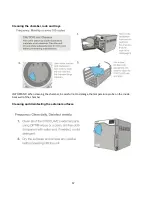
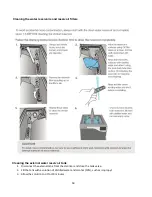
Страница 58: ...58 Draining the unit for cleaning and shipping...
Страница 61: ...61 Replacing the bacteriological filter Replacing the door seal...
Страница 75: ...75...
Страница 107: ...107 APPENDIX A STATCLAVE G4 plumbing diagram...
Страница 108: ...108 APPENDIX B STATCLAVE G4 electrical schematic...