


66
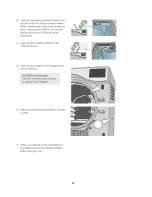
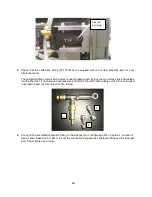
3.
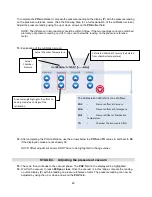
Check that the calibration fitting (01-115514S) is equipped with the correct pressure port for your
reference meter.
The calibration fitting comes with a quick connect pressure port (A) but you can remove this and replace
it with either the 1/4-inch knurled nut pressure port (B) for 1/4-inch Teflon tubing or the 3/8-inch knurled
nut pressure port (C) for 3/8-inch Teflon tubing.
4.
Connect the assembled calibration fitting to the side test port, configured either in option 1 or option 2.
Use a Teflon washer (61-114611) to seal the connection between the calibration fitting and the side test
port. Finger tighten and ¼ turn.
Side test
port plug
A
B
C
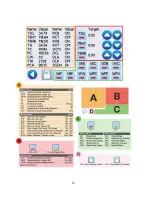
Содержание STATCLAVE G4
Страница 5: ...5 Diagram of key systems and components...
Страница 6: ...6...
Страница 17: ...17 Checking package contents...
Страница 18: ...18 Positioning a unit Unit dimensions and operating environment...
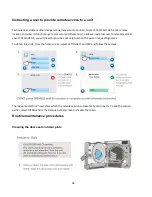
Страница 20: ...20 Direct to drain connection recommended...
Страница 21: ...21 Connecting to a waste bottle...
Страница 22: ...22 Connecting to the Internet Connecting to a wired network Connecting to a wireless network...
Страница 23: ...23...
Страница 25: ...25 Connecting an auxiliary pump...
Страница 28: ...28...
Страница 30: ...30 Starting and stopping a cycle...
Страница 50: ...50 Registering for online access...
Страница 51: ...51 First start up...
Страница 52: ...52...
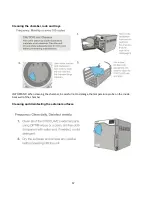
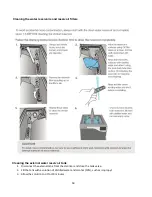
Страница 58: ...58 Draining the unit for cleaning and shipping...
Страница 61: ...61 Replacing the bacteriological filter Replacing the door seal...
Страница 75: ...75...
Страница 107: ...107 APPENDIX A STATCLAVE G4 plumbing diagram...
Страница 108: ...108 APPENDIX B STATCLAVE G4 electrical schematic...