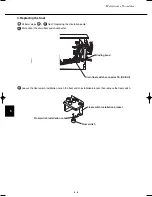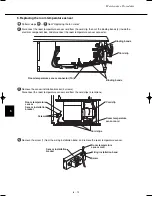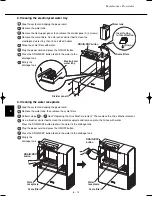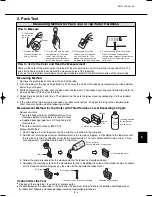
The DRAIN lamp (red) lights in the display once
or twice each week.
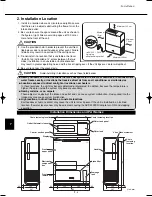
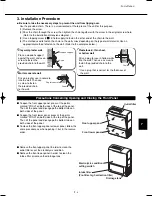
Press the ON/OFF button to stop the system,
and open the bottom part of the front panel.
Remove the drainage tank, and
drain the water into a bathroom
sink or other similar drainage outlet.
After draining the water from the drainage tank,
rinse out the tank with fresh tap water.
Set the drainage tank in the original state.
After the tank has been set, the DRAIN
lamp automatically turns OFF.
Engage the tabs at the bottom part of the
front panel, press at the points marked “PUSH”
at the top left and right of the front panel, and
set the panel in the original state.
Press the ON/OFF button to
start operation.
NOTE:
When the DRAIN lamp and ADD
WATER lamp light at the same time,
bring the water tank and drainage tank
together to a bathroom sink or other
similar drainage outlet, and perform
the draining and water addition maintenance
at the same time. Doing so can save time.
Salt must be added in regions where the electrolysis condition is 7.
The salt that is added must be composed 99% or more of NaCl.
When the DRAIN lamp lights, add salt (1 g) to the water tank.
In general, this is necessary once or twice each week.
G
Adding salt
1. Ready the empty water tank.
2. Remove the water tank cap, and
use the provided measuring spoon
to add one level spoonful of salt into the tank.
3. After adding the salt, fill the water tank with water.
4. Tighten the cap, and gently shake the tank 2 – 3
times to dissolve the salt.
5. Gently set the water tank in place inside the unit.
6
5
4
3
2
1
The FILTER lamp (red) lights in the display every 1 or 2 months.
Follow the procedures below to clean the 3 filters.
(1) Outlet filter
Open the top part of the front panel,
remove the outlet filter.
Clean the outlet filter using a
vacuum cleaner, or wash it
with water and dry.
Install the outlet filter,
with the “UPPER” side
on the tab of the outlet
filter facing up.
(2) Inlet filter
(pre-filter and high collection filter)
Remove the bottom part of the front panel.
Turn the tabs on the left and right of the
pre-filter to remove the 2 inlet filters.
Clean the inlet filter using a vacuum
cleaner, or wash it with water and dry.
Set the inlet filter in the unit, turn the
tabs on the left and right to lock in the
inlet filter.
NOTE:
Install the high collection filter,
facing the side marked “FAN SIDE”
toward the system
(fan) side.
(3) Scale filters
Prepare a towel or cloth before removing
the wet scale filters.
Remove the water tank, then remove
the scale filters on the bottom face.
* The scale filters are connected by
resin.
Wash the scale filters with water to
wash off any scale.
Return the scale filters to their original
location, while taking care about the
installation direction.
NOTE:
If dirt becomes noticeable, replace the scale filters with new ones.
The general guide for replacement is 1 year.
When the maintenance above is completed, press and hold the
FILTER RESET button for 3 seconds to turn off the FILTER lamp.
Use the optional Water Filter (model:
VW-WF100BG
) to reduce the
hardness of the water in the water tank when operating the system.
G
Replacing Water Filter pack(s)
1. When the FILTER lamp lights, it is time to
replace the old Water Filter pack(s).
2. Empty any remaining water, and remove the
previously used pack(s) from the water tank.
3. Put the specified number of fresh Water Filter
pack(s) into the water tank.
4. Refill the water tank with normal tap water.
5. Replace the cap and return the water tank to
its original position.
3
2
1
4
3
2
1
3
2
1
8
- 2
8
Miscellaneous
Fill with water
to thi
s
poi
n
t.
F
u
lly ti
g
hte
n
the cap.
Water ta
n
k
When there is no water in the water tank, the system stops
automatically, and the ADD WATER lamp (red) lights in the
display.
Fill the water tank with tap
water, then set the water tank
in the original state.
When the ON/OFF button
is pressed after the water
tank is filled, the ADD
WATER lamp turns OFF.
Press the ON/OFF button
again to start operation.
NOTE: (1) Even if some amount of water remains in the tank, be sure
to replace the water with fresh tap water every day.
(2) Be sure to use normal tap water. Never use alkali ion water
or any other type of water.
3
2
1
Fro
n
t
u
pper pa
n
el
O
u
tlet filter
Applicable model: VW-VF10BG
Fro
n
t
lower pa
n
el
Drai
n
a
g
e ta
n
k
Pre
ss
here at the
s
ame time,
the
n
p
u
ll the pa
n
el toward yo
u
.
2. When the DRAIN lamp lights (Once or twice each week)
1. When the ADD WATER lamp lights
(Every day: Approx. 10 hours of operation at Med. fan speed)
Hook
Latch
Fro
n
t
lower pa
n
el
Drai
n
a
g
e
ta
n
k
3. When the FILTER lamp lights
(Every 1 or 2 months)
K
n
ob
Pre-filter
K
n
ob
Fro
n
t
lower pa
n
el
Pre-filter
Hi
g
h collectio
n
filter
I
ns
tall with the k
n
ob
s
faci
ng
toward yo
u
.
I
ns
ert filter
s
faci
ng
i
n
thi
s
directio
n
.
(Dow
n
)
Water ta
n
k
S
cale filter
s
Pay atte
n
tio
n
to the
directio
n
that the t
u
be
face
s
whe
n
i
ns
erti
ng
the filter
s
.
Water
ta
n
k
Provided
mea
su
ri
ng
s
poo
n
O
n
e level
s
poo
n
f
u
l of
s
alt (1
g
)
For condition “7”
Adding salt
In regions with high water hardness
Water Filter
Water
Filter
Water
tank
Ca
p
1. Maintenance of Virus Washer by Customer
07-032 VW-VF10BG_TD 2/15/07 11:25 AM Page 2

