


Note:
The error codes listed in following appear in the display corresponding to their status
classification set over the condensed state (Maintenance required/Maintenance demanded:
, Out of specification:
blinking, Failure alarm: ).
If 'No message' is assigned to the error code as the status classification, the error is not in-
cluded in the condensed state.
A status classification is assigned to every error code in the default setting. The status classifi-
cation of error codes can also be changed as required in an operator software, e.g.
TROVIS-VIEW 4.
EB 8384-6 EN
101
Code list
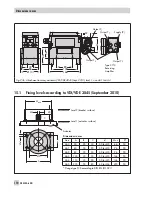
Содержание 3730-6
Страница 19: ...EB 8384 6 EN 19...
Страница 51: ...EB 8384 6 EN 51...
Страница 113: ...EB 8384 6 EN 113...
Страница 114: ...114 EB 8384 6 EN...
Страница 115: ...EB 8384 6 EN 115...
Страница 116: ...116 EB 8384 6 EN...
Страница 117: ...EB 8384 6 EN 117...
Страница 118: ...118 EB 8384 6 EN...
Страница 119: ...EB 8384 6 EN 119...
Страница 120: ...120 EB 8384 6 EN...
Страница 123: ...EB 8384 6 EN 123 diagnostic functions 11 Z Zero calibration 68 Index...


