background image

24 / 80

5

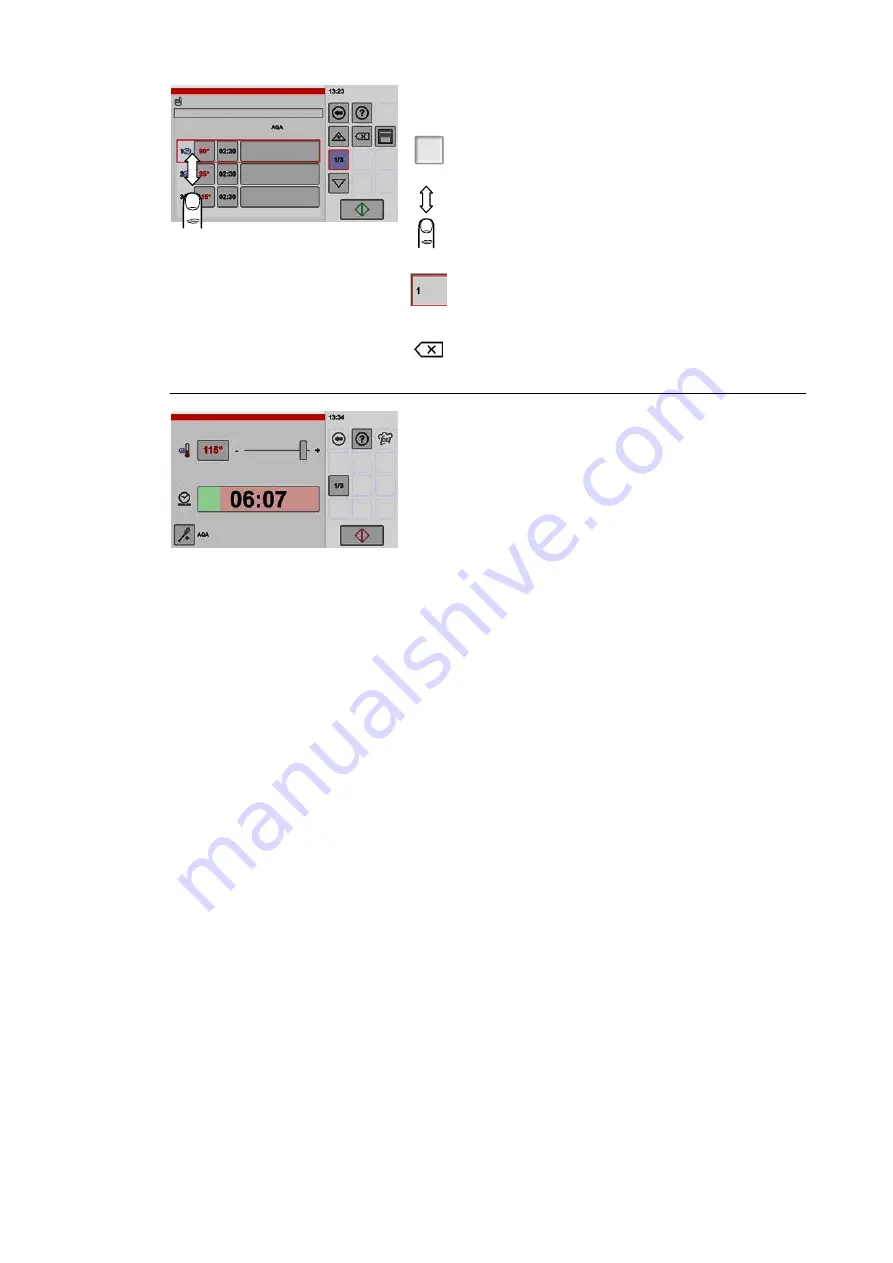
Deleting individual cooking steps in the overview
window

1/3

.

Tap the "Cooking steps overview" key

● The "Cooking steps overview" window is shown.

If more cooking steps have been created than can
be shown on the display screen:

.

Tap the screen and use your finger to scroll the
cooking steps displayed up or down.

.

Tap the number of the cooking step that you want
to delete.

● A border is shown around the cooking step.

.

Tap the "Delete" key.

● The cooking step is deleted.

6

Displaying cooking steps started

● After starting the cooking process, the sum of the

cooking times of all cooking steps set is dis­
played.

● The remaining time is displayed.
● The progress bar provides a graphical display of

the elapsed time.

● You can change settings during the cooking

process 

(see figure 3 in this section.)

● This combination of cooking steps can be started

again after the cooking process has completed.

Important information about additional functions after starting the cooking process

● AQA: the additional AQA function is activated permanently. The quantity/cooking time is ad­

justed automatically to match the quantity of the product to be cooked. After the quantity/cook­
ing time has been adjusted, the specified cooking time starts.

Содержание VitalityEVO-Easy

Страница 1: ...asy Pressure Steamer SALVIS VitalityEVO Pro Pressure Steamer Operating instructions en GB Translation of the original operating instructions Read the operating instructions before installing and commissioning the appliance ...

Страница 2: ... cooking process 15 4 5 2 Ending the cooking process 16 4 5 3 Removing the containers 16 4 6 Using the pull out shower head with automatic retraction optional 17 5 Finishing up Switch off the appliance 17 5 1 If there is a risk of frost or before long stoppage times 17 6 Using operating modes and cooking programs 18 6 1 Configuring the cooking process manual settings 18 6 2 Adding cooking steps co...

Страница 3: ...ing and care of the seal on the cooking chamber door 63 11 4 Cleaning the cooking chamber and the drip tray 63 11 5 Rinsing and cleaning the drain and valves 64 12 Regenerating the water softener 65 12 1 Regeneration prompts 65 12 2 Starting the regeneration process 65 13 Faults and troubleshooting 68 14 Technical data 71 15 Setup and connections 71 15 1 Transporting the appliance 72 15 2 Informat...

Страница 4: ...ts supplied with the appliance within easy reach and pass these on to a new owner of the appliance As the operating company ensure that personnel who work with on the appliance have access to the operating instructions 1 2 Symbols in front of the text You are requested to perform an action Bullet points or list Important information sequence of operations Note Notes that provide particularly usefu...

Страница 5: ...fications to this appliance 1 6 Misuse Do not use the appliance as a storage unit or work surface The appliance must not be used for heating drying and storing objects or for heating and melting process materials Do not place flammable objects or objects that are easily ignited into the cooking chamber The appliance must not be operated outdoors The following persons must not use the appliance Chi...

Страница 6: ...isk of injury During operation there is a risk of burns from the following Hot surfaces Hot Gastronorm containers Hot cooked products Hot removable racks Hot drip trays Hot steam escaping when the cooking chamber door is opened Risk of burn injuries Take care when opening the cooking chamber door hot air and steam may escape Always open the cooking chamber door slowly and carefully Wear waterproof...

Страница 7: ... the appliance safely in the event of fire or damage IMPORTANT Risk of damage Do not heat permanently sealed containers such as cans of food The sealed containers or cans could explode To avoid corrosion damage to the appliance do not place any salted food or liquids into the coo king chamber Also see the information about adding salt to dishes on page 13 section 4 3 The ambient temperature at the...

Страница 8: ...t use a pressurised cooking chamber The cooking chamber door cannot be opened until the chamber is no longer pressu rised Settings are made via the touch screen The control system is used to automate the cooking methods The pressure steamer is equipped with a water softener The water softener is filled at the factory with 0 5 kg of regeneration salt To regenerate the water softener see page 65 sec...

Страница 9: ...r can configure the Input and dis play area to suit operational circumstances For information about changing Input and dis play area views see page 45 section 9 fig 11 and 12 Control system operating features for Easy With operating modes Revitalisation Cooking method Manual For information about using operating modes see page 18 section 6 1 to section 6 4 Example display The operator can configur...

Страница 10: ...y to return to the previous menu If you tap and hold the back key the dis play switches to the Home symbol The start screen is shown when you release the key The help function provides you with additional context related help in the various menus If you tap the help key an explanatory help message is shown Use the exit key to close the help message Use of light grey dark grey Switch symbols are sh...

Страница 11: ...ner are filled with water automatically duration approx 2 min The steam generator heating up process then starts Total duration approx 8 min Please note The safety temperature limiter cuts off at temperatures below zero The safety tempera ture limiter switches on again automatically once it is warm enough again The appliance cannot be used until the limiter has switched on 4 1 Preparing the applia...

Страница 12: ...he cooking chamber door WARNING Crush hazard Do not re ach between the cooking chamber door and cooking chamber when closing the cooking chamber door Do not reach into the locking mechanism when locking the cooking chamber door Do not slam the cooking chamber door shut Close the cooking chamber door and lock it with the locking lever If steam escapes from the seal Remove and clean the seal Then ru...

Страница 13: ... on again For instructions on product selection changing settings see from page 18 section 6 4 3 Filling the cooking chamber Always use heat resistant Gastronorm containers Always season your dishes with salt after the cooking process has completed to avoid corrosion damage when using perforated plates in the cooking chamber This also means you will need less salt than you would if you season befo...

Страница 14: ...core temperature from one cooking phase to the next otherwise the cooking process will be ended prematurely Core temperature adjustment range 0 C to 99 C Benefits of the core temperature function Cooking results are uniform and optimum Reductions to weight losses Overcooking is avoided Hook Core temperature sensor Bracket Using the core temperature sensor CAUTION Risk of burn injuries The core tem...

Страница 15: ...ed cooking process starts automatically The timer runs down The remaining time is dis played The progress bar provides a graphical display of the elapsed time You can change settings during the cooking process Core temperature function The cooking process does not start if the core temperature sensor is not inserted into the food to be cooked or the target temperature is not set A prompt is shown ...

Страница 16: ...n only be started after the cooking chamber door has been opened and closed 4 5 3 Removing the containers WARNING Risk of scalding Open the cooking chamber door carefully Allow steam and hot air to escape in a controlled manner to avoid endangering anyone CAUTION Risk of burn injuries Caution the core temperature sensor is hot Remove the core temperature sensor from the cooked food and insert it i...

Страница 17: ...pull out shower head is comple tely retracted into the appliance after use Otherwise the shower head could be damaged by the cooking chamber door 5 Finishing up Switch off the appliance Clean the appliance see the following section 11 Cleaning and care Switch off the appliance tap the On Off key After about a second the LED ring indicator lamp goes off standby The display screen is switched off Th...

Страница 18: ...r information about the cooking process window see page 15 section 4 5 1 or change the values with the slider or the numeric keypad Using the slider Tap the slider control and move to the left or right The value to the left of the slider changes Using the numeric keypad Tap the number to be changed The numeric keypadis displayed see figure 3 and configure additional functions as required Tap the a...

Страница 19: ...d C Tap the Core temperature key The key is shaded dark grey and has a border The display switches from time to temperature Key legend Symbol next to display Time is activated Symbol next to display Core temperature is ac tivated In the numeric keypad Core temperature activated shaded dark grey and has a border In the numeric keypad Time 5 Displaying changing core temperature setpoint during the c...

Страница 20: ...n in the win dow Legend for additional functions Output signal and message window after cooking step is complete e g for basting seasoning or turning the food to be cooked Affects the acoustic signal and external signals Start time preselection Pre select start of cooking process To make settings refer to the following figure 7 AQA Automatic Quantity Adjustment quantity detection and cooking time ...

Страница 21: ...e time of day when the cooking process should start Set by using the slider or the numeric keypad Sample figure Control system time 13 08 Start time 14 00 Tap the Start Stop key The progress bar provides a graphical display of the elapsed time When the configured time of day is reached au tomatic quantity adjustment AQA takes place and the cooking process then starts 8 Resetting to start screen Ta...

Страница 22: ...ns If you require additional cooking steps repeat these steps until all of the cooking steps you need have been created Key legend Move up or down in the cooking steps only if se veral cooking steps have been stored 1 sec Inserting a new cooking step before the selected cooking step Tap and hold the Arrow key briefly The symbol changes to the New cooking step symbol After the key is released the o...

Страница 23: ...king step settings are stored for the cur rent cooking process only The settings are not preserved if the appliance is switched off and on again Cookbook option If the settings are not stored in the cookbook they are no longer available after switching the appliance off and on For instructions about sav ing to the cookbook see page 33 section 7 1 4 Starting cooking steps starting any cooking step ...

Страница 24: ...r starting the cooking process the sum of the cooking times of all cooking steps set is dis played The remaining time is displayed The progress bar provides a graphical display of the elapsed time You can change settings during the cooking process see figure 3 in this section This combination of cooking steps can be started again after the cooking process has completed Important information about ...

Страница 25: ...dy to serve dishes specifically for à la carte or ban quet catering business 1 Starting revitalisation Tap the Revitalisation key The Revitalisation window is shown 2 Select For example tap the Soup key The Settings window is shown Key legend Revitalise foods in containers e g Gastronorm con tainers Revitalise soups Revitalise fish and meat 3 Starting the cooking process Adjust settings as require...

Страница 26: ... The cooking method window is shown with the default values Use the slider or numeric keypad to change the values For instructions on using the numeric keypad see page 18 figure 3 To start the cooking method see page 15 figure 1 Cooking method legend approximate values Description Temperature Time Pressureless cooking at 95 C 90 C 15 00 minutes Pressure cooking medium setting 111 C 03 00 minutes P...

Страница 27: ... Delta T cooking key The Settings window is shown Legend for special programs Delta T cooking Suitable for all larger meat joints or roasts Uniform temperature differential between the cooking chamber and core tempera ture during the cooking process Soft cooking Program with a final phase at less than 100 ºC NT overnight cooking Tap the NT overnight cooking key A default setting with several cooki...

Страница 28: ... screen Tap the screen and use your finger to scroll the products displayed up or down 3 Cookbook Entering search terms Cookbook sch Searching for product names The search function can be used in the pictogram or list display Tap the Search key Enter the search text e g sch The search is not case sensitive You do not need to enter a whole word The more precise your search term the shorter and more...

Страница 29: ...border is added to the product Tap the Cooking steps overview key The Cooking steps overview window is shown Key legend Display cooking steps overview Each value displayed can be changed by tapping the value After the change has been made the settings for the current cooking process can be started If the settings are not stored in the cookbook they are no longer available after switching the appli...

Страница 30: ... Stop key For the End of cooking process description see from page 16 from section 4 5 2 6 7 Working with categories menu groups This function is a part of the cookbook For instructions about creating or deleting categories see page 39 section 7 4 1 Starting categories Tap the Category key The Categories product groups list is dis played 2 Scrolling the display If more categories have been created...

Страница 31: ...before the cooking time starts After AQA completes the remaining time is shown The progress bar provides a graphical display of the elapsed time The cooking process can be interrupted by tap ping the Start Stop key 6 8 Working with favourites preferred products This function is a part of the cookbook Favourites need to be assigned before you can use them For instructions about assigning products t...

Страница 32: ...red 4 Changing settings during an ac tive cooking process tap the screen the Settings window is shown for approx 5 seconds Cooking process window Automatic quantity cooking time adjustment AQA display is performed before the cooking time starts After AQA completes the remaining time is shown The progress bar provides a graphical display of the elapsed time The cooking process can be interrupted by...

Страница 33: ...0 cooking steps can be combined 1 Starting manual settings Tap the Manual key The Operating Modes window is shown 2 Configuring settings Configure the settings e g temperature time core temperature additional functions If additional cooking steps need to be created see the following figure 3 If you want to save now refer to the following figure 4 ...

Страница 34: ...he selected cooking step Tap and hold the Arrow key briefly The New cooking step key symbol is shown The Operating Modes window is shown 1 sec Inserting a new cooking step after the selected coo king step Tap and hold the Arrow key briefly The New cooking step key symbol is shown The Operating Modes window is shown Add a new cooking step before or after the cooking step marked 1 3 Switch to the co...

Страница 35: ... the Categories key Tap the category you want e g vegetables or Favourites A border is shown around the category or Favourites Tap the Arrow key The selected category or Favourites is moved from the left into the panel on the right The product is now assigned to the selected cate gory e g vegetables or Favourites A product can be assigned to several categories To do so repeat this procedure for ea...

Страница 36: ...d key The image is shown above the add key Tap the Enter key The image is now assigned and the Product en try window is shown Key legend Add the selected image Confirm 8 No Name No Name Removing an image Tap the key with the image to be deleted An overview of the images stored in the system is shown Scroll up the images shown until the Camera icon is shown at the end Tap the Camera key A border is...

Страница 37: ...in the cookbook can be adjusted or changed e g temperatures times favourite assignments category assignments cooking steps etc 1 Opening the cookbook Tap the Cookbook key The Cookbook window is shown 2 Cookbook Selecting the product Tap the product you want A border is added to the product Tap the Cooking steps key The Settings window is shown 3 Tap the value Displaying changing the cooking steps ...

Страница 38: ...ndow for confirming the save process is shown 5 Please note Cookbook has been saved Please note Program with same number is present Please confirm with OK to overwrite Confirming the save process Tap the Confirm key The save process is completed The product has been changed Tap the Confirm key The save process is completed 7 3 Deleting a product from the cookbook 1 Opening the cookbook Tap the Coo...

Страница 39: ...ion dialog is shown Tap the Confirm key The window for confirming the save process is shown Tap the Confirm key The save process is completed The product has been deleted 7 4 Creating and deleting categories This function is a part of the cookbook 7 4 1 Creating categories 1 Starting categories Tap the Category key The Categories product groups list is dis played 2 Creating a new category Tap the ...

Страница 40: ... image A border is shown around the selected image Tap the Add key The image is shown above the add key Tap the Enter key The window for confirming the save process is shown 5 Please note Cookbook has been saved Saving Tap the Confirm key The category has been saved in the cookbook For instructions about assigning products to a cate gory see from page 33 section 7 1 figure 6 7 4 2 Deleting categor...

Страница 41: ... Settings window is shown 4 Name No Opening the categories favourites window Tap the Category Favourites key The assignment window is shown 5 Name Category is removed No Selecting and removing a category Tap the category to which the product is assi gned The selected category is marked Tap the Arrow key The category is removed from the window and so is no longer assigned to the product Tap the Con...

Страница 42: ...ack key To repeat the process see from figure 3 page 41 7 Deleting a category The Delete key is active once all category as signments have been deleted Tap the category to be deleted A border is added to the selected category Tap the Delete key The window for confirming the save process is shown 8 Please note Cookbook has been saved Please note Category will be perma nently deleted Please confirm ...

Страница 43: ...ACCP logs 1 Displaying HACCP logs Tap the HACCP key The HACCP window is shown 2 Overview Scrolling the display If more logs are available than can be shown on the display screen Tap the screen and use your finger to scroll the logs displayed up or down Tap the date you want The selection is shown with a border Key legend Displaying a selected day log Active for appliances with USB activation For i...

Страница 44: ...ACCP logs Tap the HACCP key The HACCP window is shown 2 Appliance number 999004 Appliance type E101SCRNFBUW Operating hours Printout date 06 02 12 10 05 48 KT every 180s Date 2012 02 05 Time 22 02 Date 2012 02 05 22 02 03 Manual program 22 02 03 Start 22 02 04 Target 60 heating 0 dura tion 10 00h 22 05 04 Cooking chamber 65 C 22 05 08 Cancel Overview Selecting an export date Day Week Month Tap the...

Страница 45: ...s Hardware version nomi nal power 1 Software version nominal power 1 Hardware version motor 1 Note on progress bar shown while saving exporting importing for example Area Import Sounds Import options Replace Add Import Images Cookbooks User configuration Progress bar Displaying appliance data Here you can read appliance data such as the version num ber installed options and free flash memory To vi...

Страница 46: ...tap the order you want to use Alphabetic Numeric Tap the Save key A message about the save process is displayed Tap the Confirm key The message disappears Continue to the next window tap the arrow key 4 Touch calibration Touch auto zero Automatic screen sensitivity adjustment Caution Do not touch the user interface for 10 seconds du ring automatic sensitivity adjustment otherwise tapping the inter...

Страница 47: ...only after rest arting the appliance USB activation is optional Tap the Touch calibration key A window with crosshairs in the centre is shown IMPORTANT only tap the crosshairs Do not tap anywhere else otherwise malfunctions may oc cur Tap the crosshairs The crosshairs now change position to the bot tom right corner Tap the crosshairs The crosshairs move to the next corner Continue tapping the cros...

Страница 48: ...he file you want is visible Tap your chosen selection An acoustic signal sounds Tap the Save key A message about the save process is displayed Tap the Confirm key The message disappears Continue to the next window tap the arrow key Information about settings options Program end signal sounds at the end of the cooking process Step change In cooking programs with different operating modes a signal s...

Страница 49: ...age region and program security Tap the arrow key e g language or cookbook The available files are displayed A scrollbar will be shown if there are a large num ber of files available Tap the arrow or the scrollbar and scroll until the file you want is visible Tap your chosen selection An acoustic signal sounds Tap the Save key A message about the save process is displayed Tap the Confirm key The m...

Страница 50: ...n Tap the Enter key Tap the Save key A message about the save process is displayed Tap the Confirm key The message disappears You can now continue to the next window 10 User Delete PIN PIN Start screen Manual Deactivating deleting the PIN This function is used to delete a previously saved PIN The delete process is necessary for example if a new PIN should be created or the restriction of modificat...

Страница 51: ...process is displayed The selected display is saved and will be shown the next time the appliance is restarted Tap the Confirm key The message disappears Tap the key to continue to the next window Legend for selection options Figure 12 Standard the display is shown as selected in the following figure 12 Figure 11 Manual the operating modes are displayed after switching on The cookbook contents are ...

Страница 52: ...ox or arrow key The available display options are shown Tap the arrows or the scrollbar and scroll until the selection you want is visible Tap your chosen selection The selection is shown in the box Tap the Save key A message about the save process is displayed Tap the Confirm key The message disappears Tap the key to continue to the next window Legend for selection options Empty nothing is displa...

Страница 53: ...eset As a precaution save the user settings to a USB drive first For instructions about data export see page 55 figure 18 USB activation optio nal Tap the Factory settings key A warning message is shown Tap the Confirm or Cancel key Wait until the message disappears and you are prompted to switch the appliance off and on Turn the appliance off and on Wait approximately 30 seconds between switch in...

Страница 54: ...echnician popup window is displayed The current appliance status is displayed Refreshing the display Tap the Refresh key Appliance statuses are updated in the Techni cian popup For real time updates tap and hold the Refresh key Hiding the Technician popup Tap the Technician popup key or anywhere next to it The popup disappears when you tap the Techni cian popup key If you tap anywhere next to the ...

Страница 55: ...e key A message about the save process is displayed Tap the Confirm key The message disappears Tap the key to continue to the next window Information about additional selection options Log content Target temperature Manual changes Error messages 17 Area Import Sounds Import options Replace Add Import Images Cookbooks User configuration Data import USB drive control system You can use this function...

Страница 56: ... nance Use a static IP address IP address Subnet mask Gateway Input screen for remote maintenance optional This function is to be used by authorised customer service personnel only By entering the relevant data a remote connection to the factory can be initiated if remote maintenance is required To do so the appliance must be connected with a network cable to a router with an internet connection 1...

Страница 57: ...erine png 0500_blumenkohl png 0500_karotten png etc Image file formats JPEG or PNG Image size for import maximum 2 MB The device software converts the imported image files as follows size 480 270 pixels resolution 72 pixels per inch pixel depth 24 16 million colours sounds Beep wav Flipper wav Klingel wav etc Sound format WAV e g ring tones for mobile phones or PC sound files can be used Filenames...

Страница 58: ...want to add data with a new filename Sounds 1 Important All existing sounds in the sounds folder will be deleted 2 The sounds on the USB drive are co pied to the sounds folder Sounds with different filenames are added to the sounds folder Sounds with identical filenames are not changed Images 1 Important All existing images in the pictograms folder will be deleted 2 The images on the USB drive are...

Страница 59: ... see from page 50 figure 9 and 10 Keep tapping the arrow key until the Export window appears 2 Area Export Sounds Export Images Cookbooks User configuration Progress bar Data export control system USB drive Export Insert the USB drive into the USB port For instructions about inserting the USB drive see page 55 figure 17 Wait approx 5 seconds until the control system has connected to the USB drive ...

Страница 60: ...Setup icon is not shown tap and hold the Back key briefly The key display changes from Back key to Home The start screen is shown when you release the key Tap the Settings Setup key The Appliance data window is shown Continue to the next window tap the arrow key If a PIN Personal Identification Number has been enabled you cannot move to the next win dow Instead the PIN entry window appears For inf...

Страница 61: ...ructions in section 10 2 Tap the data you want to import e g a cookbook The selected data type is highlighted in colour and shown with a border Tap the Replace key The Replace key is highlighted in colour and shown with a border Tap the Import key The copying process is executed takes approx 5 to 30 seconds depending on the amount of data A message appears after completion Tap the Confirm key The ...

Страница 62: ...Important information about stainless steel risk of corrosion Please note Even high quality stainless steel can corrode if handled improperly Salt acids chlo rine iodine and food residues destroy the protective coating and can cause corrosion and pitting even in high quality stainless steel While the stainless steel surface creates a new protective coat after damage this only happens if air or oxy...

Страница 63: ...of a food grade emulsion kitchen oil or coo king oil onto the seal The seal must be replaced if is worn 11 4 Cleaning the cooking chamber and the drip tray Core temperature sensor Removable rack Drip tray Turn off the appliance and let it cool down Place the core temperature sensor and its wire in the cooking chamber Unhook the removable racks and remove and clean daily with a cleaner degreaser or...

Страница 64: ...Gastronorm containers with approx 2 5 kg of ice cubes and place in the cooking chamber Close the cooking chamber door 1 Starting the cleaning process Tap the Cleaning key The Cleaning window is shown 2 Selecting the cleaning process Tap the Cleaning key The Cleaning window is shown 3 Starting the cleaning process No rinse cycle is started yet Tap the Start Stop key A message appears Fill a Gastron...

Страница 65: ...Please start the regen eration process Usage at 90 If water softener usage is at 90 you are shown a prompt stating that the water softener regeneration now needs to be started To avoid interrupting normal business operations regene ration can also be scheduled for completion at a later point in time Please note 5041 Water softener is contaminated Please perform regen eration Usage at 95 contaminat...

Страница 66: ... regeneration is shown 5 Regeneration The appliance cannot be used during the regeneration process Message about use during the regeneration process The regeneration process can still be cancelled at this point Tap the Confirm key Water is drained from the water softener duration approx 1 minute After the draining process you are prompted to fill the softener with regeneration salt Key legend Conf...

Страница 67: ...bar provides a graphical display of the elapsed time The control system determines the conductivity of the water If the regeneration salt has not been fully dissolved a prompt is shown informing you that the regeneration process must be repeated Once the regeneration process has completed the start screen is shown Key legend The regeneration process can be interrupted by tapping the Start Stop key...

Страница 68: ...f the control panel touch screen still can not be used after recalibration and resetting the sensitivity Only possible with activated USB port optional connect a PC mouse to the USB port Operate the control panel touch screen with the PC mouse Inform the authorised Customer Ser vice A connected PC mouse is recognised only after restarting the appliance USB ac tivation is optional Water does not dr...

Страница 69: ...liance is not respon ding Open the cooking chamber door allow the appliance to cool Turn the appliance off and on If the fault occurs again contact the autho rised Customer Service The appliance was moved at temperatures below zero Frozen products were stored in the cooking chamber The safety temperature limiter has tripped because the app liance has cooled to below 5 C Set up the appliance in a w...

Страница 70: ...o heat up Check building fuses to see if one or more has tripped Have an electrician check whether the app liance is being properly supplied with all three phases If the fault occurs again contact the autho rised Customer Service Fault display No 4088 The regeneration process did not complete The regeneration salt has not dissolved completely The regeneration process must be repeated without addin...

Страница 71: ...up to 30 l h approx External dimensions incl cooking chamber door and lid L W H 624 845 866 mm Weight 95 kg approx Appliance noise emissions Less than 70 dB A Technical specifications subject to change without notice 15 Setup and connections Please observe local regulations applying to commercial kitchens Installation work must be carried out in accordance with the manufacturer s assembly instruct...

Страница 72: ...e Use a pallet truck or forklift to move the appliance to the installation site on the cargo pallet Wear protective gloves Remember the appliance is very heavy Always work with proper back posture Risk of damage If the appliance is stored or moved at temperatures below zero let the appliance warm up properly before connecting it up At a room temperature of over 10 C 50 F for example Warm up time a...

Страница 73: ... feet When the in transit protection is removed the appliance is set down on the seal In transit protection Front panel Underlay at front In transit protection Underlay at front 1 1 2 1 Underlay at front Appliance foot Remove the front panel Connect up all the supply and drain lines Position the appliance at its final location Removing the in transit protection Lift the appliance at the front and ...

Страница 74: ...stall a separate water inlet or pressure booster pump if required Maximum 350 kPa 3 5 bar static at pressures above 350 kPa 3 5 bar install a pressure regulator upstream of the appliance The appliance has a built in water softener This must be configured by the authorised Customer Service For instructions about regenerating the water softener see page 65 section 12 As standard appliances are suppl...

Страница 75: ...ted at least 50 cm underneath the cooking chamber drain 15 7 Connecting to the electrical power supply DANGER Hazardous electric voltage Risk of electric shock that could result in serious injury or death All electrical work must be carried out by the authorised Customer Service or a qualified electri cian Switch off the appliance and lock it out so it cannot be switched back on Consult the data o...

Страница 76: ...ily accessible 15 8 Connecting to an energy optimisation unit optional Wiring diagram example Control assembly PCB If the Energy optimisation connection option is purchased the appliance is fitted with the necessary interface ABCD in terface at the factory A Appliance switched on B Appliance is heating C Request energy optimisation unit D Neutral conductor N An energy optimisation unit must be con...

Страница 77: ...ts We recommend taking out a maintenance contract with the Customer Service 17 Disposing of old appliances Before dismantling switch off the appliance at the mains and lock it out so it cannot be switched back on Then disconnect the mains cable from the mains socket and from the appliance Follow local and national regulations when disposing of regeneration salt water softener Old appliances are no...

Страница 78: ...of Directive 2014 35 EU concerning electrical equipment and 2014 30 EU concerning electromagnetic compati bility Machine types Pressure Steamer D311S Harmonised EN standards applied DIN EN 60335 2 42 DIN EN 55014 1 DIN EN 55014 2 DIN EN 61000 3 2 DIN EN 6100 3 11 Person authorised to compile the technical file SERVATOR ServiceLine GmbH Thomas Schmalz Lindenweg 36 42 97999 Igersheim Germany 19 Soft...

Страница 79: ...79 80 ...

Страница 80: ...Artikel Nr 889860 7 19 SALVIS AG Nordstrasse 15 4665 Oftringen Switzerland Phone 41 62 788 18 18 Fax 41 62 788 18 98 Internet www salvis ch Email info salvis ch smart cooking ...

Отзывы: