39
4
INSTALLING THE SOFTWARE PROGRAM
Note the following when installing the software program from the "Network Scanner Expansion kit" CD-ROM:
●
Be sure to check the system requirements for installation of each of the software programs in the user's guides
and on the information screen during installation.
●
The user's guides give detailed instructions for installing and setting up the programs. Be sure to read the user's
guides before installing the programs. In particular, if you are going to use Network Scanner Tool, be sure to
carefully read the instructions regarding network preparation and setup procedures before installing the program.
The network administrator should verify that network preparation has been carried out correctly.
●
If you are going to send an original scanned on the machine to a computer (Scan to Desktop), Network Scanner
Tool must be installed.
●
If you perform a standard installation of Companion (select "Typical" in the Setup Type selection screen), Network
Scanner Tool will be simultaneously installed. You can also select "Custom" installation and install only Network
Scanner Tool.
●
If your computer does not currently have Internet Explorer version 5.5 or later installed, Companion will install a
minimal version of Internet Explorer 5.5 on your computer.
●
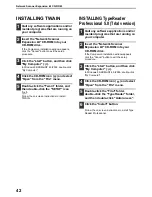
If you intend to install TWAIN, install Network Scanner Tool first. TWAIN cannot be installed alone.
●
The contents of the information screens that appear during installation can also be found in the ReadMe files on
the same CD-ROM. The ReadMe file for Companion is located in the root directory of the CD-ROM, and the
ReadMe file for TWAIN is located in the Twain folder.
INSTALLING COMPANION AND NETWORK SCANNER TOOL
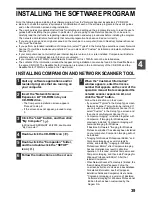
1
Quit any software applications and/or
resident programs that are running on
your computer.
2
Insert the "Network Scanner
Expansion kit" CD-ROM into your
CD-ROM drive.
• The Companion installation screen appears.
Proceed to step 6.
• If the screen does not appear, proceed to step
3.
3
Click the "start" button, and then click
"My Computer" (
).
In Windows 95/98/Me/NT 4.0/2000, double-click
"My Computer".
4
Double-click the CD-ROM icon (
).
5
Double-click the "Companion" folder,
and then double-click the "SETUP"
icon (
).
6
Follow the instructions on the screen.
7
When the "Customer Information"
window appears, enter the license
number that appears on the cover of the
operation manual that accompanied the
network scanner expansion kit, and
click the "Next" button.
Follow the instructions on the screen.
• If you select "Typical" in the Setup Type screen,
Network Scanner Tool will also be installed. If
you only wish to install Network Scanner Tool,
select "Custom" in the Setup Type screen and
then check only Network Scanner Tool.
• Companion Imaging* is installed together with
Companion. If Imaging for Windows was
previously installed, Companion Imaging will
overwrite Imaging for Windows.
If Eastman Software's "Imaging for Windows
Professional Edition" has already been installed
on your computer, Companion Imaging will not
be installed.
• "Imaging for Windows Professional Edition" and
Companion Imaging use common registry
entries, and installing "Imaging for Windows
Professional Edition" after Companion lmaging
has been installed may result in abnormal
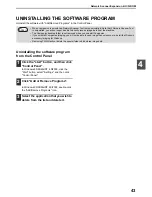
operation. In this case, uninstall Companion and
Companion Imaging, and then install "Imaging for
Windows Professional Edition". After that,
reinstall Companion.
• When Network Scanner Tool setup is finished, the
"Search Setup Wizard" appears. Follow the
on-screen instructions to create an index database.
For detailed information, see the Companion
Installation Guide and Companion User's Guide.
* Companion Imaging is a version of Eastman
Software's Imaging for Windows Professional
Edition that has been customized by the
Sagem SA.

