background image

- 6 -

MF 6990dn - Agoris C935

1 - 

Presentation of the machine


Presentation of the machine

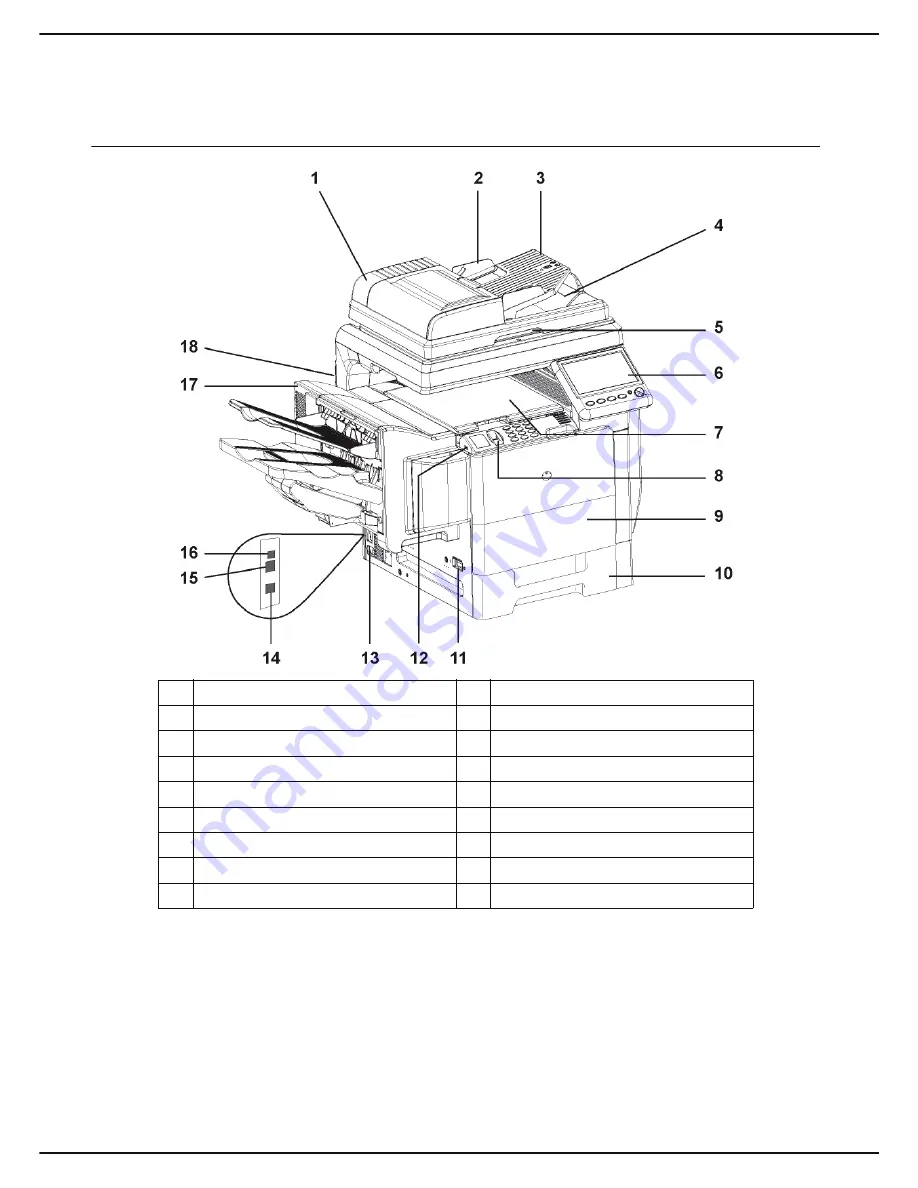
Description of the machine

1

Automatic document feeder (ADF)

10

Main paper tray

2

Paper adjustment guide

11

On/Off button

3

Automatic document feeder

12

Master USB connector (USB key)

4

Original document output

13

Power cable connection

5

Access handle to flatbed scanner

14

LINE In - telephone cable connection

6

Touch screen

15

LAN connector

7

Paper outlet (Finisher not installed)

16

Slave USB connector (for PC)

8

Fingerprint reader

17

Finisher (optional)

9

Access trap to toner cartridges

18

Smartcard reader

Содержание MF 6990dn

Страница 1: ...TELECOM User Manual SAGEM MF 6990dn Agoris C935...

Страница 2: ...t biometric identification user rights and administration of appliance resources management of resources available to users quotas counters Rules for using symbols This document makes use of symbols d...

Страница 3: ...ngs 27 Defining the machine name and number 27 Fax emission settings 28 Fax reception settings 30 Configuring the fax server optional 32 Advanced fax settings 33 Service default settings 34 Copy funct...

Страница 4: ...ng documents 66 Scan to Key 66 Scan to Mail 66 Scan to FTP 68 Scan to SMB 69 Scan to PC 71 Scan to Archive 71 Stopping an emission in progress 72 Receiving emails 72 Monitoring document emissions 72 F...

Страница 5: ...sia 126 Position of safety labels on the machine 126 Power switch symbols 127 Regulatory information 127 Certifications in Europe 127 Location conditions 127 Precautions for use 128 Operating environm...

Страница 6: ...Off button 3 Automatic document feeder 12 Master USB connector USB key 4 Original document output 13 Power cable connection 5 Access handle to flatbed scanner 14 LINE In telephone cable connection 6 T...

Страница 7: ...MF 6990dn Agoris C935 7 1 Presentation of the machine 19 Paper reception stop 21 Manual feeder 20 Duplex module 22 Number pad...

Страница 8: ...d Fax function To activate the Scan Document function To activate the Copy Document function To cancel the operation in progress To exit a menu without saving the changes To run the operation in progr...

Страница 9: ...ll a perfume diffuser on the machine When this option is installed and activated the machine diffuses perfume every hour and for a period of time defined by you Consult the installation guide supplied...

Страница 10: ...r cover and fix it in place with the screw 9 Reconnect all cables to the machine If you are installing your machine for the first time do not switch it on First complete the configuration and connecti...

Страница 11: ...5 Close the main paper tray 6 Define the paper format and type used in the ma chine The machine automatically detects standard paper formats To check define the format and type of pa per loaded consul...

Страница 12: ...gainst the side of the pile 7 Define the paper format and type used in the ma chine The machine automatically detects standard paper formats To check define the format and type of pa per loaded consul...

Страница 13: ...per guides against the sides of the en velopes 9 Define the paper format and type used in the ma chine The machine automatically detects standard paper formats To check define the format and type of p...

Страница 14: ...d of the telephone cable to the ma chine socket and the other to the wall telephone socket 2 Connect one end of the LAN network cable not supplied to the machine port and the other to your local netwo...

Страница 15: ...K to confirm the new set ting 4 In the navigation path at the top of the screen press SETTINGS to return to the higher menu To run an automatic configuration of the Ethernet network automatic allocati...

Страница 16: ...irm the modification CANCEL cancel the modification Screen scrolling When a dedicated function e g copy a document or menu e g create a contact in the address book includes a series of parameters on s...

Страница 17: ...cific function is running to display the current operation progress document being scanned fax being sent etc The home screen displays the available menus in the left and right frames The central fram...

Страница 18: ...g EMISSION QUEUE The emission queue contains all the documents waiting to be sent faxes sent by the local network etc For more information consult the sections Monitoring fax emissions 56 and Monitori...

Страница 19: ...e warning message or error just press the corresponding button A detailed description window is displayed on the screen Inserting original documents The instructions for inserting original documents a...

Страница 20: ...the re cipient to receive a single file Use the following table to know how to configure and use the Multiple Scan option Setting Description NO Multiple Scan deactivated The machine operates a single...

Страница 21: ...COMMANDS AUTHENTICATION LOGIN The machine displays the identification screen To log out manually 1 Press MENU 2 Press OTHER COMMANDS AUTHENTICATION LOG OFF The machine disconnects you from your user a...

Страница 22: ...ess using the vir tual keyboard In the event of an error use the key to delete a character Press OK to con firm 6 To enter your fingerprint press FINGERPRINT Place the finger you will always use your...

Страница 23: ...executed by another connected user General settings Date Time Settings Setting the date and the time At any time you can edit the machine s date and time 1 Press MENU 2 Select SETTINGS GENERAL DATE A...

Страница 24: ...automatically 1 Press MENU 2 Select SETTINGS GENERAL GEOGRAPHICAL TELEPHONE NETWORK 3 Select the required option from the list Use the up and down arrows to scroll through the available op tions Pres...

Страница 25: ...he list Press OK to confirm the new setting 4 Press MENU to return to the home screen Perfume Setting The perfume unit is an option enabling you to install a perfume diffuser on the machine When this...

Страница 26: ...scanner printer margins 1 Press MENU 2 Select SETTINGS SCANN PRINTER ADJUSTMENTS 3 Make the necessary adjustment s 4 Press MENU to return to the home screen To define the paper format then in the main...

Страница 27: ...ently printing is cancelled following a printer error in PC print mode PAGE TIMEOUT Waiting time for data from the PC before the PC print page is cancelled SYMBOL SET This parameter is used to draw up...

Страница 28: ...the next In the event of an error use the key to delete a character Press OK to confirm the new setting 5 Press MENU to return to the home screen Prefix for fax server If you configure the machine to...

Страница 29: ...t To change the setting 1 Press HEADING 2 Select the required status by pressing the check box 3 Press OK to confirm the new setting Emission speed Emission speed of outgoing documents If the quality...

Страница 30: ...when printing received documents To activate toner saving printing 1 Press MENU 2 Select SETTINGS COMMUNICATION FAX RECEPTION PRINT 3 Press TONER SAVE 4 Select the required status by pressing the chec...

Страница 31: ...the machine the PC the PC if available otherwise the machine For more information consult the section PC functions 79 To select the reception mode 1 Press MENU 2 Select SETTINGS COMMUNICATION FAX RECE...

Страница 32: ...ONE FOLD BACK 2 Select the required option 3 Press OK to confirm the new setting Defining a reply address The reply address is used to receive emission and reception reports for faxes managed by the f...

Страница 33: ...back To select the type of emission report 1 Press EMISSION REPORT 2 Select the required report type from the list 3 Press OK to confirm the new setting Advanced fax settings Line parameters This para...

Страница 34: ...djustments The following table lists the available parameters 3 When you have made the adjustments press BY DEFAULT in the navigation path to return to the previous menu MENU to return to the home scr...

Страница 35: ...ve to configure them manually Manual configuration of the Ethernet network To manually configure the machine you must first avail of the usual information used to configure a peripheral on the local n...

Страница 36: ...t AUTOMATIC 100 FULL DUPLEX 100 HALF DUPLEX 10 FULL DUPLEX and 10 HALF DUPLEX Use the up and down arrows to view all available options Press OK to confirm the new setting 5 Press MENU to return to the...

Страница 37: ...ting 7 Press MENU to return to the home screen Configuring the SNMP service An SNMP Simple Network Management Protocol agent is available on the machine for network administrators wishing to monitor a...

Страница 38: ...OK to confirm the new setting 5 To modify the port number used press PORT En ter the number of the server port from 1 to 65535 using the virtual keyboard or the number pad The default ports are 9100 f...

Страница 39: ...primary DNS server and press OK to confirm 7 Press SECONDARY DNS Enter the name or IP address of the secondary DNS server and press OK to confirm 8 Press ACTIVATION Select the required connec tion fre...

Страница 40: ...emission report but the machine records all emissions made in its emissions log SYSTEMATIC a report is printed at each emission at tempt ON FAIL a report is printed only when the emission attempts hav...

Страница 41: ...3 Press TELEPHONE NUMBER Enter the tele phone number of the server centre Press OK to confirm the new setting 4 Press LOGIN Enter the login for connection to the server centre Press OK to confirm the...

Страница 42: ...nications are saved in the log faxes sent and received emails sent and received scan to archive operations The communications log is automatically printed out every 25 communications However you can r...

Страница 43: ...he event of technical intervention or during a maintenance operation To access this information 1 Press MENU 2 Select OTHER COMMANDS STATUS The following information can be consulted Counter Descripti...

Страница 44: ...rights management and limit access to all machine functions without creating user accounts the machine will only be able to be used by the Admin user account Therefore in order to set up user rights m...

Страница 45: ...YES only authorised users ac counts can scan and send docu ments using the SCAN function after logging in Press OK to confirm the new setting Function Description Procedure Property Description Code 4...

Страница 46: ...a user account proceed as follows Administrator rights 1 Press the MENU key 2 Select SETTINGS OTHER PARAMETERS RIGHTS MANAGEMENT DELETE USER The list of existing user accounts is displayed on the scr...

Страница 47: ...report by email export an interim report reset the usage counters Printing an interim report Printing out an interim report does not affect monthly print outs of the usage counters To print out an int...

Страница 48: ...and short edges Long edge binding The pages are printed to be bound on the left margin and turned from right to left Short edge binding The pages are printed to be bound at the top and turned from bo...

Страница 49: ...e list Press OK to confirm 6 To change the binding type press BINDING EDGE Select the required option from the list see section Binding 48 Press OK to confirm 7 Press to photocopy the document in blac...

Страница 50: ...the box to se lect the required option Press OK to confirm 8 If the finisher option is installed on the machine you can select the output tray and the finish for the photocopied document Press OUTPUT...

Страница 51: ...confirmation to start the task 1 Press COPY 2 Enter the number of copies required and press OK The first settings appear on the screen Use OTHER PARAMETERS to access all available settings 3 Press ID...

Страница 52: ...the flatbed scanner glass as indicated be low 9 Press to photocopy the document in black and white or to photocopy the document in colour The document is scanned 10 Turn the document over and press O...

Страница 53: ...down arrows to view all entries in the ad dress book OR Enter the first few letters of the name of your corre spondent using the virtual keyboard and add letters until the full name of the re quired...

Страница 54: ...o confirm 12 Press or to send the document User rights Notice You may cancel an operation at any time by pressing To select a recipient then from the address book Press ADR BOOK then Select the contac...

Страница 55: ...on is stopped is deleted from the emission queue To stop an emission in progress 1 Press A message asking you to confirm the cancellation is displayed on the screen 2 Press OK to confirm cancelling th...

Страница 56: ...ion request Delete an emission request on standby or rejected Print out a document awaiting emission Forcing an emission request To force sending or resend a fax that is on standby or has been rejecte...

Страница 57: ...ay and the finish for the print ed document printed document exits on the lower finisher tray printed document exits on the upper finisher tray printed document stapled and exits on the upper finisher...

Страница 58: ...ed only authorized user ac counts will be able to print on the machine If you user account authorizes you to print you must en ter the 4 figure code or use the fingerprint associ ated with your user a...

Страница 59: ...ue You will then be asked for the 4 figure code or the fingerprint associated with the print task However before using this function consider the following if rights management is deactivated or if th...

Страница 60: ...hat con tains your fingerprint see Receiving your fingerprint 59 9 Click OK to start printing The print task is saved on the machine To recover your print you must manually force it from the print que...

Страница 61: ...to print Editing a print task To edit the properties of a print task from the print queue 1 Press DISPLAY EDIT 2 Select the required print task and press OK The properties of the selected print task a...

Страница 62: ...and selection suited to the types of documents you wish to print Printable files documents and images are displayed without taking account of their arborescence on the USB key Printing files from a US...

Страница 63: ...present on your USB key proceed as follows Cancelling an operation 1 Insert your USB key into the machine respecting the insertion direction The USB key is analyzed When the analysis is complete the U...

Страница 64: ...n folder is created by the application To scan a document and save it to a USB key proceed as follows Cancelling an operation 1 Insert the document to scan see section Inserting original documents 19...

Страница 65: ...n press MULTIPLE ANALYSIS Select YES to acti vate it or NO to deactivate it see Using the Multiple Scan option correctly 20 Press OK to confirm 13 Press to scan the document in black and white or to s...

Страница 66: ...Description Scan to Key Scan a document and save it on a USB key connected to the machine Scan to Mail Send an email with the scanned document as an attachment Scan to File Save a scanned document in...

Страница 67: ...press NUMBER OF PAGES Enter the number of pages using the virtual keyboard or the number pad Press OK to confirm 16 To activate deactivate the Multiple Scan option press MULTIPLE ANALYSIS Select the...

Страница 68: ...0 characters In the event of an error use the key to delete a character Press OK to confirm 11 To customize the format of the attachment press DOCUMENT FORMAT Select the format from the available opti...

Страница 69: ...to the destination directory shared address the SMB user and its password The SMB address is in the following format PCJohn SharedFolder JohnFiles where PCJohn means the name of the destination PC 134...

Страница 70: ...to activate deac tivate double sided scanning of the document Check the box to activate the required option Press OK to confirm 16 To specify the number of pages in the document before sending press...

Страница 71: ...chive it directly on your fax server Cancelling an operation 1 Insert the document to scan see section Inserting original documents 19 2 Press SCAN 3 Select SCAN TO ARCHIVE 4 To modify the user name p...

Страница 72: ...was stopped at the request of the user Receiving emails Emails are automatically received via the local network or at each internet connection if this is configured on the machine The machine systema...

Страница 73: ...from the emission queue 1 Press DISPLAY EDIT Documents sent by email or for archiving are identified by MAIL or NET documents sent to an FTP or SMB address are identified by FILE or NET 2 Select the...

Страница 74: ...ber pad from 1 to 1000 Press OK to confirm 6 To mark the contact as a favourite press FAVOURITE Check the box to select the required option Press OK to confirm You can now enter the contact details wi...

Страница 75: ...ohn Press OK to confirm 3 Press PASSWORD Enter the SMB password Press OK to confirm 4 Press DOCUMENT FORMAT Select the format for documents sent to the contact PDF TIFF or JPEG Press OK to confirm Edi...

Страница 76: ...list The contact selection window is displayed on the screen The left hand side contains existing contacts The right hand side contains contacts selected for the list 8 Use the up and down arrows to v...

Страница 77: ...e virtual keyboard and add let ters until the full name of the required correspondent is displayed Exporting Importing the address book The address book export and import functions are particularly us...

Страница 78: ...ry card 1 Insert the first directory card into the machine s smart card reader The machine analyzes the directory card con tents 2 If several directory cards are required a message asking you to inser...

Страница 79: ...emory of minimum 128 Mb for Windows 2000 minimum 192 Mb for Windows XP x86 Home and Pro 1 Gb for Windows Vista Installing the software This section describes the following installation procedures comp...

Страница 80: ...your multifunction machine To connect the multifunction machine to the PC via the local network consult the section Adding a peripheral connected to the network 84 You can run the management software...

Страница 81: ...ars This screen enables you to install or unin stall software access the product s user manuals or explore the CD ROM content 4 Click on Install products 5 The production installation screen appears C...

Страница 82: ...ardware and sound Printer depending on the operating system select Add a printer and follow the instructions on the screen When the drivers are requested insert the installation CD ROM The drivers are...

Страница 83: ...ctor This graphic interface enables you to run utilities and software to manage your multifunction machine Graphic presentation Run the application by clicking on the Companion Director icon on your d...

Страница 84: ...he following window shows the list of the various properties of the printer to be installed Click on Next 7 The window indicating that the installation proce dure was successful appears Click on Finis...

Страница 85: ...ble indicates the possible connections statuses Peripheral parameters 1 Select a peripheral by clicking on the correspond ing line in the list and click on Properties to config ure the scanning settin...

Страница 86: ...uration tools from the peripheral s integrated website The Settings link opens the page devoted to the peripheral settings see section Configuring the machine and services 23 for a detailed descriptio...

Страница 87: ...the progress of the current scan 4 When the scan is complete the scanned image ap pears in the PaperPort window To scan a document from PaperPort 1 Click on File Scan 2 Select the scanner of your choi...

Страница 88: ...Color HFCv2 For more information on the print options see the section Printing documents 57 Fax communications Fax communications enables you to send documents by fax from your machine s scan ners th...

Страница 89: ...elect the Cover page tab and check the box With cover page Select the cover page you want to include in the drop down menu or create a new one For more information consult the section Cover page 92 7...

Страница 90: ...sts currently being sent deferred emission requests requests for which several attempts have been made and which are about to be reattempted requests which have been rejected failed calls Rejected req...

Страница 91: ...the send report An emission report is printed out each time a fax is sent Print the send log The log is automatically printed out when its content reaches a full page Option Description Sending speed...

Страница 92: ...ing the information provided for each document recipient There are two steps to creating the cover page template First step Create a background image with the re quired logos and page formatting Secon...

Страница 93: ...AX Manager select New Fax click on the tab Cover page and click on the box With cover page 2 Click on the New button The cover page Creation page is displayed 3 Click on Open in the tool bar switch th...

Страница 94: ...er page tab Notice Adjust the size of your field boxes so that the text is legible Option Description Name of the cover page Name of the page selected by default or the name of the page you have chose...

Страница 95: ...are consult the section Uninstalling drivers using the Companion Suite Pro software 95 If you installed the drivers manually consult the sec tion Manually uninstalling the drivers 95 Uninstalling driv...

Страница 96: ...e window Device manager Start Control panel System Hardware Device manager or Start Control panel Hardware and sound Device manager depending on the operating system 2 In the sub menu Imaging devices...

Страница 97: ...he printer using a soft cloth soaked in mild household detergent Use a soft cloth to clean the printer Never use abrasives or corrosive detergents Cleaning the touch screen To clean the touch screen s...

Страница 98: ...message PLEASE CLEAN THE SCANNER FEED ROLLER AS DESCRIBED IN THE USER MAN UAL THEN PRESS STOP informs you that the automatic feeder can no longer feed sheets of paper dust dirt or debris obstructing...

Страница 99: ...right and left are re leased 3 Clean the paper feed rollers by wiping them with a soft dry cloth To clean them rotate them in the same direction as normal paper feed 4 Close the manual feeder Cleaning...

Страница 100: ...ing them with a soft dry cloth To clean them rotate them in the same direction as normal paper feed 3 Close the additional paper tray 4 Open the right side cover of the additional paper tray 5 Clean t...

Страница 101: ...er cartridge The machine is equipped with a consumable management system It indicates when a toner cartridge is nearing the end of its lifespan The following messages will appear on your machine THE T...

Страница 102: ...LIFE REPLACE IT X the print unit is empty You can replace the print unit between the time it has reached critical threshold and when it is empty If you do not replace it the machine will not print Th...

Страница 103: ...the perfume cartridge when the machine displays the message THE PERFUME CARTRIDGE IS AT THE END OF ITS LIFE REPLACE IT The procedure for replacing the consumable is included with the new cartridge Aft...

Страница 104: ...stall the new one 5 Replace the stapler 6 Replace the stapling unit 7 Close the cover of the stapling unit Replacing the feeder shoe Replace the feeder shoe on the autofeed scanner when the machine di...

Страница 105: ...r shoe should be replaced about every 50 000 pages scanned on the autofeed scanner Contact your retailer to have servicing carried out Removing paper jams If a paper jam occurs in the paper feed unit...

Страница 106: ...canner paper jam In the event of paper jam 1 Open the cover of the autofeed scanner 2 Remove the paper causing the jam without tearing it 3 Close the cover of the autofeed scanner Main paper tray jam...

Страница 107: ...the paper on a flat surface 6 Load the sheets into the paper tray with the print surface facing up 7 Close the main paper tray Additional paper tray jam 1 Open the right side cover of the additional p...

Страница 108: ...g up 7 Close the additional paper tray Duplex module paper jam 1 Open the manual feeder 2 Open the cover of the duplex module 3 Remove the paper causing the jam without tearing it 4 Close the cover of...

Страница 109: ...er unit cover and lower the two levers holding it down 5 Close the right side cover WARNING The fuser unit may reach very high tempe ratures during operation To avoid injury do not touch this zone Not...

Страница 110: ...ng it 3 Close the right side cover Transfer unit paper jam 1 Open the upper cover 2 Remove the paper causing the jam without tearing it 3 Close the upper cover WARNING The fuser unit may reach very hi...

Страница 111: ...pen the finisher cover 2 Remove the paper causing the jam without tearing it To remove a paper jam visible at the auxiliary output tray 1 Open the finisher cover 2 Remove the paper causing the jam wit...

Страница 112: ...ple jam 1 Open the cover of the stapling unit 2 Remove the stapling unit 3 Remove the stapler 4 Lift the staple cartridge guide and remove any jammed staples 5 Replace the guide in its initial positio...

Страница 113: ...is procedure Z Please remove the scanner before starting this proce dure Z The machine should be switched off and all cables disconnected 1 Remove all toner cartridges and waste toner bot tles from th...

Страница 114: ...occurred Contact a maintenance technician The machine does not detect the presence of the document inserted in the autofeed scanner The document is too thick or incorrectly positioned 1 Remove the do...

Страница 115: ...mory is insufficient If the print jobs dealt with by the machine are mostly comprised of very complex jobs and print times are affected you can add memory Contact your retailer for more information An...

Страница 116: ...ies before loading them The jam message remains displayed The right side cover must be opened and closed to reinitialize the printer Open and close the right side printer cover One or several sheets h...

Страница 117: ...tray Special media must only be loaded into the manual feeder The recommended print side of transparencies or sheets of labels is not turned the right way up in the manual feeder Load the transparenci...

Страница 118: ...the media in the paper tray Load the appropriate media into the paper tray Several sheets are fed at the same time into the printer Remove the sheets from the paper tray and check they are not stickin...

Страница 119: ...fective toner cartridge s Fuzzy printing Stained back ground Lack of lustre One or more toner cartridges are defective Remove the toner cartridges and check their condition Replace the defective toner...

Страница 120: ...toner cartridges and check their condition Replace the defective toner cartridge s Reinstall the toner cartridges correctly Traces of toner on the underside of the printed page There is toner in the...

Страница 121: ...ong colours One or more toner cartridges are defective Remove the toner cartridges and check that the toner is evenly distributed inside Reinstall the toner cartridges correctly One or more toner cart...

Страница 122: ...d the document again send the document again immediately via the emission queue see section Forcing an emission request 56 cancel the operation by deleting the corresponding request from the emission...

Страница 123: ...interference occurred in a useless part of the document 0B Wrong number of pages There is a difference between the number of pages indicated during preparation and the number of pages sent Check the...

Страница 124: ...nd server parameters 45 Disconnection from provider The service is momentarily unavailable Try again later 46 SMTP server disconnection Disconnection from the outgoing SMTP server the service is momen...

Страница 125: ...llowing precautions must be taken the machine must be connected to a nearby power plug The power plug must remain easily accessible The machine is supplied with a mains power cable fitted with an eart...

Страница 126: ...Europe Asia This machine complies with IEC 60825 1 1993 A1 1997 A2 2001 standard is classified as class 1 Laser Product and is safe for office EDP use It contains one class 3B laser diode of maximum p...

Страница 127: ...r ventilation systems or in a zone subject to significant differences of temperature or humidity Choose a stable horizontal surface on which the machine will not be exposed to intense vibrations Keep...

Страница 128: ...high voltage circuits Any contact with these cir cuits may lead to a risk of electric shock Never try to modify the machine This may cause a risk of fire or electric shock Ensure that all paper clips...

Страница 129: ...not remain under the machine so as not to damage it When disconnecting the mains cable from the wall socket always pull on the plug and not the cable Ensure that paper clips staples and other small me...

Страница 130: ...dragged Two people are required to move the machine Keep the machine horizontal to prevent spilling toner Never lift the machine using the metal scanner frame or you risk damaging it To lift the mach...

Страница 131: ...r wipe your eyes or touch your mouth Ensure that toner does not come in contact with your skin If you get toner in your eyes rinse immediately with cold water and consult a doctor Toner on the hands c...

Страница 132: ...locally for this type of waste If your product contains batteries or rechargeable batteries they must be disposed of in designated collection points The crossed bin symbol on the product indicates tha...

Страница 133: ...se by destroying the program and the documentation and any copies of them This license will be automatically cancelled if you fail to respect the terms of this license In the event of cancellation you...

Страница 134: ...demark of the Group SAFRAN PCL is a registered trademark of Hewlett Packard Company PostScript is a registered trademark of Adobe Systems Incorporated Adobe and Adobe products mentions are is register...

Страница 135: ...and that you know you can do these things To protect your rights we need to make restrictions that forbid anyone to deny you these rights or to ask you to surrender the rights These restrictions tran...

Страница 136: ...f that work are not derived from the Program and can be reasonably considered independent and separate works in themselves then this License and its terms do not apply to those sections when you distr...

Страница 137: ...n of this section is held invalid or unenforceable under any particular circumstance the balance of the section is intended to apply and the section as a whole is intended to apply in other circumstan...

Страница 138: ...r modify it under the terms of the GNU General Public License as published by the Free Software Foundation either version 2 of the License or at your option any later version This program is distribut...

Страница 139: ...aking changes to the library and recompiling it And you must show them these terms so they know their rights We protect your rights with a two step method 1 we copyright the library and 2 we offer you...

Страница 140: ...source code means all the source code for all modules it contains plus any associated interface definition files plus the scripts used to control compilation and installation of the library Activitie...

Страница 141: ...the requirement to distribute the source code even though third parties are not compelled to copy the source along with the object code 5 A program that contains no derivative of any portion of the Li...

Страница 142: ...e permitted and provided that you do these two things a Accompany the combined library with a copy of the same work based on the Library uncombined with any other library facilities This must be distr...

Страница 143: ...he two goals of preserving the free status of all derivatives of our free software and of promoting the sharing and reuse of software generally NO WARRANTY 15 BECAUSE THE LIBRARY IS LICENSED FREE OF C...

Страница 144: ...in Street Fifth Floor Boston MA 02110 1301 USA Also add information on how to contact you by electronic and paper mail You should also get your employer if you work as a programmer or your school if a...

Страница 145: ...W on average during printing peak of 1400 W Admissible ambient temperature Operating 10 C to 35 C 50 F to 95 F with maximum differ ence of 10 C per hour Storage 0 C to 35 C 32 F to 95 F with maximum...

Страница 146: ...216x1200 mm Paper Standard Recycled Thick Transparencies Headed Enve lopes Labels Weight 91 to 210 g m 25 to 55 9 lb Additional paper tray Capacity maximum 500 sheets of standard paper 80 g m 22 lb Pa...

Страница 147: ...MMR Modified Modified Read JBIG JPEG Dial type DTMF Internet general characteristics Type PSTN V34 Communication speed 33600 bps maximum V34Fax Protocol TCP IP PPP protocols PAP CHAP MD5 C protocols...

Страница 148: ...can be used Support Format Millimetres inches Main tray Manual feeder Additional tray Duplex Finisher Stapling Offset Letter 215 9 x 279 4 8 5 x 11 0 Yes Yes Yes Yes Yes Legal 14 215 9 x 355 6 8 5 x...

Страница 149: ...sive paper Folded creased warped embossed deformed or crinkled paper Cut out perforated or torn paper Paper that is too supple too rigid or too fibrous Paper with a different texture roughness on the...

Страница 150: ...Capacity Not supported Up to 20 sheets depending on thickness Orientation Not supported Print side facing down Driver Thick 1 91 to 150 g m Thick 2 151 to 210 g m Weight 91 to 210 g m 25 to 55 9 lb D...

Страница 151: ...ormation concerning printing labels consult your application documentation Recommendations for use Using sheets of labels Recommended for laser printers Format A4 or Letter sheets of self adhesive lab...

Страница 152: ...output tray to prevent the accumulation of static electricity Do not fan your transparencies before loading them into the manual feeder as this creates static electricity and may cause printing errors...

Страница 153: ...er the media the guaranteed print surface corresponds to the size of the media minus 4 mm from each edge On Banner paper the bottom margin is 10 mm Printable surface for envelopes Envelopes have a fla...

Страница 154: ...nformation and specifications included are subject to change without prior notice Sagem Communications tries to ensure that all information in this document is correct but does not accept liability fo...

Отзывы: