


99
How to Create a Song
5.
To clear the Skip function, move to the red
frame and press the [ENTER] button once
again.
You can also directly touch a group box in the screen to gray-out
(clear) the box .
6.
To return to the normal state, repeat steps 2–4.
MEMO
The SKIP setting is saved in the scene .
Editing the Song’s Structure
(SONG EDIT)
You can use the song edit functions to change the structure of
an already-completed song by copying, moving, or deleting
selected groups . You can also use various other convenient
functions, such as making loop playback settings for specific
groups or for the entire song .
Basic song editing operation
1.
Press the [SONG] button.
The SONG screen appears .
2.
Select [E2] EDIT.
The SONG EDIT screen appears .
3.
Select the pattern to which you want to apply
an operation.
The selected group box is enclosed by a red frame . You can select
a group by using the cursor [
H
] [
I
] [
K
] [
J
] buttons or by directly
touching the group box .
4.
Use knobs [E1]–[E6] to select the operation
that you want to execute.
5.
Edit the settings of the menu item you
selected.
Menu
Explanation
[E1] MOVE
Moves a group .
[E2] COPY
Copies a group and pastes it at another location .
[E3] DELETE
Deletes a group .
[E4] LOOP
Makes loop playback settings for the entire song .
Repeat [E5] knob
Makes loop playback settings for an individual group .
[E6] PATTERN
Accesses the PATTERN screen .
6.
Press the [EXIT] button to return to the SONG
screen.
MEMO
The changes that you make in song edit are saved in the scene .
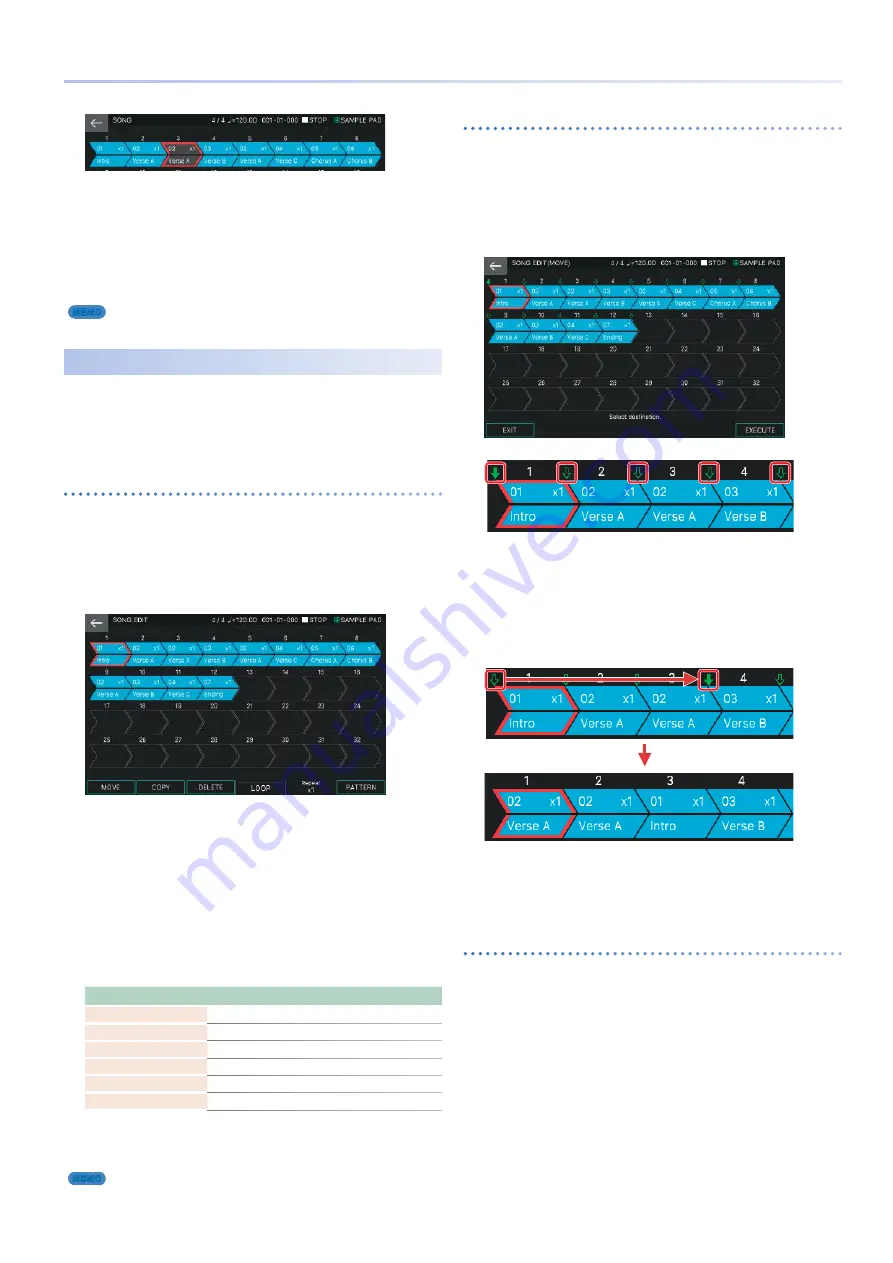
Moving a group
(MOVE)
Here’s how to move the selected group .
1.
In the SONG EDIT screen, select the move-
source group, and then select [E1] MOVE.
The SONG EDIT (MOVE) screen appears .
A green
/
(pointer) appears above the icon of each group box .
Use these pointers to specify the move-destination location .
Pointer
2.
Touch the pointer that corresponds to the
desired move-destination location.
The pointer changes color to a solid
/
, indicating that the move-
destination has been specified .
For example, if you want the “Intro” group located at the first
position to move between the third and fourth positions, specify
the pointer as shown in the illustration below .
3.
Select [E6] EXECUTE.
The selected group is moved, and you return to the SONG EDIT
screen .
If you decide to cancel, choose [E1] EXIT .
Copying a group
(COPY)
Here’s how to copy the selected group and insert it in a different
location . The copy-source group remains in its original location .
1.
In the SONG EDIT screen, select the copy-
source group, and then select [E2] COPY.
The SONG EDIT (COPY) screen appears .
A green
/
(pointer) appears above the icon of each group box .
Use these pointers to specify the copy-destination location .
2.
Touch the pointer that corresponds to the
desired copy-destination location.
The pointer changes color to a solid
/
, indicating that the move-
destination has been specified .
For example, if you want the “Intro” group located at the first
position to be inserted between the second and third positions,
specify the pointer as shown in the following illustration .
Содержание FANTOM Series
Страница 1: ...Reference Manual 2019 Roland Corporation 01...
Страница 28: ...28 Memo...
Страница 78: ...78 Memo...
Страница 106: ...106 Memo...
Страница 118: ...118 Memo...
Страница 131: ...131 Memo...
Страница 132: ......


