97
How to Create a Group
Editing a Group
Even after creating a group, you can edit the structure of the
group in the GROUP screen .
Basic Operation in the GROUP Screen
1.
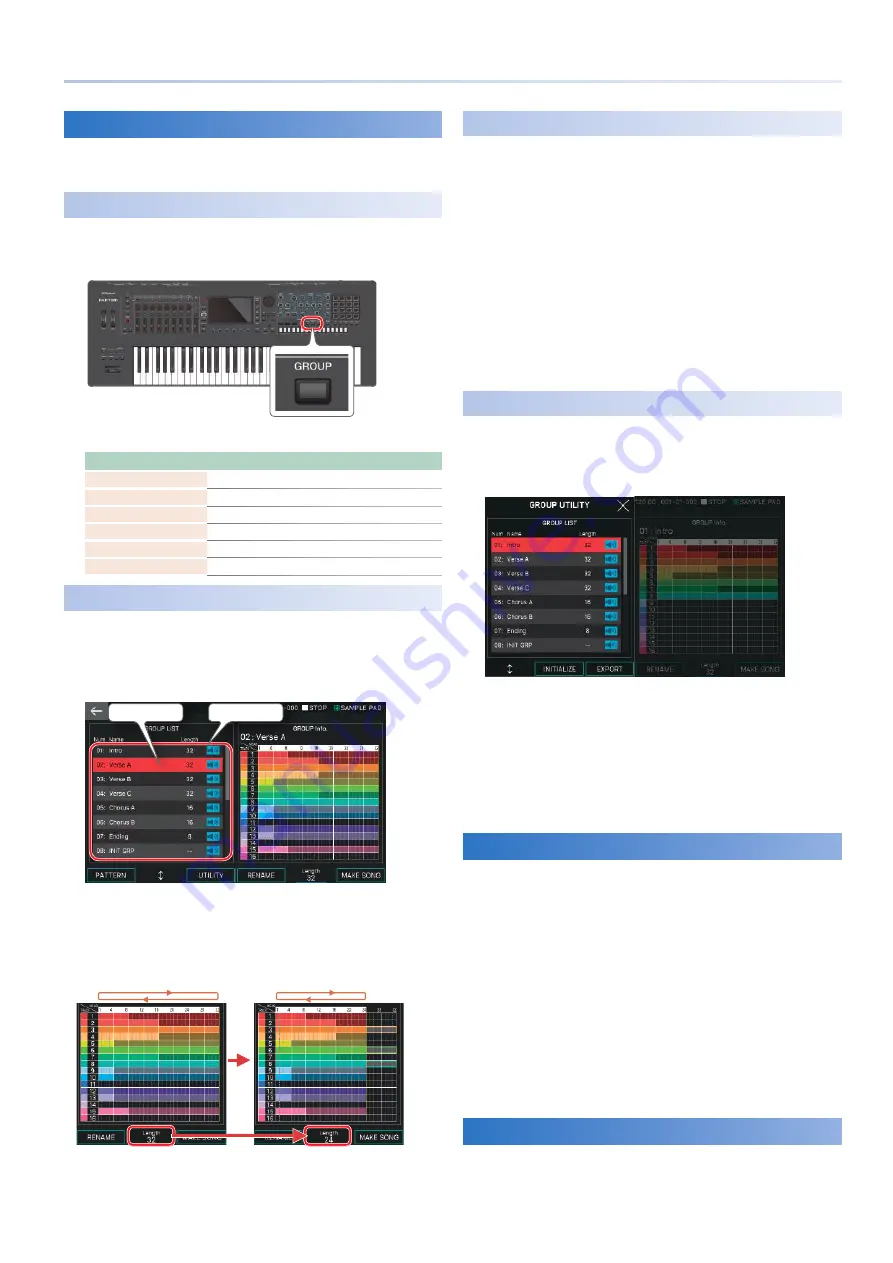
Press the [GROUP] button.
The GROUP screen appears .
2.
Select a function and edit the parameters.
Function
Explanation
[E1] PATTERN
Accesses the PATTERN screen .
[E2] knob
Moves the cursor in GROUP LIST .
[E3] UTILITY
Accesses the GROUP UTILITY screen .
[E4] RENAME
Renames the group .
[E5] LENGTH
Edits loop settings for the group .
[E6] MAKE SONG
Accesses the MAKE SONG screen .
Specifying the Loop Settings
(Length)
The loop length of each group (Length) can be specified
separately from the loop settings specified for a pattern . For
example, the playback might loop in eight-measure units in
the PATTERN screen, but you could halve this to make it loop in
four-measure units when played as a group .
Current group
Group list
The right side of the screen is called the GROUP Info area . This
area shows the presence or absence of data for each track in the
current group, and the length of the current pattern for each
track .
1.
Use the [E5] knob to set the Length parameter.
Loop region
Loop region
This changes the length for when the group is played .
The length is also shown in the GROUP Info . area . The area outside the
region specified by Length is grayed-out and is not played .
Naming a Group
(RENAME)
You can assign a name to each group . Assigning an informative
name helps you tell the groups apart without needing to
specifically examine the content of each group .
1.
In the GROUP screen, select the group that
you want to rename, and then select [E4]
RENAME.
The RENAME screen appears .
2.
Edit the group name as described in the
explanation for the RENAME screen (p. 13).
3.
Select [E6] OK.
If you decide to cancel, choose [E5] CANCEL .
Initializing a Group
(INITIALIZE)
Here’s how to initialize a group .
1.
In the GROUP screen, select [E3] UTILITY.
The GROUP UTILITY screen appears .
2.
Use the [E1] knob to select the group that you
want to initialize.
3.
Select [E2] INITIALIZE.
The group is initialized .
4.
Press the [EXIT] button to return to the GROUP
screen.
Exporting a Group as SMF
(EXPORT)
Here’s how the patterns of a group in the currently selected
scene can be converted into SMF data and exported to a USB
flash drive .
1.
In the GROUP UTILITY screen, select [E3]
EXPORT.
The SEQ EXPORT screen appears .
2.
Make settings in the SEQ EXPORT screen
as described in steps 2–14 of “Exporting a
Pattern as SMF (EXPORT)” (p. 95). In this
case, select “GROUP” as the source.
3.
Press the [EXIT] button to return to the GROUP
UTILITY screen.
Saving a Group
The data of the groups you create is saved as a whole in the
current scene . If you want to keep the groups you create, save
the scene (p . 44) .
Содержание FANTOM Series
Страница 1: ...Reference Manual 2019 Roland Corporation 01...
Страница 28: ...28 Memo...
Страница 78: ...78 Memo...
Страница 106: ...106 Memo...
Страница 118: ...118 Memo...
Страница 131: ...131 Memo...
Страница 132: ......


