


Rockwell Automation Publication 2715P-UM001C-EN-P - March 2019
33
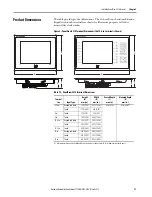
Install the PanelView 5510 Terminal
Chapter 2
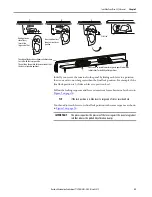
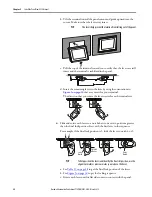
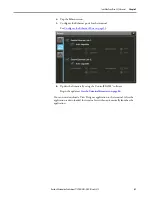
5.
Adjust each lever to its final lock position shown in the same locking
sequence in
.
a. Unlock lever one in the sequence by rotating it away from the bezel.
b. With the lever positioned vertically to the slot, slide the lever to the
final locking position in
.
The outer notch of the lever aligns with the bezel indentation.
c. Carefully rotate the lever back toward panel.
d. Lock the remaining levers to their final position.
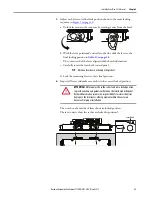
6.
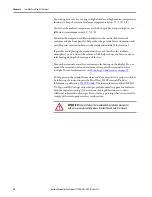
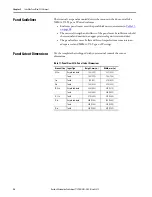
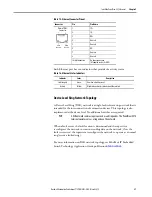
Inspect all levers and make sure each is in the correct locked position.
The notch on the outside of lever shows its locked position.
These two views show levers that are locked in position 3.
TIP
A broken lever does not damage the product.
ATTENTION:
All levers must be in the correct and same locked position
to provide an adequate gasket seal between the terminal and the panel.
Rockwell Automation assumes no responsibility for water or chemical
damage to the terminal or other equipment within the enclosure
because of improper installation.
Lever Notch
Содержание Allen-Bradley PanelView 5510 Series
Страница 6: ...6 Rockwell Automation Publication 2715P UM001C EN P March 2019 Table of Contents Notes...
Страница 10: ...10 Rockwell Automation Publication 2715P UM001C EN P March 2019 Preface Notes...
Страница 86: ...86 Rockwell Automation Publication 2715P UM001C EN P March 2019 Chapter 5 Install and Replace Components Notes...
Страница 92: ...92 Rockwell Automation Publication 2715P UM001C EN P March 2019 Chapter 6 Update Firmware Notes...
Страница 108: ...108 Rockwell Automation Publication 2715P UM001C EN P March 2019 Index Notes...
Страница 109: ...Rockwell Automation Publication 2715P UM001C EN P March 2019 109 Index Notes...
Страница 110: ...110 Rockwell Automation Publication 2715P UM001C EN P March 2019 Index Notes...
Страница 111: ......


