1) Tap a record to select/deselect it.
2) Tap to select/deselect all records.
3) Tap to delete the selected records.
4) Tap
to come back to main page.
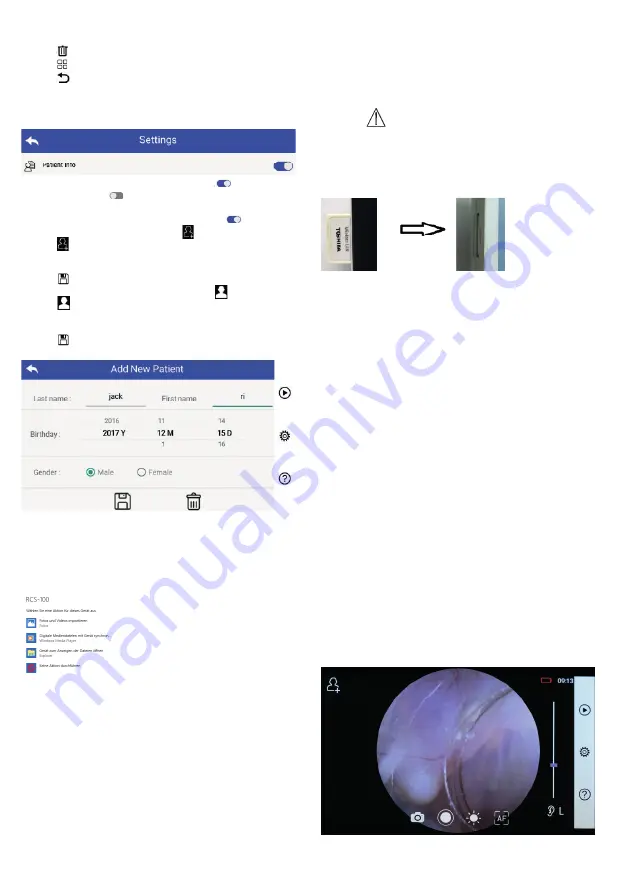
7.8 Patient information
a) Patient information data:
“Patient Info” in parameter setting page,
patient infor-
mation enable and
patient information disable.
b) Patient information add/edit (patient Info
):
If patient did not add (shown by ):
1) Tap to enter the patient information add page.
2) Enter the correct last name, first name, birthday,
gender.
3) Tap to finish the patient information addition.
If patient has already added (shown by
):
1) Tap
to enter the patient information edit page.
2) Enter the correct last name, first name, birthday,
gender.
3) Tap to complete the patient information editing.
7.9 Connect PC
a) USB disk mode:
Image data transfer method to a PC is similar as with a USB
Stick. When connected to a PC running Microsoft Windows,
the operating system displays optional mode of operation.
It is possible to select an appropriate image viewing program,
or simply open the folder to view and transfer files to the PC.
b) UVC mode:
The camera can work on UVC mode.
1) Please activate the UVC-mode in the settings.
2) Open windows system UVC component on computer.
3) Camera connects to the computer by USB cable.
4) Power on the camera.
5) Windows UVC component automatically connect the
camera and display the preview image of the Camera.
Warning:
PC should follow EN 60950-1 standard.
7.10 Wifi-SD
This device only supports TOSHIBA FlashAir Wifi-SD card
(optional) to expand internal storage or support Wlan. You
can also use the TOSHIBA FlashAir center setup guide. More
information about the card can be found in TOSHIBA internet
pages: http://www.toshiba-personalstorage.cn
Warning:
Does not guarantee use of other brands of Wifi-SD/SD cards.
a) Wifi-SD card installation:
Put Wifi-SD card into handset card slot (as shown
below) and push it into place.
WiFi SD
Slot
b) Use Wifi-SD on handset:
When Wifi-SD is installed, system first saves records on
Wifi-SD until it is full, and then system saves records on
internal storage.
c) PC connect Wifi-SD:
In the PC (with Wifi function) Wifi management page,
select the name of „flashair_XXXXXXXXXXX“connection,
and enter the password (initial password 12345678).
After the connection is successful, the PC automatically
displays file management page, and you can view
captured records that had been saved on Wifi-SD/SD on
the file management page.
8 Imaging using optics module otoscope (OT)
The RCS-100 camera with otoscope lens is intended to cap-
ture digital images and videos of the eardrum.
It consists of:
• Camera handset.
• Attachable otoscope module.
• Disposable specula (default Ø 4).
The otoscope supports adjust brightness, manual/auto fo-
cus, left/right ear mode.
The picture brightness can be automatically adjusted by the
system according to the illumination intensity of the subject
in real time, and it can be adjusted manually.
The brightness level can be adjusted manually in 6 steps. Il-
lumination will turn off when the brightness level is at the
lowest level, and it will turn on when the brightness level is
more than the lowest level.
19
Содержание RCS-100
Страница 1: ...RCS 100 Gebrauchsanweisung...
Страница 13: ...RCS 100 Instruction For Use...
Страница 25: ...RCS 100 Instructions d utilisation...
Страница 37: ...RCS 100 Instrucciones de uso...
Страница 49: ...RCS 100...
Страница 51: ...51 2 3 3 3 1 3 2 3 6 2600 3 3 4 Riester RCS 100 5 Riester 7 3...
Страница 54: ...54 1 2 2800 3 5600 4 4500 5 7500 6 10 000 7 9000 8 6500 2 3 5 7 7 a 1...
Страница 60: ...60 1 RCS 100 CISPR 11 1 RCS 100 CISPR 11 B RCS 100 IEC 61000 3 2 A IEC 61000 3 3...
Страница 63: ...63 RCS 100 Istruzioni per l uso...
Страница 78: ...78...
Страница 79: ...79...


