background image

56

Endura

®

 Delta

en

Installer

8.2.1.2 

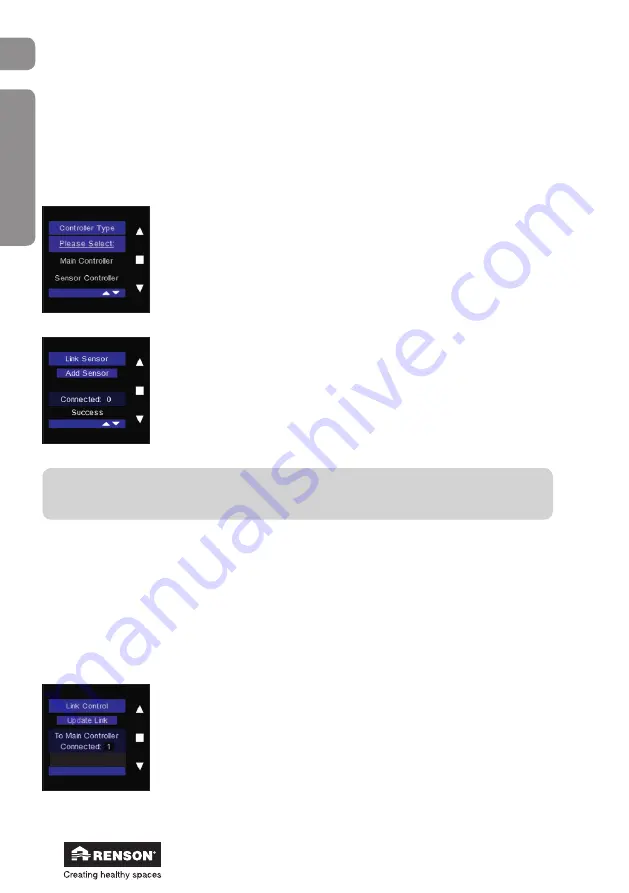
 Making the TouchDisplay the Sensor Controller

If you want to install an external TouchDisplay as an air quality sensor, you must make sure that a 

Main Controller is installed that is connected to the Endura Delta using a cable.

When connecting the air quality sensor to the mains voltage, the screen for which the 

TouchDisplay will be used as Sensor Controller appears.

Select “Main Controller” using the 

 and 

 buttons, and confirm your 

selection by tapping 

.

The/each TouchDisplay must be individually linked to the Endura Delta in 

order to achieve wireless data transmission.

The “Link Sensor” screen appears and “Add Sensor” lights up. 

It must now be linked to the Endura Delta.

Note:

A sensor can only be linked to a Main Controller! Therefore, a Main Controller must be 

installed before you can link any sensors.

Procedure:

•  The links must be done within close proximity. We recommend linking the Sensor Controller and 

Main Controller within the same room at a distance of > 3 m.

•  The link is made by individually “opening” an Endura Delta and a controller, and allowing 

them to “search” for a connection.

•  Ensure that the Main Controller is turned on (mains voltage must be live).

Then tap 

 in the TouchDisplay.

An extra line appears at the bottom of the display that says “Linking”.

Linking

Содержание Endura Delta 330

Страница 1: ...Endura Delta Installer User manual...

Страница 2: ...9 4 1 General description of the unit 9 4 2 Inspection upon delivery 9 4 3 Composition of the unit 10 4 4 Technical specifications 11 5 Dimensions 13 Endura Delta 330 T4 L standard 13 Endura Delta 330...

Страница 3: ...ins voltage 37 8 Programming the ventilation system 38 8 1 Programming using the Endura Delta app 38 8 1 1 Opening configuring the app unit 38 8 1 1 1 Connecting the Endura Delta to a Wi Fi network 39...

Страница 4: ...4 Data 97 10 2 5 Settings 97 10 2 5 1 My device 98 10 2 5 2 My app 105 10 2 5 3 My network 105 11 Using the TouchDisplay 106 11 1 Main menu 106 11 1 1 Main menu layout 106 11 1 2 Main menu basic funct...

Страница 5: ...dly manner after taking the unit out of the packaging By recycling the packaging the use of raw materials is lessened and the waste mountain is reduced Disposing of the unit Old electrical and electro...

Страница 6: ...laid down by the municipality and other bodies 3 2 Transport The necessary caution should be taken during transport and unpacking of the unit Avoid severe jostling of the unit during transport and ha...

Страница 7: ...r must take place through the roof roof ducts or through the wall wall ducts Keep in mind that the roof ducts must be sufficiently water repellent and that the drop in pressure is kept to a minimum 15...

Страница 8: ...dura Delta is equipped as standard with a frost protection mechanism see Section 10 2 5 1 3 a to prevent frost from forming in the heat exchanger When frost forms there is a decrease in your ventilati...

Страница 9: ...ers positioned to the left but can be converted to a right facing R model The unit is also available with 4 upper connections T4 or with 2 upper and 2 lower connections T2 B2 The unit is available wit...

Страница 10: ...ion 1 Connections 150 180 mm 2 Counter flow heat exchanger 3 Condensate discharge 4 Integrated control only for types 380 and 450 5 Supply fan 6 Extraction fan 7 Bypass 8 Preheater 9 Filters 10 Temper...

Страница 11: ...optional 2 x coarse G4 PM1 F7 optional 2 x coarse G4 PM1 F7 optional Controls Smartphone Tablet Optional 4 position switch Integrated TouchDisplay Smartphone Tablet Optional 4 position switch Integra...

Страница 12: ...0 700 750 800 850 900 0 25 50 75 100 125 150 175 200 225 250 275 300 325 350 375 400 425 450 475 500 P W ESP Pa 10V 8V 6V 4V Flow rate m h Fan curves for the Endura Delta 380 pressure based on flow ra...

Страница 13: ...13 Endura Delta en 5 Dimensions Endura Delta 330 T4 L standard 380 485 372 615 240 2 1 0 510 158 398 130 615 18 520 18 37 862 45 745 1 8 0 140 8...

Страница 14: ...14 Endura Delta en 380 485 372 615 240 2 1 0 510 158 398 130 615 18 520 18 37 862 45 745 1 8 0 140 8 Endura Delta 330 T4 R only possible after conversion...

Страница 15: ...15 Endura Delta en 380 485 372 615 240 2 1 0 510 158 398 130 615 18 520 18 37 862 45 745 1 8 0 140 8 Endura Delta 330 T2 B2 L standard...

Страница 16: ...16 Endura Delta en 380 485 372 615 240 2 1 0 510 158 398 130 615 18 520 18 37 862 45 745 1 8 0 140 8 Endura Delta 330 T2 B2 R only possible after conversion...

Страница 17: ...17 Endura Delta en 380 485 372 615 240 2 1 0 510 158 398 130 615 18 562 5 18 37 862 45 745 1 8 0 140 24 5 8 Endura Delta 380 450 T4 L standard...

Страница 18: ...18 Endura Delta en Endura Delta 380 450 T4 R only possible after conversion 380 485 372 615 240 2 1 0 510 158 398 130 615 18 562 5 18 37 862 45 745 1 8 0 140 24 5 8...

Страница 19: ...19 Endura Delta en Endura Delta 380 450 T2 B2 L standard 380 485 372 615 240 2 1 0 510 158 398 130 615 18 562 5 18 37 45 862 45 745 1 8 0 140 24 5 8...

Страница 20: ...20 Endura Delta en Endura Delta 380 450 T2 B2 R only possible after conversion 380 485 372 615 240 510 158 398 130 615 18 562 5 18 37 45 862 45 745 140 24 5 8 2 1 0 1 8 0...

Страница 21: ...ed to the home s waste water disposal system The Endura Delta may not be connected to a cooker exhaust hood or clothes dryer Supply and discharge for the fans must always be towards the outside The di...

Страница 22: ...for which the air speed of 3 5 m s is not exceeded Easyflex Type of room Required flow rate surface area x 3 6 m3 h Flexible duct 140 x 60 mm Fixed flattened oval 135 x 55 mm Round 125 mm Round 80 mm...

Страница 23: ...the extraction grille have not been taken into account Take a maximum loss in pressure of approx 150 Pa across the entire ventilation system into account Acoustics Certain situations require that aco...

Страница 24: ...top cover and disconnect the control panel connector from the circuit board Remove the filter covers and their filters from the unit Disconnect the control panel connector from the glass panel Remove...

Страница 25: ...xchange the front and rear plate and fix them onto the unit Make sure that the power supply and the network connection are located at the front Connect the control panel connector to the circuit board...

Страница 26: ...be level A shock absorption material can also be placed between the unit and the assembly wall Use the assembly bracket to mark where the holes must be drilled in the fixation wall Please note that th...

Страница 27: ...drainage in the air duct Air ducts that are installed in the uninsulated volume of the home must be insulated to prevent condensate from forming We recommend connecting the unit and the supply and dis...

Страница 28: ...e polluted air Therefore sufficient distance between the outdoor air supply opening and the sewer ventilation indoor air discharge opening extractor for the combustion gasses etc must be maintained Ac...

Страница 29: ...0 3 m with respect to the position of the roof ducts for roofs with an incline 30 The air supply opening must be easily accessible for cleaning when necessary After all a reduction in the feedthrough...

Страница 30: ...which the unit is supplied Place the rubber ring at the top of this pipe and screw it tight to the condensate discharge on the unit The condensate discharge must be connected to the internal sewerage...

Страница 31: ...e diameter of the duct 6 2 7 Installing the Master TouchDisplay and air quality sensors A TouchDisplay is already integrated into the unit as standard only for types 380 and 450 You can set and contro...

Страница 32: ...ings A few examples of single mounting only recess casing Lastly click in the cover for the TouchDisplay and or air quality sensor Find more information about the relevant cover from a specialist reta...

Страница 33: ...nnection 7 Bypass connection 8 T12 extract air temperature sensor 9 T22 supply air temperature sensor 10 T21 outdoor air temperature sensor 11 T21bis outdoor air temperature sensor 12 Output contact 2...

Страница 34: ...ndroid or Windows Store Windows However you can opt to install an external Master TouchDisplay This Master TouchDisplay is equipped with a CO2 sensor It is best to place this in a room where you want...

Страница 35: ...ng Zekeringskast L PE N L N Bijgeleverde voedingskabel type JT003 ST3 met IEC connector aansluiting via IEC connector bovenaan het toestel 50Hz 230V AC 10 Netvoeding Min 2 x 0 75 mm2 Imax 1 AAC Zekeri...

Страница 36: ...put contact These contacts can be used e g to activate the Fireplace function indicate a filter message on an external switch etc via an external contact See Section 8 1 1 5 or Section 8 2 3 1 for a f...

Страница 37: ...T THE INTERNET WAN PORT Connect the Ethernet cable to the port on the Endura Delta A See Section 8 1 1 3 to add the unit to your home network and continue to configure it 7 2 Connecting to the mains v...

Страница 38: ...mail for registration with all unit data Via the integrated TouchDisplay or an external Main Controller The TouchDisplay has fewer functions than the Endura Delta app Programming flow rates 8 1 Progra...

Страница 39: ...OS Android Windows allowing you to have immediate access to your personalised Renson controls using any modern smartphone tablet You can download the Endura Delta app from the app store for your opera...

Страница 40: ...connection for your router and activate this Your smartphone tablet is now successfully connected to the router 8 1 1 4 Opening the app After your smartphone tablet is connected to the network LAN or...

Страница 41: ...this registration so tap register later The main screen opens 8 1 1 5 Installer settings In order to gain access to the installer settings please follow the steps below Tap the Settings button in the...

Страница 42: ...ve configuration edit firmware change installer settings Most of the settings in this menu are for the end user As an installer you need the Installer settings Access to this menu is only granted afte...

Страница 43: ...this menu The nominal flow rate must equal the design flow rate of the home Thanks to the constant flow operation of the Endura Delta the system always operates in a balanced manner and guarantees th...

Страница 44: ...ach room separately with the programmable valves and to check the flow rates If 30 minutes was not enough time in which to finalise the programming and measurements then you can reactivate the C mode...

Страница 45: ...mperature setting if the client wants this due to specific comfort requirements c Electric preheater You can turn the electric preheater on or off using this menu Attention Not all Endura Delta units...

Страница 46: ...m h supply and discharge Upon activating the Fireplace function the supply increases to 225 m h and the discharge decreases to 175 m h so that the supply gains a difference of 50 m h The total flow r...

Страница 47: ...uirement according to NBN D50 001 Input 1 digital open contact Position 0 Turn off supply and discharge fire safety Position 1 Turn off discharge Position 2 Turn off supply unit works as a C system Po...

Страница 48: ...architect and EPB reporter After registration you will receive an email containing all the data you registered including the measurement report You will receive a configuration file with all of the s...

Страница 49: ...r the measured flow rates per room As soon as all of the fields have been completed you can finish the registration by tapping Register now Attention Your unit and smartphone tablet must be in the sam...

Страница 50: ...to send the registration form Suppose you initially answer that you want to send it later then you can find the file in the Installer menu under Installer registration Saved registration You can also...

Страница 51: ...unit or after resetting the unit The unit will take on the parameters as these were saved You can choose to save or load in the menu My device Load save configuration If you tap Save configuration the...

Страница 52: ...Display does not have all of the functions of the Master Controller The TouchDisplay is composed of three MENU levels Level 1 MAIN CONTROLLER MENU This menu allows the user to manually change the vent...

Страница 53: ...up the TouchDisplay only the first time Set the TouchDisplay as the Main Controller or Sensor Controller TouchDisplay country selection When connecting to the mains voltage the screen for which the To...

Страница 54: ...s are then set as the SENSOR Controller and communicate wirelessly with the MAIN Controller Note The correct operation of the wireless communication can be disrupted by the presence of a lot of steel...

Страница 55: ...y tapping The factory settings for your choice of country are loaded After confirming your country the Main Controller menu opens You can now begin correctly programming the Endura Delta Use the Insta...

Страница 56: ...dura Delta in order to achieve wireless data transmission The Link Sensor screen appears and Add Sensor lights up It must now be linked to the Endura Delta Note A sensor can only be linked to a Main C...

Страница 57: ...If the link is not made then Failed appears on the screen Repeat the link procedure Note After a power outage involving the Endura Delta and or the TouchDisplay both devices remain connected to one an...

Страница 58: ...ler menu in order to gain access to the relevant menus for programming the system MAIN MENU USER MENU INSTALLER MENU Briefly tap Briefly tap in the menu Settings Installer settings Briefly tap and sim...

Страница 59: ...ages to the unit or poor air quality in the home as a result of incorrect changes to the Installer settings Select Installer Settings using and and confirm by tapping You will be asked to enter an acc...

Страница 60: ...nal flow rate You can set the intensity of the four ventilation levels yourself L1 10 50 Default L1 25 L2 10 75 L2 50 L3 10 100 L3 75 L4 10 120 L4 100 E g the total required flow rate for the home is...

Страница 61: ...and and confirm by tapping To exit the menu briefly tap and simultaneously Electric Preheater optional You can turn the electric preheater on or off using this menu Please note that not all Endura De...

Страница 62: ...is temporarily over pressurised so that the fireplace burns easier and more oxygen is temporarily supplied Example you set a differential flow rate of 50 m h The unit operates balanced at a level of 2...

Страница 63: ...function Position 4 Reset filter Input 2 digital open contact Position 0 Turn off supply and discharge fire safety Position 1 Turn off discharge Position 2 Turn off supply unit works as a C system Pos...

Страница 64: ...y tapping To exit the menu briefly tap and simultaneously Reset Device You can delete the settings for the Endura Delta and reset them to the factory settings using this menu Select Reset Device using...

Страница 65: ...eck the signal strength set the CO2 threshold and reset the controls Select My Controller using and and confirm by tapping Select Controller Information using and and confirm by tapping Controller Inf...

Страница 66: ...e Select Connect Sensor using and and confirm by tapping Connect sensor You can link the Sensor Controllers to the Main Controller using this menu Tap Add Sensor using You can interrupt the link by ta...

Страница 67: ...ver is activated Tapping one of the three buttons will activate the screen again Active Time Select Brightness Active using and and confirm by tapping Use and to adjust the brightness of the screen wh...

Страница 68: ...the CO2 concentration in the room where the controller is located exceeds this value the pollution triggered ventilation level will begin to operate see 8 1 3 4 1 6 The higher you set this value the l...

Страница 69: ...ivated and the programming control is reactivated In order to change the hysteresis select Hysteresis using and and confirm by tapping You can change the value by 50 ppm using the and Confirm your cho...

Страница 70: ...thout having to change the settings Software Reset You can also choose to interrupt the link between one or more Sensor Controllers and the Main Controller Clear Sensor s In addition you can also choo...

Страница 71: ...nue with the software reset select OK using and confirm by tapping The Controller is now restarted and you will be returned to the Main menu Select Clear Sensor s on the Main Controller using and and...

Страница 72: ...et You can delete the settings for the Controller and reset them to the factory settings using this menu If you wish to continue deleting the settings select OK using and confirm by tapping Then indic...

Страница 73: ...the Repeater the signal sent by the other Controller will be transferred through another Controller that is closer to the ventilation system The Controller then signals the ventilation system To set t...

Страница 74: ...tapping This can be useful to check the signal strength To do this select Ventilation Level in the Main menu and then select Signal Strength The menu now shows you the actual values To exit the menu...

Страница 75: ...de the error code so that you can make a correct diagnosis The Error Log can be found in the Endura Delta app and on the TouchDisplay 9 1 1 Endura Delta App Error Log The menu Settings Error Code List...

Страница 76: ...is defective 1 T urn off the power for 30 seconds and then restart the unit 2 I f the error message remains try reconnecting the connectors or replace the IAQ printed circuit board 3 I f the error mes...

Страница 77: ...RH temperature too low Warning The unit continues to operate There are abnormally low temperature values detected via the SHT20 sensor 1 T urn off the power for 30 seconds and then restart the unit 2...

Страница 78: ...replaced 17 Trh Temp too low Warning The unit continues to operate T9602 sensor failure Abnormally low value detected via the T9602 sensor 1 T urn off the power for 30 seconds and then restart the un...

Страница 79: ...mains try reconnecting the connectors or replace the T12 sensor 3 I f the error message remains then the motherboard may need to be replaced 24 Exhaust air temperature T12 too high Critical warning Th...

Страница 80: ...ains try reconnecting the connectors or replace the T21bis sensor 3 I f the error message remains then the motherboard may need to be replaced 30 Outdoor air temperature T21bis too high Critical warni...

Страница 81: ...s check the supply fan wiring 3 I f the error message remains then the motherboard or the supply fan itself may need to be replaced 36 Exhaust fan tacho error Critical warning The unit has stopped wor...

Страница 82: ...re openings Check to see if there are any obstructions or build up present 3 I f there are no obstructions or build up present then the motherboard may need to be replaced 42 Exhaust pressure sensor r...

Страница 83: ...f the error message remains make sure the Bypass is working 48 Extract air T11ANA temperature too low Critical warning The unit has stopped working Abnormally low temperatures detected via the tempera...

Страница 84: ...off the power for 30 seconds and then restart the unit 2 I f the error message remains try reconnecting the connectors or replace the CO 2 printed circuit board 3 I f the error message remains then t...

Страница 85: ...learly mark which filter was on top and which filter was on bottom and in which direction they are placed so that it is easy to return them to the correct position after cleaning Clean the filters usi...

Страница 86: ...re removed from the unit Close the filters using the filter caps Make sure that the filter caps are put back into the correct position to ensure the airtightness of the unit Restart the unit by turnin...

Страница 87: ...that the power cable for the built in TouchDisplay has been disconnected before removing the glass panel Remove the front panel by unscrewing the 3 screws at the bottom Then slide the front panel up...

Страница 88: ...heat exchanger from the unit by pulling on the strip Clean the heat exchanger with warm water max 40 C and washing up liquid Do not use any aggressive or solvent based cleaners Rinse the heat exchang...

Страница 89: ...Delta to your home network 10 1 1 Connecting the Endura Delta to a Wi Fi network Connect the router to the Endura Delta using a category 5 Ethernet cable RJ45 Plug the router in and turn it on Check t...

Страница 90: ...g the Wi Fi The Endura Delta must be connected to the Wi Fi network in order to operate configure the Endura Delta using the Renson Ventilation app If there is no Wi Fi connection available on site th...

Страница 91: ...ain Ensure that your smartphone is connected to the correct network If you are outside of the network s range the screen above appears Go somewhere where you are within the network s range and retry t...

Страница 92: ...ps The Renson Endura Delta Ventilation app is divided into four user friendly submenus Home Timer Schedule Data which you can select from the Navigation Bar This is covered fully in this chapter so th...

Страница 93: ...eeze Holiday Time limit specified by the user FIRE PLACE FROST PROTECTION The number of bars indicates the intensity of the ventilation Activation of the Holiday function puts the ventilation system i...

Страница 94: ...tem to deviate from the pre programmed ventilation level for a certain amount of time You can choose between Timer mode Manual Breeze and Holiday mode Tip If you drag the slider in the Home menu you c...

Страница 95: ...een measured if you set this in the menu Settings My Device Breeze However if you opt to manually activate the Breeze mode then the Endura Delta will not take any temperature differences into account...

Страница 96: ...point that you configured in the Schedule tab You can then choose for yourself the ventilation level that you desire at which time of the day There is a total of six programmable program points You ca...

Страница 97: ...ventilation level Total supply flow rate Total extraction flow rate Time until filter replacement Outdoor air temperature Indoor air temperature Relative humidity level Air quality expressed in ppm Gr...

Страница 98: ...and firmware number a Choice of country You can change the regional settings using this menu Every country has a specific configuration for the unit based on the applicable ventilation requirements Th...

Страница 99: ...atus for the supply fan If Active is displayed then the supply fan has been activated If Inactive is displayed then the supply fan has been deactivated and you must check to see if an error message ha...

Страница 100: ...nder control If there is a preheater available then an imbalance will never arise between the supply and extraction flow rates If there is still a risk that the heat exchanger could freeze after the a...

Страница 101: ...air is blown in unheated but the actual ventilation level according to the programming control is maintained Therefore the ventilation level is not adjusted The Breeze function can also be manually ac...

Страница 102: ...d ventilation level can have varying levels of intensity during the day or night periods Use this menu to define the start and end time for the day and night periods Use the Indoor Air Pollution menu...

Страница 103: ...an activate the C mode design position using this menu If the C mode is active then the Endura Delta will nominally ventilate for 30 minutes You can calibrate the system during this half hour by adjus...

Страница 104: ...firmware You can use this menu to check if recent updates are available for your ventilation unit If there is an update available then we recommend that you run this This way you always have the most...

Страница 105: ...IP properties and carry out the registration using this menu a Add change devices You can choose which unit you want to link into the network using this menu Normally there will only be one unit in y...

Страница 106: ...vel P set program point A set program point is exceeded by a sensor value M manual mode is activated via the 4 position switch Frost Protection is active Fireplace function is active Error message The...

Страница 107: ...on level for a period of 30 minutes You can do this by using the or in the Main menu to increase or decrease the ventilation level A timer will start For 30 minutes the ventilation system will ventila...

Страница 108: ...UTO Note The Endura Delta demand control RH VOC is only active in automatic mode In the Manual mode you can choose a fixed ventilation level for a specific period of time This manual mode does not tak...

Страница 109: ...oller Information Reset Controller My Device My Device C mode Restart Device Installer Settings Connect Sensor Display Settings Day Night Settings Pollution Settings Clock Settings Error Log Device In...

Страница 110: ...As soon as you start the timer the ventilation system will start ventilating at the selected level You can choose between level 1 min level 2 level 3 level 4 max Holiday and Breeze see below in this...

Страница 111: ...mum ventilation position in order to keep your energy consumption to a minimum Select Holiday using and in the Timer menu and confirm by tapping The Return Date bar appears under Holiday Enter the dat...

Страница 112: ...nd confirm by tapping You can set the time intervals for the timer in the duration by first briefly tapping and then using and to change the time in 5 minute intervals The maximum time for a timer is...

Страница 113: ...erent weekly programs and confirm by tapping You can choose to set a program per week MO SU per work week MO FRI per weekend SA SU or individually per day MON TUE WED THU FRI SAT SUN Set the first pro...

Страница 114: ...nges To delete programmed program points use and to select the program point to be deleted in the Schedule menu and tap Edit lights up Use or to navigate to Remove and tap once more to delete the prog...

Страница 115: ...is bar 11 1 3 3 1 Active mode The total exhaust flow rate for the home is displayed in this bar This is the sum of all the extraction flow rates in your home all wet rooms Given that the Endura Delta...

Страница 116: ...increase temporarily when taking a shower bath or intensive cooking 11 1 3 3 6 Relative humidity level This bar displays the indoor air quality VOC expressed in ppm particles per million the air qual...

Страница 117: ...ilable from the Main and Sensor Controllers Select Settings in the USER MENU and confirm by tapping Select My Device using and and confirm by tapping 11 1 3 4 1 My device You can use this menu to chan...

Страница 118: ...on warranty number and firmware number This is the only menu under My device on a Sensor Controller You can find other menus under this in the Main Controller as described below a Region You can find...

Страница 119: ...ilter using and and confirm by tapping If you tap then the filter timer is deleted and the timer starts over again Do not forget to reset the filter timer after replacing the filters This way you are...

Страница 120: ...you the status for several elements in the Endura Delta You cannot change any of the settings in this menu a Supply Fan This menu displays the status for the extraction fan If Active is displayed then...

Страница 121: ...frost shutdown As soon as temperatures allow the unit will return to normal operation automatically For Endura Delta with preheater If there is a risk that the heat exchanger could freeze then the pr...

Страница 122: ...ireplace function the supply increases to 225 m h and the discharge decreases to 175 m h so that the supply gains a difference of 50 m h You can activate the automatic Breeze function and set the para...

Страница 123: ...inside Tap to enable the automatic Breeze function The parameter settings appear You can then set the Breeze temperature and the Breeze level To exit the menu briefly tap and simultaneously Select Tem...

Страница 124: ...ty rises then the pollution triggered ventilation level is activated This ventilation level is maintained until the quality of the air is back under control You can set the intensity of this pollution...

Страница 125: ...evel Select the internal RH sensor control using and and confirm by tapping You can now use and to turn the Endura Delta internal humidity sensor ON or OFF The humidity sensor is activated as standard...

Страница 126: ...nything that these sensors may detect Select the external AQ sensor control using and and confirm by tapping You can now use and to turn the Endura Delta external air quality sensors ON or OFF Externa...

Страница 127: ...d simultaneously You can delete the old error messages by tapping Clear Tap to clear the list and restart the unit 11 1 3 4 1 9 C Mode You can activate the C mode design position using this menu If th...

Страница 128: ...automatic mode Select Restart Device using and and confirm by tapping Use to select OK in order to restart the Endura Delta Confirm by tapping The unit is now restarted 11 1 3 4 1 10 Restart Device R...

Страница 129: ...e Reset Filter function after you have cleaned replaced the filters The time interval for the filter time is then restarted After this time interval ends you will receive another message stating that...

Страница 130: ...filters from the openings be sure to clearly mark which filter was on top and which filter was on bottom and in which direction they are placed so that it is easy to return them to the correct positio...

Страница 131: ...the power cable for the built in TouchDisplay has been disconnected before removing the glass panel Remove the front panel by unscrewing the 3 screws at the bottom Then slide the front panel up so th...

Страница 132: ...exchanger from the unit by pulling on the strip Clean the heat exchanger with warm water max 40 C and washing up liquid Do not use any aggressive or solvent based cleaners Rinse the heat exchanger we...

Страница 133: ...residential ventilation supply and extraction vents EN 13141 2 Testing components residential ventilation supply and extraction grills EN 13141 4 Testing components residential ventilation fan ISO 374...

Страница 134: ...ris the injection of other products than the appropriate products use of aggressive liquids or solvents defects resulting from incorrect or abnormal usage small imperfections in the finish that have n...

Страница 135: ...N installer stating the warranty number and manufacturing date to request that your unit be serviced for maintenance This is where the sticker bearing the unique number for this Endura Delta will be a...

Страница 136: ...136 Endura Delta en...

Страница 137: ...137 Endura Delta en...

Страница 138: ...138 Endura Delta en...

Страница 139: ...139 Endura Delta en...

Страница 140: ...e portraying our corporate mission No speed limit on innovation A multidisciplinary team of more than 90 R D employees continually optimize our products and develop new and innovative concepts Strong...

Отзывы: