


D12281-3
3
4
1
2
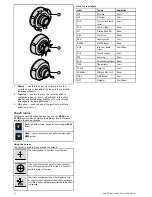
Screen item
Description
1
Back
— On touchscreen displays (New e Series and New
a series) you can press the on-screen
<<
(back) icon to go
back to a previous menu. (On New c Series displays use
the
Back
button.
2
Close
— On touchscreen displays (New e Series and New
a series) you can press the on-screen
X
(close) icon to go
back to a previous menu. (On New c Series displays use
the
Back
button to back out of the menu structure.
3
On / Off switch
— On touchscreen displays (New e Series
and New a series) you can select on-screen menu items to
switch features On or Off to enable or disable the function.
(On New c Series displays use the
OK
button to switch
the function On or Off.
4
Scroll bar
— indicates that further menu items are available
by scrolling the menu. On touchscreen displays (New e
Series and New a series) to scroll through the available
menu items, press and hold your finger on the menu and
drag it up or down. (On New c Series displays use the
Rotary control
.
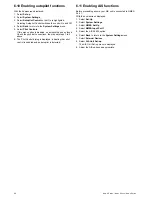
Using menu dialogs
Menu dialogs are full-screen menus that enable you to manage
data items such as waypoints and routes.
The following diagram shows the main features of a standard
menu:
D
12277-1
1
4
5
6
2
3
Screen item
Description
1
Back
• Touchscreen — Select the on-screen
Back
icon to
go back to the previous menu.
• Non–touchscreen — Use the
Back
button to go back
to the previous menu.
2
Menu item
• Touchscreen — Momentarily touching a menu item
highlights and automatically selects the item. To
scroll a menu, touch a menu item and hold your
finger down on the item while dragging your finger
up or down
• Non–touchscreen — Use the
Rotary control
to
highlight an item, and the
Ok
button to select it. To
scroll a menu, use the
Rotary control
.
3
Function icon
— Some menu dialogs include an icon
which can be selected to access additional functions.
For example, in the Waypoint Group List menu dialog,
the
Add New
icon can be used to add a new Waypoint
group.
4
Close
— On Touchscreen displays you can select
this icon to close the menu(s). The close icon is not
available on non-touchscreen displays.
5
Scroll bar
• Touchscreen — To scroll through the available menu
items, press and hold your finger on the menu to
drag it up or down.
• Non-touchscreen — To scroll through the available
menu items, use the
Rotary control
.
6
Options
— Select a menu item to access more options
for that item. For example, in the Waypoint Group list
you can select a menu item to view the waypoints in the
group, edit the group name, or erase the group.
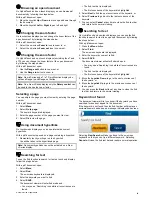
Using list dialogs
List dialogs are full-screen menus that display the details for
specific types of data, such as Waypoints.
The following diagram shows the main features of a list dialog:
D
12278-1
1
3
4
5
2
Screen item
Description
1
Back
• Touchscreen — Select the on-screen
Back
icon to
go back to the previous menu.
• Non–touchscreen — Use the
Back
button to go back
to the previous menu.
2
Sort icon
— Some list dialogs include an icon which
can be selected to sort the items in the list. For
example, in the Waypoint List you can sort the list by
name, range, group, symbol, and so on.
84
New a Series / New c Series / New e Series
Содержание a67
Страница 2: ......
Страница 4: ......
Страница 8: ...8 New a Series New c Series New e Series...
Страница 12: ...12 New a Series New c Series New e Series...
Страница 20: ...20 New a Series New c Series New e Series...
Страница 36: ...36 New a Series New c Series New e Series...
Страница 70: ...70 New a Series New c Series New e Series...
Страница 100: ...100 New a Series New c Series New e Series...
Страница 110: ...110 New a Series New c Series New e Series...
Страница 113: ...Chapter 12 Fuel manager Chapter contents 12 1 Fuel manager overview on page 114 Fuel manager 113...
Страница 116: ...116 New a Series New c Series New e Series...
Страница 158: ...158 New a Series New c Series New e Series...
Страница 182: ...182 New a Series New c Series New e Series...
Страница 204: ...204 New a Series New c Series New e Series...
Страница 214: ...214 New a Series New c Series New e Series...
Страница 236: ...236 New a Series New c Series New e Series...
Страница 237: ...Chapter 21 Camera application Chapter contents 21 1 Camera application overview on page 238 Camera application 237...
Страница 240: ...240 New a Series New c Series New e Series...
Страница 260: ...260 New a Series New c Series New e Series...
Страница 290: ...290 New a Series New c Series New e Series...
Страница 306: ...306 New a Series New c Series New e Series...
Страница 309: ...Chapter 30 Technical specification Chapter contents 30 1 Technical specification on page 310 Technical specification 309...
Страница 314: ...314 New a Series New c Series New e Series...
Страница 329: ......
Страница 330: ...www raymarine com...