


19.5 Image adjustments
Adjusting the thermal camera image
With the thermal camera application displayed:
1. Select
Menu
.
2. Select
Adjust Contrast
.
3. Select the Contrast, Brightness, or Color option as
appropriate.
The relevant numeric adjust control is displayed.
4. Adjust the value as required.
5. Select
Back
or
Ok
to confirm the new value.
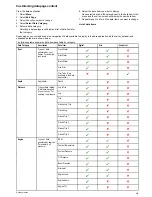
Thermal camera scene presets
Scene presets enable you to quickly select the best image
setting for the current environmental conditions.
During normal operation the thermal camera automatically
adjusts itself to provide a high-contrast image optimized for most
conditions. The Scene presets provide 4 additional settings that
may provide better imagery in certain conditions. The 4 modes
are:
Night Running
— scene preset mode for night
conditions.
Day Running
— scene preset mode for daytime
conditions.
Night Docking
— scene preset mode for night docking.
Search
— scene preset mode for identifying people or
objects in the water.
Although the preset names indicate their intended use, varying
environmental conditions might make another setting more
preferable. For example, the night running scene preset might
also be useful while in a harbor. You may find it beneficial to
experiment with the different scene presets to discover the best
preset to use for different conditions.
Changing the thermal camera scene preset
With the thermal camera application displayed:
1. Select
Menu
.
2. Select
Image Options
.
3. Use the
Scene
menu item to switch between the available
scene presets, as appropriate.
Thermal camera color modes
A range of color modes are available to help you distinguish
objects on-screen in different conditions.
Changing the color mode switches the thermal camera image
between a greyscale mode and 1 or more color modes. There
are 5 color modes available.
The factory default color mode is red, which may improve your
night vision. This default mode can be changed if required using
the camera's on-screen
Video Setup
menu.
Note:
If you have the Disable Color Thermal Video option
selected in the camera's on-screen
Video Setup
menu, only
2 color modes are available — greyscale and red.
Changing the thermal camera color mode
With the thermal camera application displayed:
1. Select
Menu
.
2. Select
Image Options
.
3. Use the
Colour
menu item to switch between the available
color palettes, as appropriate.
Thermal camera reverse video
You can reverse the polarity of the video image to change the
appearance of objects on-screen.
The reverse video option (video polarity) switches the thermal
image from white-hot (or red-hot if the color mode setting is
active) to black-hot. The difference between white-hot and
black-hot is shown below:
White-hot thermal image.
Black-hot thermal image.
You may find it useful to experiment with this option to find the
best setting to suit your needs.
Enabling thermal camera reverse video
With the thermal camera application displayed:
1. Select
Menu
.
2. Select
Image Options
.
3. Select
Reverse Video
.
Thermal and visible-light operation
“Dual payload” thermal cameras are equipped with 2 cameras —
a thermal imaging (infrared) camera and a visible-light camera.
Thermal camera
— provides
night-time imagery, based
on temperature differences
between objects. Thermal
imaging produces a clear
image even in total darkness.
Visible-light camera
—
provides black and white (or
greyscale) imagery during
the day and in low-light
conditions. Helps to improve
navigational abilities in
low-light conditions; for
example during twilight
hours when operating along
intercoastal waterways and
near harbor entrances.
Note:
The T470SC and
T473SC have a color
camera and continuous
zoom lens.
Switching between thermal and visible-light camera lenses
With the thermal camera application displayed:
1. Select
Menu
.
2. Select
Image Options
.
220
New a Series / New c Series / New e Series
Содержание a67
Страница 2: ......
Страница 4: ......
Страница 8: ...8 New a Series New c Series New e Series...
Страница 12: ...12 New a Series New c Series New e Series...
Страница 20: ...20 New a Series New c Series New e Series...
Страница 36: ...36 New a Series New c Series New e Series...
Страница 70: ...70 New a Series New c Series New e Series...
Страница 100: ...100 New a Series New c Series New e Series...
Страница 110: ...110 New a Series New c Series New e Series...
Страница 113: ...Chapter 12 Fuel manager Chapter contents 12 1 Fuel manager overview on page 114 Fuel manager 113...
Страница 116: ...116 New a Series New c Series New e Series...
Страница 158: ...158 New a Series New c Series New e Series...
Страница 182: ...182 New a Series New c Series New e Series...
Страница 204: ...204 New a Series New c Series New e Series...
Страница 214: ...214 New a Series New c Series New e Series...
Страница 236: ...236 New a Series New c Series New e Series...
Страница 237: ...Chapter 21 Camera application Chapter contents 21 1 Camera application overview on page 238 Camera application 237...
Страница 240: ...240 New a Series New c Series New e Series...
Страница 260: ...260 New a Series New c Series New e Series...
Страница 290: ...290 New a Series New c Series New e Series...
Страница 306: ...306 New a Series New c Series New e Series...
Страница 309: ...Chapter 30 Technical specification Chapter contents 30 1 Technical specification on page 310 Technical specification 309...
Страница 314: ...314 New a Series New c Series New e Series...
Страница 329: ......
Страница 330: ...www raymarine com...