


•
Stop Goto
•
Restart XTE
•
Advance Waypoint
•
Measure
•
Build Route
•
Acquire Target
(only available if Radar overlay is switched
on.)
•
Slew thermal camera
(only available when thermal camera
is connected and operating.)
Accessing the context menu
You can access the context menu by following the steps below.
1. New e Series or New c Series:
i.
Selecting a location, object or target on-screen and
pressing the
Ok
button.
2. Touchscreen multifunction displays:
i.
Selecting an object or target on-screen.
ii. Selecting and holding on a location on-screen.
Waypoint features
There are a range of features for placing, navigating and
managing waypoints.
Waypoint features are accessed from:
•
the waypoint context menu
— by positioning the cursor over
an existing waypoint on the screen.
•
any application
— by pressing the
WPT
button (New c Series
and New e Series) or the
WPT
icon (New a Series). This
displays the
Waypoints
menu.
•
the chart application
— by going to the following menu:
Menu > My Data
.
•
the homescreen
— by going to the following menu:
My Data
.
Note:
Pressing the
WPT
button or the
WPT
icon from the
homescreen will open the waypoint list.
Waypoint (MOB) button / icon
Depending on the multifunction display variant there will be
either a Waypoint (MOB) button or an on-screen icon.
WPT button
• New c Series
• New e Series
WPT icons
• New a Series
Throughout this manual the term: Select
WPT
, refers to pressing
the physical
WPT
button or pressing the on-screen
WPT
icon.
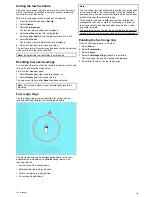
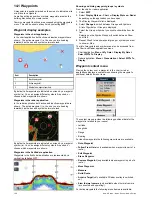
Waypoint placement
Placing a waypoint
You can place a waypoint on a touchscreen multifunction
displays by following the steps below.
D
11763-2
From the chart, radar or fishfinder application:
1. Select and hold the required location on screen.
The context menu is displayed.
2. Select
Place Waypoint
.
Placing a waypoint
From the chart, radar or fishfinder application:
1. Position the cursor at the required position.
2. Press the
WPT
button.
The chart context menu is displayed.
3. Select
Place Waypoint
.
The waypoint is placed at the location and a confirmation
pop up message is displayed.
4. Select
Ok
to confirm waypoint placement, or
Edit
to edit the
waypoint details.
Placing a waypoint at your vessel's position
In addition to positional information, a waypoint placed at the
vessel position will capture temperature and sounded depth
information (if you have the appropriate sensors connected to
your system).
From the chart, radar or fishfinder application:
1. Select
WPT
.
The waypoint menu is displayed.
2. Select
WPT
again.
A confirmation pop up message is displayed.
3. Select
Ok
to place the waypoint, or Edit to edit the waypoint
details.
Note:
Alternatively with the waypoint menu displayed you can
select
Place Waypoint At Vessel
.
Placing a waypoint at a known position
You can place a waypoint at a specified location using latitude
and longitude coordinates:
1. Select
WPT
.
2. Select
Place Waypoint At Lat/Lon
.
3. Select the
Position
field.
4. Enter the Latitude/Longitude position.
5. Select
SAVE
.
6. You can also add a name for the waypoint and add to a group
by selecting the
Name
and
Group
fields.
Navigation
Navigating to a location on the chart
From the chart application:
1. Select the required location on-screen.
The chart context menu is displayed.
2. Select
Goto Cursor
.
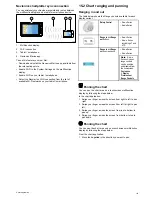
Navigating to the cursor position on the chart using the
menu
D
11764-2
From the chart application:
1. Position the cursor at the desired destination on the chart.
2. Select
Menu
.
3. Select
Navigate
.
4. Select
Goto Cursor
.
Waypoints, Routes and Tracks
129
Содержание a67
Страница 2: ......
Страница 4: ......
Страница 8: ...8 New a Series New c Series New e Series...
Страница 12: ...12 New a Series New c Series New e Series...
Страница 20: ...20 New a Series New c Series New e Series...
Страница 36: ...36 New a Series New c Series New e Series...
Страница 70: ...70 New a Series New c Series New e Series...
Страница 100: ...100 New a Series New c Series New e Series...
Страница 110: ...110 New a Series New c Series New e Series...
Страница 113: ...Chapter 12 Fuel manager Chapter contents 12 1 Fuel manager overview on page 114 Fuel manager 113...
Страница 116: ...116 New a Series New c Series New e Series...
Страница 158: ...158 New a Series New c Series New e Series...
Страница 182: ...182 New a Series New c Series New e Series...
Страница 204: ...204 New a Series New c Series New e Series...
Страница 214: ...214 New a Series New c Series New e Series...
Страница 236: ...236 New a Series New c Series New e Series...
Страница 237: ...Chapter 21 Camera application Chapter contents 21 1 Camera application overview on page 238 Camera application 237...
Страница 240: ...240 New a Series New c Series New e Series...
Страница 260: ...260 New a Series New c Series New e Series...
Страница 290: ...290 New a Series New c Series New e Series...
Страница 306: ...306 New a Series New c Series New e Series...
Страница 309: ...Chapter 30 Technical specification Chapter contents 30 1 Technical specification on page 310 Technical specification 309...
Страница 314: ...314 New a Series New c Series New e Series...
Страница 329: ......
Страница 330: ...www raymarine com...