


17.12 Fishfinder display modes
Selecting a fishfinder display mode
From the fishfinder application:
1. Select
Menu
.
2. Select
Display Mode
.
3. With dual frequency preset set, select
Adjust
to select which
frequency display you wish to change.
Selecting Adjust in Dual frequency preset will switch between
Frequency 1 and Frequency 2.
4. Select the
Select Mode
menu item.
5. Select the required display mode:
• None
• Zoom
• Bottom Lock
• A-Scope
Fishfinder zoom mode
The zoom display mode magnifies a region of the fishfinder
screen to display more detail.
This zoom option enables you to:
• Replace the standard fishfinder image with the zoomed image,
or display the zoomed image alongside the standard fishfinder
image.
• Set the zoom factor to a predefined level, or adjust it manually.
• Reposition the zoomed portion of the image to a different point
in the display.
When the range increases, the area shown in the zoom window
also increases.
Zoom split
With the zoom display mode you can split the screen and
display the zoomed image alongside the standard fishfinder
image (ZOOM SPLIT). The zoomed section is indicated on the
standard fishfinder screen by a zoom box.
Selecting split screen in zoom mode
From the fishfinder application, with the zoom display mode
selected:
1. Select
Menu
.
2. Select
Display Mode
.
3. Select
Zoom
so that Split is highlighted.
Selecting Zoom will switch between Split and Full.
Adjusting the fishfinder zoom factor
When the zoom function is active (Zoom Full or Zoom Split), you
can either select a predefined zoom factor or adjust it manually.
From the fishfinder application, with Zoom preset selected:
1. Select
Menu
.
2. Select
Display Mode
.
3. Select
Zoom Factor
.
4. Select a preset Zoom Factor (
x2
,
x3
,
x4
) or select
Manual
Once selection is made you will be returned to the Display
Mode menu.
5. If Manual is chosen select
Manual Zoom
The manual zoom factor dialog is displayed.
6. Adjust the setting to the required value.
7. Select
Back
or use the
Ok
button to confirm the setting.
Adjusting the position of the fishfinder zoomed area
When the zoom function is selected, the system automatically
selects the zoom position so that the bottom details are always
in the lower half of the display. If required you can reposition
the portion of the image to be zoomed so that an alternative
area is displayed.
From the fishfinder application, with Zoom preset selected:
1. Select
Menu
.
2. Select
Display Mode
.
3. Select
Zoom Position
.
The zoom position menu is displayed.
4. Select
Zoom Position
.
Selecting the zoom position displays the zoom position slider
bar control.
5. Adjust the setting to the required value, or select Auto to
switch to automatic.
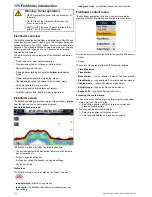
Fishfinder A-Scope mode
The A-Scope mode enables you to view a live (rather than
historical) image of the seabed and fish directly below your
vessel.
The standard fishfinder display shows a historical record of
fishfinder echoes. If required, you can display a live image of the
bottom structure and the fish directly below the transducer by
using the A-Scope feature. The width of the bottom covered by
the A-Scope is indicated at the bottom of the window. A-Scope
provides a more precise and easier to interpret indication of the
target strength.
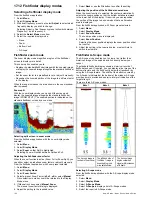
There are three A-Scope modes:
Mode 1
Mode 2
Mode 3
The A-scope image is
centred in the window.
The left-hand side of
the Mode 1 image is
expanded to give a
more detailed view.
The A-scope image
angles outward as
signal width increases
with depth.
Selecting A-Scope mode
From the fishfinder application, with the A-Scope display mode
selected:
1. Select
Menu
.
2. Select
Display Mode
.
3. Select
A-Scope Mode
.
4. Select
A-Scope
to display a list of A-Scope modes.
5. Select the required A-Scope mode.
192
New a Series / New c Series / New e Series
Содержание a67
Страница 2: ......
Страница 4: ......
Страница 8: ...8 New a Series New c Series New e Series...
Страница 12: ...12 New a Series New c Series New e Series...
Страница 20: ...20 New a Series New c Series New e Series...
Страница 36: ...36 New a Series New c Series New e Series...
Страница 70: ...70 New a Series New c Series New e Series...
Страница 100: ...100 New a Series New c Series New e Series...
Страница 110: ...110 New a Series New c Series New e Series...
Страница 113: ...Chapter 12 Fuel manager Chapter contents 12 1 Fuel manager overview on page 114 Fuel manager 113...
Страница 116: ...116 New a Series New c Series New e Series...
Страница 158: ...158 New a Series New c Series New e Series...
Страница 182: ...182 New a Series New c Series New e Series...
Страница 204: ...204 New a Series New c Series New e Series...
Страница 214: ...214 New a Series New c Series New e Series...
Страница 236: ...236 New a Series New c Series New e Series...
Страница 237: ...Chapter 21 Camera application Chapter contents 21 1 Camera application overview on page 238 Camera application 237...
Страница 240: ...240 New a Series New c Series New e Series...
Страница 260: ...260 New a Series New c Series New e Series...
Страница 290: ...290 New a Series New c Series New e Series...
Страница 306: ...306 New a Series New c Series New e Series...
Страница 309: ...Chapter 30 Technical specification Chapter contents 30 1 Technical specification on page 310 Technical specification 309...
Страница 314: ...314 New a Series New c Series New e Series...
Страница 329: ......
Страница 330: ...www raymarine com...