


6.1 Display power
Powering the display on
1. Press the
POWER
button.
2. Select
Accept
to acknowledge the disclaimer message.
Powering the display on
1. Press the
POWER
button.
2. Press the
OK
button to accept the disclaimer message.
Powering the display off
1. Press and hold the
POWER
button until the countdown
reaches zero.
Note:
If the
POWER
button is released before the countdown
reaches zero, the power off is cancelled.
Standby (PowerSave) mode
In PowerSave mode all functions of the multifunction display
remain active, but the unit is placed into a low power state. The
LED lights around the Rotary controller will blink once every
1.5 seconds to indicate that the unit is in PowerSave mode.
PowerSave mode is cancelled by pressing a physical button or
when an alarm event occurs.
D12367-1
Note:
To ensure user safety the PowerSave feature will not
be available if any connected radars are switched on.
Enabling PowerSave mode
To enable PowerSave mode follow the steps below.
1. Ensure any radars connected to the system are switched off.
2. Press the
POWER
button.
The shortcuts menu is displayed.
3. Select
PowerSave Mode
.
The multifunction displays is now in PowerSave mode.
4. You can wake the unit from PowerSave mode at anytime by
pressing a physical button on the multifunction display.
Note:
PowerSave mode is automatically cancelled if an alarm
event occurs.
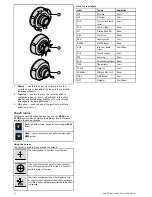
6.2 New a Series Controls
D12577-1
3
1
2
1.
Touchscreen
— touch the screen to operate functions,
including all menu operations.
2.
Power
— press once to switch the unit ON. Once powered
on, press the Power button again to adjust the brightness,
perform a screen capture, access Powersave mode or
access the power controls for external devices. Press and
hold to switch the unit OFF.
3.
Chart card slot
— open the card door to insert or remove
an MicroSD card. There is 1 card slot, used for electronic
charts and archiving waypoint, route and track data.
72
New a Series / New c Series / New e Series
Содержание a67
Страница 2: ......
Страница 4: ......
Страница 8: ...8 New a Series New c Series New e Series...
Страница 12: ...12 New a Series New c Series New e Series...
Страница 20: ...20 New a Series New c Series New e Series...
Страница 36: ...36 New a Series New c Series New e Series...
Страница 70: ...70 New a Series New c Series New e Series...
Страница 100: ...100 New a Series New c Series New e Series...
Страница 110: ...110 New a Series New c Series New e Series...
Страница 113: ...Chapter 12 Fuel manager Chapter contents 12 1 Fuel manager overview on page 114 Fuel manager 113...
Страница 116: ...116 New a Series New c Series New e Series...
Страница 158: ...158 New a Series New c Series New e Series...
Страница 182: ...182 New a Series New c Series New e Series...
Страница 204: ...204 New a Series New c Series New e Series...
Страница 214: ...214 New a Series New c Series New e Series...
Страница 236: ...236 New a Series New c Series New e Series...
Страница 237: ...Chapter 21 Camera application Chapter contents 21 1 Camera application overview on page 238 Camera application 237...
Страница 240: ...240 New a Series New c Series New e Series...
Страница 260: ...260 New a Series New c Series New e Series...
Страница 290: ...290 New a Series New c Series New e Series...
Страница 306: ...306 New a Series New c Series New e Series...
Страница 309: ...Chapter 30 Technical specification Chapter contents 30 1 Technical specification on page 310 Technical specification 309...
Страница 314: ...314 New a Series New c Series New e Series...
Страница 329: ......
Страница 330: ...www raymarine com...