


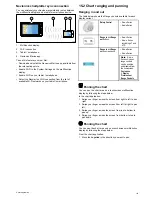


1. Use the
Range In
and
Range Out
buttons to range in and
out of the chart.
Adjusting chart range while building a route
From the Build Route menu:
1. Use the on-screen
Range In
and
Range Out
icons to range
in and out of the chart.
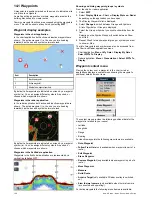
Build a route from a track
You can create a route from a recorded track.
When a track is converted the system creates the closest route
through the recorded track, using the minimum number of
waypoints. Each waypoint created will be saved with the depth
and temperature data (if applicable) for that position.
D
11752-2
Note:
If a track break occurs, only the last segment is
converted to a route.
Building a route from a track
From the Track List:
• accessed from the homescreen:
My Data > Track List
• accessed from the chart application:
Menu > My Data >
Track List
1. Select the Track you want to convert to a route.
The track options dialog is displayed.
2. Select
Create Route From Track
.
On completion, the maximum deviation of the route from the
recorded track is displayed in a dialog and the new route is
added to the route list. It can now be displayed, edited and
erased etc. in the same way as other routes in the system.
3. Select
Ok
to confirm.
4. Select
Edit
to change the name and line color of the created
route.
Building a route from a track displayed on the chart
From the chart application:
1. Select the required track.
The track context menu is displayed.
2. Select
Create Route From Track
.
On completion, the maximum deviation of the route from the
recorded track is displayed in a pop up message and the
new route is added to the route list. It can now be displayed,
edited and erased etc. in the same way as other routes in
the system.
3. Select
Ok
to confirm.
4. Select
Edit
to change the name and line color of the created
route.
Route context menu
Placing the cursor over a route in the chart application displays
a context menu showing the leg of the route highlighted by the
cursor and menu items.
The context menu provides the following menu items:
•
Follow Route
•
Follow Route In Reverse
•
Hide Route
•
Insert Waypoint
•
Edit Route
•
Erase Route
•
Add Route Leg
•
Acquire Target
(only available if Radar overlay is switched
on.)
When following a route the context menu options change to:
•
Stop Follow
•
Restart XTE
•
Advance Waypoint
•
Insert Waypoint
•
Edit Route
•
Erase Route
— Disabled
•
Add Route Leg
•
Acquire Target
(only available if Radar overlay is switched
on.)
Accessing the context menu
You can access the context menu by following the steps below.
1. New e Series or New c Series:
i.
Selecting a location, object or target on-screen and
pressing the
Ok
button.
2. Touchscreen multifunction displays:
i.
Selecting an object or target on-screen.
ii. Selecting and holding on a location on-screen.
Navigating a route
You can follow any route stored on the display. When following
a route you visit each waypoint in order. You may also use the
follow route options in conjunction with a compatible autopilot to
automatically navigate along your chosen route.
D
11751-2
There are a number of ways to select the follow route option:
• Using a stored route within the route list.
134
New a Series / New c Series / New e Series
Содержание a67
Страница 2: ......
Страница 4: ......
Страница 8: ...8 New a Series New c Series New e Series...
Страница 12: ...12 New a Series New c Series New e Series...
Страница 20: ...20 New a Series New c Series New e Series...
Страница 36: ...36 New a Series New c Series New e Series...
Страница 70: ...70 New a Series New c Series New e Series...
Страница 100: ...100 New a Series New c Series New e Series...
Страница 110: ...110 New a Series New c Series New e Series...
Страница 113: ...Chapter 12 Fuel manager Chapter contents 12 1 Fuel manager overview on page 114 Fuel manager 113...
Страница 116: ...116 New a Series New c Series New e Series...
Страница 158: ...158 New a Series New c Series New e Series...
Страница 182: ...182 New a Series New c Series New e Series...
Страница 204: ...204 New a Series New c Series New e Series...
Страница 214: ...214 New a Series New c Series New e Series...
Страница 236: ...236 New a Series New c Series New e Series...
Страница 237: ...Chapter 21 Camera application Chapter contents 21 1 Camera application overview on page 238 Camera application 237...
Страница 240: ...240 New a Series New c Series New e Series...
Страница 260: ...260 New a Series New c Series New e Series...
Страница 290: ...290 New a Series New c Series New e Series...
Страница 306: ...306 New a Series New c Series New e Series...
Страница 309: ...Chapter 30 Technical specification Chapter contents 30 1 Technical specification on page 310 Technical specification 309...
Страница 314: ...314 New a Series New c Series New e Series...
Страница 329: ......
Страница 330: ...www raymarine com...