


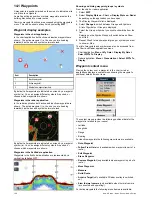


14.2 Routes
A route is a series of waypoints typically used to assist with
passage planning and navigation.
A route is displayed on screen as a series of waypoints linked
by a line.
D
11750-1
Route features
There are a range of route features for building, navigating and
managing routes.
The route features allow you to:
• Build and save a route for use when required (stored in the
route list).
• Navigate (follow) routes.
• Manage and edit routes stored on the system.
• Build a route from an existing track.
Route features are accessed from the chart application:
• by selecting an existing route.
• by using the
Build Route
option in the chart context menu.
• by using the chart application menu:
Menu > Navigate >
Follow Route
.
Note:
The Route List can also be accessed from the
homescreen by selecting
My Data
and then
Route List
.
Route building
A route can consist of a combination of:
• New waypoints which you place on the screen as required
and/or
• existing waypoints selected from a list displayed on screen.
Note:
A route can also be created from a track.
As each waypoint is added, it is assigned an index number
corresponding to its position in the route and drawn on the chart
using the currently specified symbol. The following should be
noted:
• When a route is being built it is not active and does not affect
any current navigation.
• You cannot save a new route if any of the waypoints within
it are currently active.
Building a route
You can build a route on a touchscreen multifunction display
by following the steps below.
D
11762-1
From the chart application:
1. Select and hold a location on screen.
The chart context menu is displayed.
2. Select
Build Route
.
The build route menu is displayed.
3. Select a location on screen to be the starting position.
4. Select relevant locations to place subsequent waypoints in
order.
The route is saved and displayed as each waypoint is placed.
5. When complete select
Finish Build
.
The finish route build pop up message is displayed.
6. Select
Follow
to immediately follow the route. or
7. Select
Edit
to change the route name or change the route
color. or
8. Select
Exit
to save the route and return to the chart
application.
Note:
If you place a waypoint at the wrong position, select
Undo Waypoint
from the Route Menu.
Building a route
From the chart application:
1. Select
Menu
.
2. Select
Navigate
.
3. Select
Build Route
.
The build route menu is displayed.
4. Select
Place Wpt
.
5. Using the
Joystick
select a location on screen.
6. Press the
Ok
button to place the first waypoint in the route.
7. Use the
Joystick
and the
Ok
button to place subsequent
waypoints.
The route is saved and displayed as each waypoint is placed.
8. When your route is complete select
Finish Build
.
The finish route build pop up message is displayed.
9. Select
Follow
to immediately follow the route. or
10. Select
Edit
to change the route name or change the route
color. or
11. Select
Exit
to save the route and return to the chart
application.
Note:
If you place a waypoint at the wrong position, select
Undo Waypoint
.
Building a route using the waypoint list
From the chart application:
1. Select
Menu
.
2. Select
Navigate
.
3. Select
Build Route
.
The build route menu is displayed.
4. Select
Use WPT List
.
The waypoint list is displayed.
5. Select the required waypoint.
You will be taken back to the build route menu.
6. Add subsequent waypoints to the route.
The route is saved and displayed as each waypoint is placed.
7. When your route is complete select
Finish Build
.
The finish route build pop up message is displayed.
8. Select
Follow
to immediately follow the route. or
9. Select
Edit
to change the route name or change the route
color. or
10. Select
Exit
to save the route and return to the chart
application.
Note:
If you select the wrong waypoint, select
Undo
Waypoint
from the route menu.
Adjusting the chart range while building a route
From the Build Route menu:
Waypoints, Routes and Tracks
133
Содержание a67
Страница 2: ......
Страница 4: ......
Страница 8: ...8 New a Series New c Series New e Series...
Страница 12: ...12 New a Series New c Series New e Series...
Страница 20: ...20 New a Series New c Series New e Series...
Страница 36: ...36 New a Series New c Series New e Series...
Страница 70: ...70 New a Series New c Series New e Series...
Страница 100: ...100 New a Series New c Series New e Series...
Страница 110: ...110 New a Series New c Series New e Series...
Страница 113: ...Chapter 12 Fuel manager Chapter contents 12 1 Fuel manager overview on page 114 Fuel manager 113...
Страница 116: ...116 New a Series New c Series New e Series...
Страница 158: ...158 New a Series New c Series New e Series...
Страница 182: ...182 New a Series New c Series New e Series...
Страница 204: ...204 New a Series New c Series New e Series...
Страница 214: ...214 New a Series New c Series New e Series...
Страница 236: ...236 New a Series New c Series New e Series...
Страница 237: ...Chapter 21 Camera application Chapter contents 21 1 Camera application overview on page 238 Camera application 237...
Страница 240: ...240 New a Series New c Series New e Series...
Страница 260: ...260 New a Series New c Series New e Series...
Страница 290: ...290 New a Series New c Series New e Series...
Страница 306: ...306 New a Series New c Series New e Series...
Страница 309: ...Chapter 30 Technical specification Chapter contents 30 1 Technical specification on page 310 Technical specification 309...
Страница 314: ...314 New a Series New c Series New e Series...
Страница 329: ......
Страница 330: ...www raymarine com...